Introduction
Writing a variable to an SD card using an Arduino Uno is a common application in the field of data logging and data storage. The SD (Secure Digital) card module provides a convenient and reliable way to store data that can be easily read, written, and deleted using an Arduino Uno microcontroller board. This functionality makes it possible to store data generated by sensors, devices, or other components connected to the Arduino board, which can later be retrieved for analysis, processing, or further use.
The Arduino SD card module is an external device that allows the Arduino microcontroller board to read and write data to a Secure Digital (SD) card. This module makes it easy for hobbyists and professionals alike to store large amounts of data, such as sensor readings, images, and audio files, on an SD card. The module interfaces with the Arduino board via a simple Serial Peripheral Interface (SPI) bus and can be easily connected to any available digital pins on the board. Additionally, the module typically includes a voltage regulator, allowing it to be powered directly from the Arduino board, making it a simple and convenient addition to any Arduino project.
Hardware Components
You will require the following hardware for SD Card with Arduino.
| S.no | Component | Value | Qty |
|---|---|---|---|
| 1. | Arduino UNO | – | 1 |
| 2. | USB Cable Type A to B | – | 1 |
| 3. | Micro SD Card | – | 1 |
| 4. | Micro SD Card Module | – | 1 |
| 5. | USB 3.0 SD Card Reader | – | 1 |
| 6. | 9V Power Adapter for Arduino | – | 1 |
| 7. | Jumper Wires | – | 1 |
Steps to Write Variable to SD Card with Arduino
- Include the SD library:
#include <SD.h>
- Define the chip select (CS) pin for the SD card:
#define PIN_SPI_CS 4
- Declare variables for different data types:
File myFile;
int myInt = -52;
float myFloat = -12.7;
String myString = "HELLO";
char myCharArray[] = "ArduinoGetStarted.com";
byte myByteArray[] = {'1', '2', '3', '4', '5'};
- In the
setup()function, initialize the Serial Monitor, and check if the SD card is present and initialized. If not, print an error message and stop the program:
void setup() {
  Serial.begin(9600);

  if (!SD.begin(PIN_SPI_CS)) {
    Serial.println(F("SD CARD FAILED, OR NOT PRESENT!"));
    while (1); // don't do anything more:
  }
}
- Print a message to indicate that the SD card is initialized:
Serial.println(F("SD CARD INITIALIZED."));
Serial.println(F("--------------------"));
- Delete the file “arduino.txt” if it exists:
SD.remove("arduino.txt");
- Open the file “arduino.txt” for writing and write the variables to it:
myFile = SD.open("arduino.txt", FILE_WRITE);

if (myFile) {
  myFile.println(myInt);
  myFile.println(myFloat);
  myFile.println(myString);
  myFile.println(myCharArray);
  myFile.write(myByteArray, 5);
  myFile.write("\n");

  for (int i = 0; i < 5; i++) {
    myFile.write(myByteArray[i]);

    if (i < 4)
      myFile.write(",");
  }
  myFile.write("\n");

  myFile.close();
} else {
  Serial.print(F("SD Card: error on opening file arduino.txt"));
}
- Open the file “arduino.txt” for reading and read the contents of the file and print them to the Serial Monitor:
myFile = SD.open("arduino.txt", FILE_READ);

if (myFile) {
  while (myFile.available()) {
    char ch = myFile.read();
    Serial.print(ch);
  }
  myFile.close();
} else {
  Serial.print(F("SD Card: error on opening file arduino.txt"));
}
Schematic
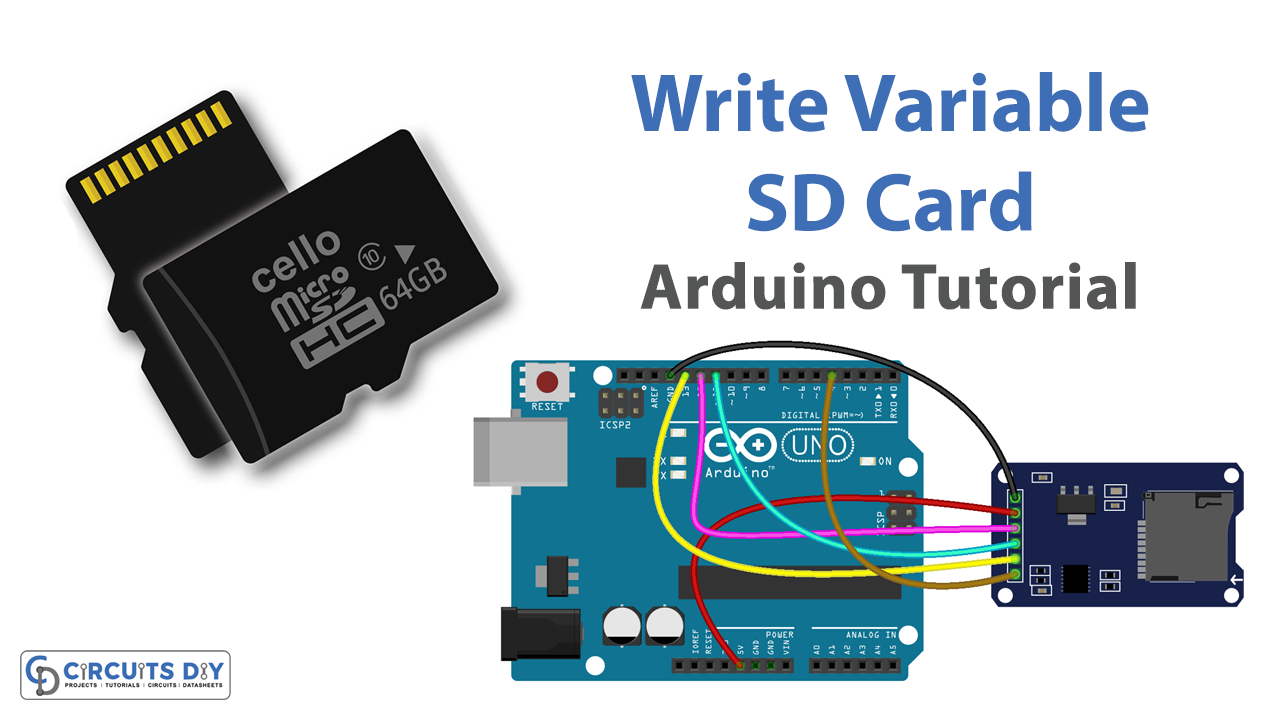
Make connections according to the circuit diagram given below.

Wiring / Connections
| Arduino | SD Card Module |
|---|---|
| 5V | VCC |
| GND | GND |
| D12 | MISO |
| D11 | MOSI |
| D13 | SCK |
| D4 | CS |
Installing Arduino IDE
First, you need to install Arduino IDE Software from its official website Arduino. Here is a simple step-by-step guide on “How to install Arduino IDE“.
Installing Libraries
Before you start uploading a code, download and unzip the following libraries at /Progam Files(x86)/Arduino/Libraries (default), in order to use the sensor with the Arduino board. Here is a simple step-by-step guide on “How to Add Libraries in Arduino IDE“.
Code
Now copy the following code and upload it to Arduino IDE Software.
#include <SD.h>

#define PIN_SPI_CS 4

File myFile;
int myInt = -52;
float myFloat = -12.7;
String myString = "HELLO";
char myCharArray[] = "ArduinoGetStarted.com";
byte myByteArray[] = {'1', '2', '3', '4', '5'};

void setup() {
  Serial.begin(9600);

  if (!SD.begin(PIN_SPI_CS)) {
    Serial.println(F("SD CARD FAILED, OR NOT PRESENT!"));
    while (1); // don't do anything more:
  }

  Serial.println(F("SD CARD INITIALIZED."));
  Serial.println(F("--------------------"));
  SD.remove("arduino.txt"); // delete the file if existed

  // create new file by opening file for writing
  myFile = SD.open("arduino.txt", FILE_WRITE);

  if (myFile) {
    myFile.println(myInt);    // write int variable to SD card in line
    myFile.println(myFloat);  // write float variable to SD card in line
    myFile.println(myString); // write String variable to SD card in line
    myFile.println(myCharArray); // write char array to SD card in line
    myFile.write(myByteArray, 5);
    myFile.write("\n"); // new line

    for (int i = 0; i < 5; i++) {
      myFile.write(myByteArray[i]); // new line

      if (i < 4)
        myFile.write(","); // comma
    }
    myFile.write("\n"); // new line

    myFile.close();
  } else {
    Serial.print(F("SD Card: error on opening file arduino.txt"));
  }

  // open file for reading
  myFile = SD.open("arduino.txt", FILE_READ);
  if (myFile) {
    while (myFile.available()) {
      char ch = myFile.read(); // read characters one by one from Micro SD Card
      Serial.print(ch); // print the character to Serial Monitor
    }
    myFile.close();
  } else {
    Serial.print(F("SD Card: error on opening file arduino.txt"));
  }
}

void loop() {
}
Working Explanation
The program first initializes the Serial interface with a baud rate of 9600. Then it checks if the SD card is present and initialized successfully. If not, it prints an error message and halts the program. If the SD card is present and initialized successfully, it deletes any existing “arduino.txt” file on the card and creates a new one for writing.
The program writes several types of data to the SD card using the File.println() and File.write() methods. The data types include an integer, a float, a String, a character array, and a byte array. After writing the data to the SD card, the program closes the file and opens it again for reading. It reads the contents of the file character by character using the File.read() method and prints them to the Serial monitor. The loop() function is empty, so the program just runs once and then stops.
Applications
- Sensor data storage
- Remote weather monitoring
- GPS data storage
- Internet of Things (IoT) applications
- Industrial automation
- Robotics
- Home automation
- Environmental monitoring
Conclusion.
We hope you have found this Write Variable to SD Card Circuit very useful. If you feel any difficulty in making it feel free to ask anything in the comment section.