Introduction
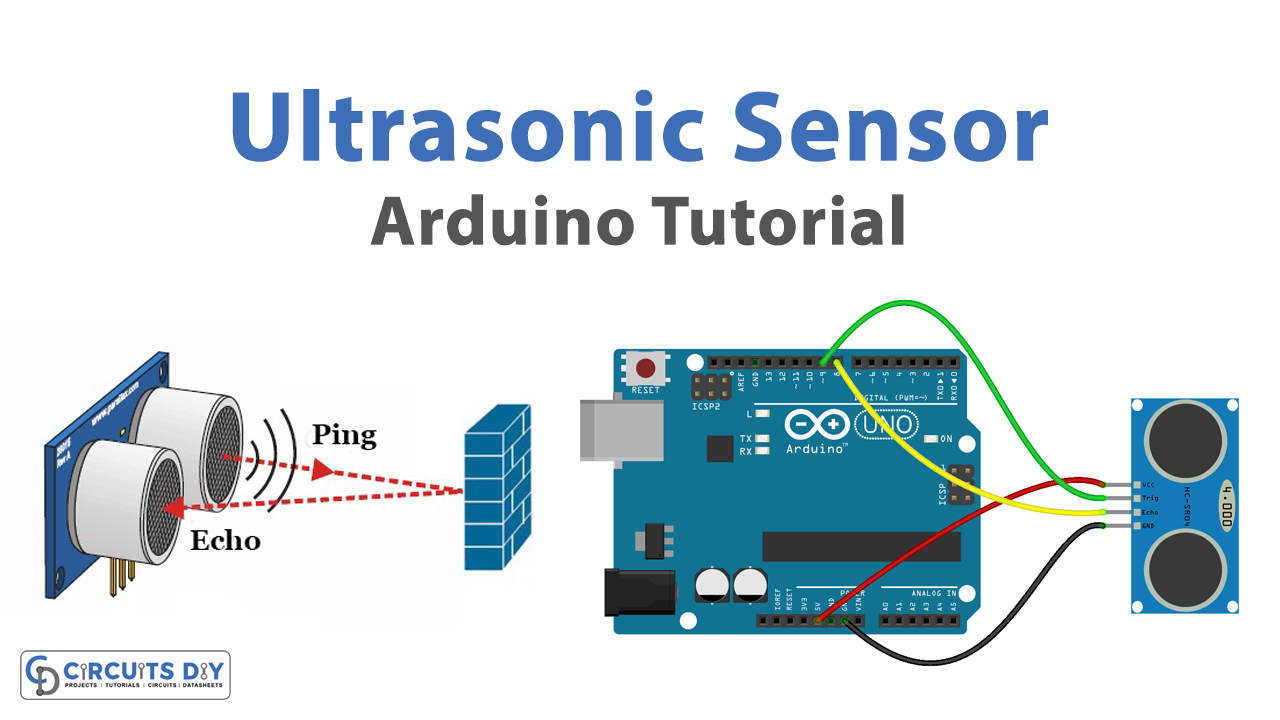
Ultrasonic sensors are widely used in various applications such as distance measurement, object detection, and obstacle avoidance. One of the most popular ultrasonic sensors is the HC-SR04, which is known for its high accuracy and reliability. In this tutorial, we will learn how to interface and measure distance in centimeters using an HC-SR04 ultrasonic sensor and an Arduino Uno microcontroller.
The HC-SR04 is a popular ultrasonic sensor that is used for measuring distance or detecting objects. It works by emitting a high-frequency sound wave, which is then reflected off of an object and received by the sensor. The time it takes for the sound wave to travel to the object and back is used to calculate the distance to the object. The HC-SR04 sensor is relatively inexpensive, easy to interface with microcontroller boards like Arduino, and can measure distances between 2cm and 400cm with an accuracy of 3mm.
Hardware Components
You will require the following hardware for Interfacing Ultrasonic Sensor with Arduino.
| S.no | Component | Value | Qty |
|---|---|---|---|
| 1. | Arduino UNO | – | 1 |
| 2. | USB Cable Type A to B | – | 1 |
| 3. | Ultrasonic Sensor | – | 1 |
| 4. | Power Adapter for Arduino | 9V | 1 |
| 5. | Jumper Wires | – | 1 |
Ultrasonic Sensor with Arduino
- Start by including the library for the HC-SR04 ultrasonic sensor in the code.
#include <Ultrasonic.h>
- Declare the Ultrasonic object and the pin numbers that the sensor is connected to. Also, you can add the variable to keep track of the distance.
Ultrasonic ultrasonic(12, 13);
long distance;
- In the setup() function, initialize the serial communication at a specific baud rate and set the pin modes for the trigger and echo pin of the sensor.
Serial.begin(9600);
pinMode(12, OUTPUT);
pinMode(13, INPUT);
- In the loop() function, use the ultrasonic.distanceRead() function to measure the distance and store it in a variable. Also, you can add a condition to check if the sensor is working correctly and to avoid reading large distances that may cause errors.
distance = ultrasonic.distanceRead();
if (distance >= 2 && distance <= 400) {
   // code to post the distance on the serial monitor
}
- Use the Serial.print() function to post the distance on the serial monitor.
Serial.print("Distance: ");
Serial.print(distance);
Serial.println(" cm");
- Use the delay() function to pause the program for a specific amount of time before measuring the distance again. It’s recommended to use a delay of at least 60ms to allow the sensor to stabilize.
delay(100);
- Repeat the process in the loop() function to continuously measure the distance.
while(1){
    //loop code
}
Schematic
Make connections according to the circuit diagram given below.

Wiring / Connections
| Arduino | Ultrasonic Sensor |
|---|---|
| 5V | VCC |
| GND | GND |
| D8 | ECHO |
| D9 | TRIG |
Installing Arduino IDE
First, you need to install Arduino IDE Software from its official website Arduino. Here is a simple step-by-step guide on “How to install Arduino IDE“.
Code
Now copy the following code and upload it to Arduino IDE Software.
int trigPin = 9;    // TRIG pin
int echoPin = 8;    // ECHO pin

float duration_us, distance_cm;

void setup() {
  // begin serial port
  Serial.begin (9600);

  // configure the trigger pin to output mode
  pinMode(trigPin, OUTPUT);
  // configure the echo pin to input mode
  pinMode(echoPin, INPUT);
}

void loop() {
  // generate 10-microsecond pulse to TRIG pin
  digitalWrite(trigPin, HIGH);
  delayMicroseconds(10);
  digitalWrite(trigPin, LOW);

  // measure duration of pulse from ECHO pin
  duration_us = pulseIn(echoPin, HIGH);

  // calculate the distance
  distance_cm = 0.017 * duration_us;

  // print the value to Serial Monitor
  Serial.print("distance: ");
  Serial.print(distance_cm);
  Serial.println(" cm");

  delay(500);
}
Working Explanation
First, the necessary libraries are included in the code, such as the “Ultrasonic.h” library which is required for the HC-SR04 ultrasonic sensor. Next, the pin numbers for the ultrasonic sensor are declared. The HC-SR04 ultrasonic sensor module uses a trigger pin and an echo pin.
In the setup() function, the serial communication is initialized by calling Serial.begin(9600) which starts the serial communication at a specific baud rate. In the loop() function, the distance is measured by calling the distance() method of the Ultrasonic object. The status of the sensor is also checked and if the sensor is out of range, an error message is printed on the serial monitor, otherwise, the distance in centimeters is printed on the serial monitor.
Applications
- Obstacle detection and avoidance
- Distance measurement
- Proximity sensing
- Automated parking systems
- Robot navigation
- Level sensing
- Industrial automation
Conclusion.
We hope you have found this Ultrasonic Sensor Circuit very useful. If you feel any difficulty in making it feel free to ask anything in the comment section.