Introduction
There are several reasons why environmental characteristics need to be monitored. Not just for various sectors, but also for individuals. For a normal being, neither higher nor lower values of certain environmental parameters are acceptable. Hence they need to be monitored. Thus temperature monitoring system can be installed for that purpose.
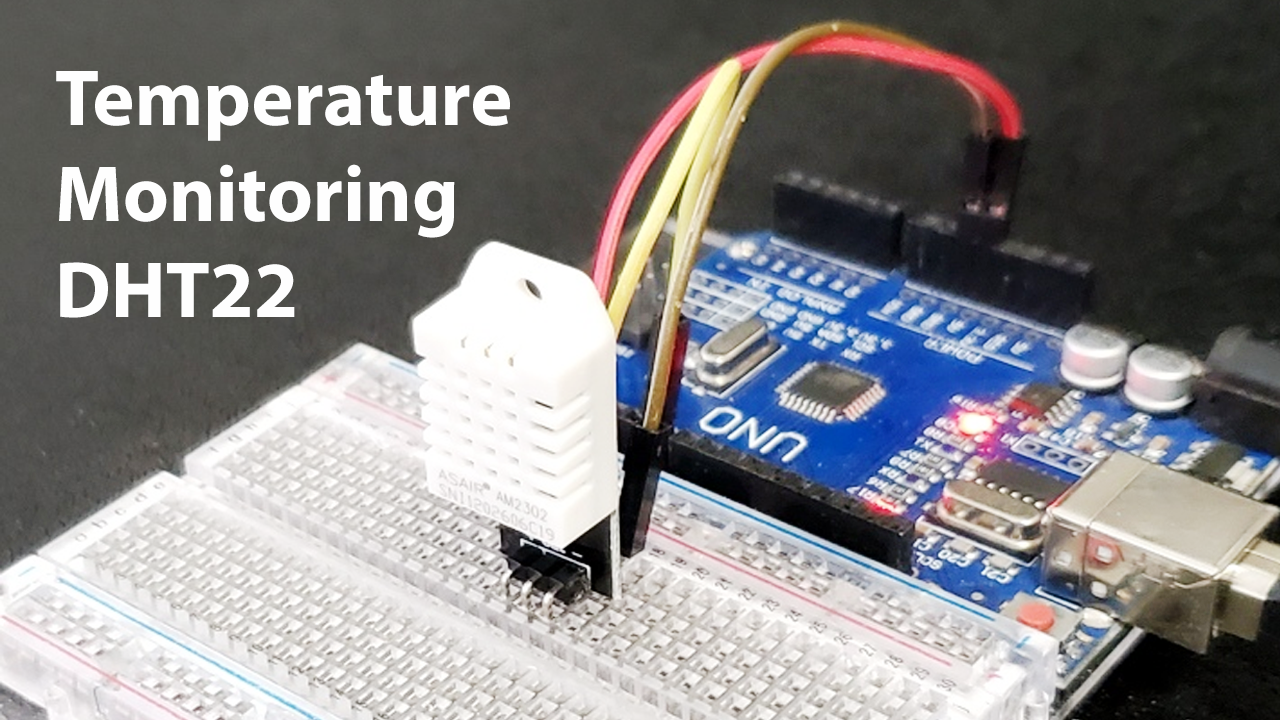
To obtain measurements of certain characteristics, such as temperature and humidity, many sensors are available. We will be using one of those sensors in this article; i.e, the DHT22 sensor.
What is Temperature Monitoring System?
A system that automatically collects temperature data using sensor technology is a temperature monitoring system. Sensors, data storage, temperature measuring, and software are all parts of temperature monitoring systems.
Hardware Components
You will require the following hardware to make a Temperature Monitoring System.
Steps in Making Temperature Monitoring System
Only an Arduino and a DHT sensor are required for this Temperature Monitoring System. Once you have them, follow these steps:
Schematic
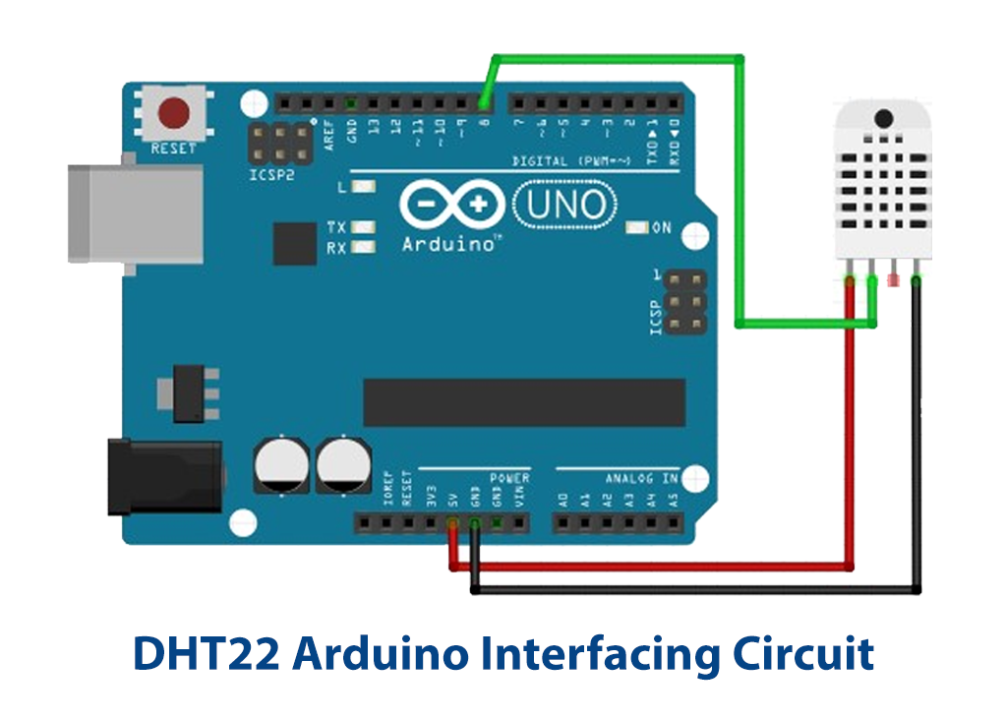
Make connections according to the circuit diagram given below.
Wiring / Connections
| Arduino | Temperature Sensor |
|---|---|
| 5V | VCC |
| GND | GND |
| D8 | OUT |
Installing Arduino IDE
First, you need to install Arduino IDE Software from its official website Arduino. Here is a simple step-by-step guide on “How to install Arduino IDE“.
Installing Libraries
Before you start uploading a code, download and unzip the following libraries at /Progam Files(x86)/Arduino/Libraries (default), in order to use the sensor with the Arduino board. Here is a simple step-by-step guide on “How to Add Libraries in Arduino IDE“.
Code
Now copy the following code and upload it to Arduino IDE Software.
#include <DHT.h>;

//Constants
#define DHTPIN 7     // what pin we're connected to
#define DHTTYPE DHT22   // DHT 22  (AM2302)
DHT dht(DHTPIN, DHTTYPE); //// Initialize DHT sensor for normal 16mhz Arduino

//Variables
int chk;
float hum;  //Stores humidity value
float temp; //Stores temperature value

void setup()
{
  Serial.begin(9600);
  dht.begin();
}

void loop()
{
    delay(2000);
    //Read data and store it to variables hum and temp
    hum = dht.readHumidity();
    temp= dht.readTemperature();
    //Print temp and humidity values to serial monitor
    Serial.print("Humidity: ");
    Serial.print(hum);
    Serial.print(" %, Temp: ");
    Serial.print(temp);
    Serial.println(" Celsius");
    delay(10000); //Delay 2 sec.
}
Let’s Test It
Time to put the circuit to the test now! Open the Arduino and turn it on. Next, open the serial monitor and analyze the temperature and humidity readings. Every two seconds, the sensor provides measurements. Bring the sense at a temperature different from room temperature if you want to look into the major variations in the readings. You’ll notice that the measurements change significantly as a result.
Working Explanation
Let’s explore coding to comprehend how the circuit works.
- The essential library for the DHT22 sensor is included first. The sensor is connected to pin 8 of an Arduino UNO, so we define that pin. Next, we describe the type of DHT sensor. Furthermore, we created a dht object to initialize the sensor. We also create a few variables to hold the value.
- In the void setup, we just initialize the serial monitor and the sensor.
- The code has a 2-second delay in the void loop. The purpose of this delay is to collect environmental readings. For measuring humidity, there is the command readHumidity(). In a similar vein, the command readTemperature () may be used to measure the temperature. The reading is finally printed on Serial Monitor.
Applications
- Irrigation systems
- Weather stations
- Home, office, and industrial applications
Conclusion.
We hope you have found this Temperature Monitoring System Circuit very useful. If you feel any difficulty in making it feel free to ask anything in the comment section.


