Introduction
A touch-controlled SG51R servo motor using a TTP233 touch sensor module and an Arduino UNO microcontroller is a system that uses an Arduino UNO microcontroller to control the movement of an SG51R servo motor by reading the state of a TTP233 touch sensor module. The touch sensor module is connected to the Arduino using a digital pin and when it is touched, the microcontroller sends a signal to the servo motor to rotate to a specific angle.
A TTP233 touch sensor module is a type of touch sensor that can be used to detect the presence of a human finger or other conductive objects. The TTP233 touch sensor module is a small, low-cost device that can be easily integrated into a variety of projects. It is based on the TTP223 touch sensor chip, which has a built-in power-saving sleep mode and low power consumption. The module typically consists of a touch-sensitive button and an LED indicator, and it communicates with the microcontroller via a digital input/output pin. When the button is touched, it sends a digital signal (HIGH or LOW) to the microcontroller, which can be used to trigger different actions or events in the code.
Hardware Components
You will require the following hardware for the Servo Motor touch sensor with Arduino.
| S.no | Component | Value | Qty |
|---|---|---|---|
| 1. | Arduino UNO | – | 1 |
| 2. | USB Cable Type A to B | – | 1 |
| 3. | Touch Sensor | – | 1 |
| 4. | Servo Motor | – | 1 |
| 5. | Power Adapter for Arduino | 9V | 1 |
| 6. | Jumper Wires | – | 1 |
Servo Motor Touch Sensor with Arduino
- Connect the TTP233 touch sensor module to the Arduino using the digital pin specified in the TTP233 documentation. Connect the servo motor to digital pin 9 of the Arduino.
- In the Arduino IDE, include the Servo library at the beginning of the sketch:
#include <Servo.h>
- Declare the Servo object and variables for storing the touch sensor state and the servo position:
Servo servo;
int touchSensorPin = 2;
int touchSensorState = 0;
int servoPosition = 0;
- In the setup() function, attach the servo to its corresponding pin, initialize the touch sensor pin as an input, and set the initial position of the servo to 90 degrees:
servo.attach(9);
pinMode(touchSensorPin, INPUT);
servo.write(90);
Serial.begin(9600);
- In the loop() function, read the touch sensor state by using the digitalRead() function:
touchSensorState = digitalRead(touchSensorPin);
- Check the touch sensor state and move the servo to 0 or 180 degrees accordingly:
if (touchSensorState == HIGH) {
  servo.write(180);
} else {
  servo.write(0);
}
- Send the touch sensor state and servo position values to the serial monitor:
Serial.print("Touch sensor state: ");
Serial.println(touchSensorState);
Serial.print("Servo position: ");
Serial.println(servo.read());
Schematic
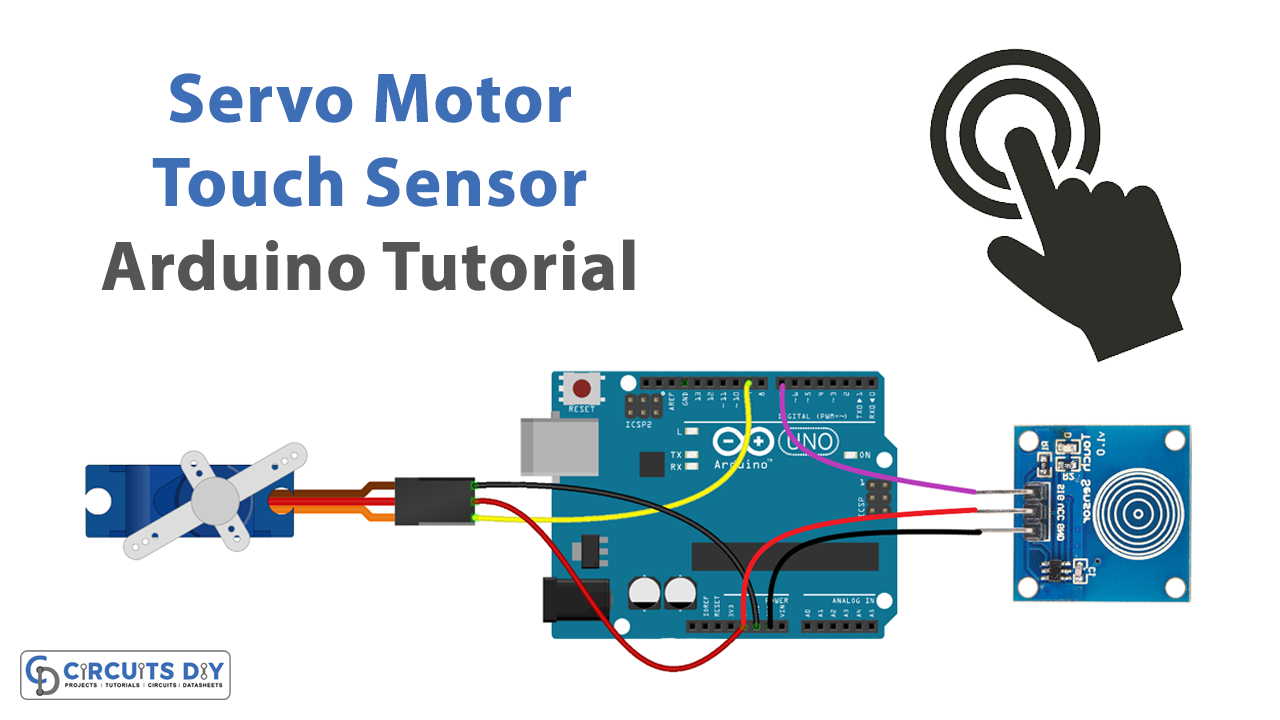
Make connections according to the circuit diagram given below.

Wiring / Connections
| Arduino | Motor | Touch Sensor |
|---|---|---|
| 5V | 5V | VCC |
| GND | GND | GND |
| D7 | SIG | |
| D9 | YELLOW |
Installing Arduino IDE
First, you need to install Arduino IDE Software from its official website Arduino. Here is a simple step-by-step guide on “How to install Arduino IDE“.
Installing Libraries
Before you start uploading a code, download and unzip the following libraries at /Progam Files(x86)/Arduino/Libraries (default), in order to use the sensor with the Arduino board. Here is a simple step-by-step guide on “How to Add Libraries in Arduino IDE“.
Code
Now copy the following code and upload it to Arduino IDE Software.
#include <Servo.h>

// constants won't change
const int TOUCH_SENSOR_PIN = 7; // Arduino pin connected to touch sensor's pin
const int SERVO_PIN        = 9; // Arduino pin connected to servo motor's pin

Servo servo; // create servo object to control a servo

// variables will change:
int angle = 0;         // the current angle of servo motor
int lastTouchState;    // the previous state of touch sensor
int currentTouchState; // the current state of touch sensor

void setup() {
  Serial.begin(9600);               // initialize serial
  pinMode(TOUCH_SENSOR_PIN, INPUT); // set arduino pin to input mode
  servo.attach(SERVO_PIN);          // attaches the servo on pin 9 to the servo object

  servo.write(angle);
  currentTouchState = digitalRead(TOUCH_SENSOR_PIN);
}

void loop() {
  lastTouchState    = currentTouchState;             // save the last state
  currentTouchState = digitalRead(TOUCH_SENSOR_PIN); // read new state

  if(lastTouchState == LOW && currentTouchState == HIGH) {
    Serial.println("The sensor is touched");

    // change angle of servo motor
    if(angle == 0)
      angle = 90;
    else
    if(angle == 90)
      angle = 0;

    // control servo motor arccoding to the angle
    servo.write(angle);
  }
}
Working Explanation
The setup() function initializes the serial communication and the servo motor’s pin and attach the servo to its corresponding pin, and set the initial position of the servo to 90 degrees. In the loop() function, the touch sensor state is read by calling the digitalRead() function on the touch sensor pin. The state is then stored in a variable. If the touch sensor state is HIGH, the servo motor rotates to 90 degrees by calling the write() function on the Servo object. If the touch sensor state is LOW, the servo motor remains in its current position.
The Arduino also sends the touch sensor state and servo position values to the serial monitor by using the Serial.print() and Serial.println() functions. This allows the user to see the current position of the servo motor and the state of the touch sensor in real time.
Applications
- Interactive installations
- Robotics
- Home automation
- Medical equipment
- Industrial control
- Consumer electronics
- Interactive displays
Conclusion
We hope you have found this Touch Sensor Servo Motor Circuit very useful. If you feel any difficulty in making it feel free to ask anything in the comment section.