Introduction
An analog threshold-dependent SG51R servo motor using a potentiometer and Arduino Uno microcontroller is a system where a potentiometer is used to set a threshold for the position of the servo motor. The Arduino microcontroller reads the analog voltage output of the potentiometer and compares it to the set threshold. If the potentiometer output is above the threshold, the servo motor will be commanded to move to a certain position.
The potentiometer is connected to an analog input pin on the microcontroller, and its value is read by the MCU using the analogRead() function. The microcontroller then uses this value to determine the position of the servo motor. It does this by mapping the potentiometer value to a range of angles that the servo motor can move to.
Hardware Components
You will require the following hardware for Arduino Potentiometer Triggers Servo Motor Circuit.
| S.no | Component | Value | Qty |
|---|---|---|---|
| 1. | Arduino UNO | – | 1 |
| 2. | USB Cable Type A to B | – | 1 |
| 3. | Potentiometer | – | 1 |
| 4. | Servo Motor | – | 1 |
| 5. | Power Adapter for Arduino | 9V | 1 |
| 6. | Jumper Wires | – | 1 |
Potentiometer Servo Motor with Arduino
- Include the Servo library: The Servo library should be included at the top of the code, this allows the microcontroller to control the servo motor.
#include <Servo.h>
- Initialize the pin numbers for the potentiometer and the servo motor: In the setup() function, the pin numbers for the potentiometer and the servo motor are defined using the const keyword. The potentiometer is typically connected to an analog input pin on the microcontroller, for example, pin A0, and the servo motor is connected to a digital output pin, for example, pin 3.
const int potentiometerPin = A0;
const int servoPin = 3;
- Setup the serial communication: In the setup() function, the Serial.begin() function is used to initialize serial communication at a specific baud rate, for example, 9600. This allows the microcontroller to communicate with the computer and post the status of the servo motor to the serial monitor.
Serial.begin(9600);
- Initialize the servo motor: In the setup() function, the Servo library’s attach() function is used to initialize the servo motor. This function takes the pin number of the servo motor as its argument.
servo.attach(servoPin);
- Read the value of the potentiometer: In the loop() function, the analogRead() function is used to read the value of the potentiometer. This value is then stored in a variable, for example
potentiometerValue.
int potentiometerValue = analogRead(potentiometerPin);
- Set a threshold value: In the loop() function, set a threshold value that the potentiometer value must surpass in order to move the servo motor. For example, if the threshold value is set to 512, the servo motor will only move if the potentiometer value is greater than 512.
const int thresholdValue = 512;- Control the servo motor: In the loop() function, use an if statement to check if the potentiometer value is greater than the threshold value. If it is, use the Servo library’s write() function to move the servo motor to a specific angle, for example, 90 degrees.
if (potentiometerValue > thresholdValue) {
    int servoAngle = map(potentiometerValue, 0, 1023, 0, 180);
    servo.write(servoAngle);
}
- Post the status of the servo motor to the serial monitor: In the loop() function, use the Serial.print() and Serial.println() functions to send the value of the potentiometer and the status of the servo motor (e.g. “moving” or “stopped”) to the serial monitor.
Serial.print("Potentiometer Value: ");
Serial.print(potentiometerValue);
Serial.print(", Servo Motor: ");
if (potentiometerValue > thresholdValue) {
    Serial.println("moving");
} else {
    Serial.println("stopped");
}
- Add a delay: To prevent the serial monitor from being flooded with data, it’s a good idea to add a delay after sending the data to the serial monitor, for example, delay(100);
Schematic
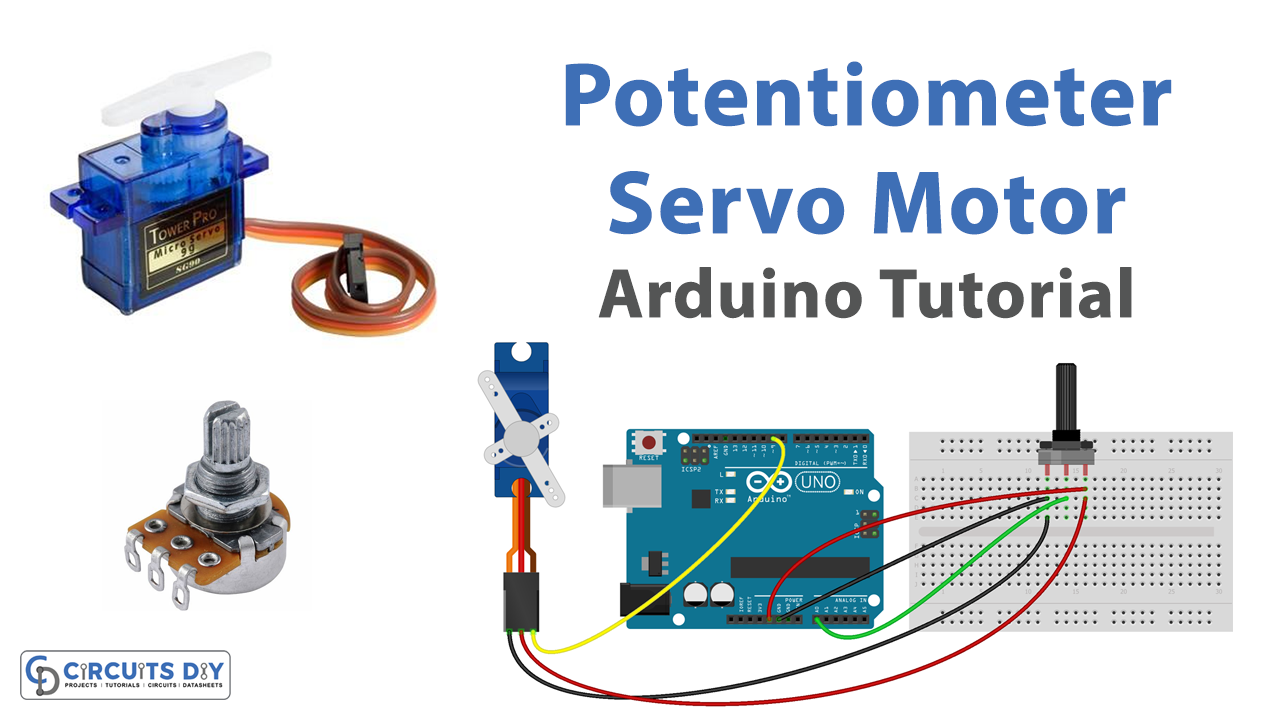
Make connections according to the circuit diagram given below.

Wiring / Connections
| Arduino | Servo | Potentiometer |
|---|---|---|
| 5V | RED | Left |
| GND | BLACK | Right |
| D9 | Yellow | |
| A0 | Wiper |
Installing Arduino IDE
First, you need to install Arduino IDE Software from its official website Arduino. Here is a simple step-by-step guide on “How to install Arduino IDE“.
Installing Libraries
Before you start uploading a code, download and unzip the following libraries at /Progam Files(x86)/Arduino/Libraries (default), in order to use the sensor with the Arduino board. Here is a simple step-by-step guide on “How to Add Libraries in Arduino IDE“.
Code
Now copy the following code and upload it to Arduino IDE Software.
Arduino Code – Analog Threshold
#include <Servo.h>
const int POTENTIOMETER_PIN = A0; // Arduino pin connected to Potentiometer pin
const int SERVO_PIN         = 9; // Arduino pin connected to Servo Motor's pin
const int ANALOG_THRESHOLD  = 500;

Servo servo; // create servo object to control a servo

void setup() {
  servo.attach(SERVO_PIN);   // attaches the servo on pin 9 to the servo object
  servo.write(0);
}

void loop() {
  int analogValue = analogRead(POTENTIOMETER_PIN); // read the input on analog pin

  if(analogValue > ANALOG_THRESHOLD)
    servo.write(90); // rotate servo motor to 90 degree
  else
    servo.write(0);  // rotate servo motor to 0 degree
}
Arduino Code – Voltage Threshold
#include <Servo.h>

const int POTENTIOMETER_PIN   = A0; // Arduino pin connected to Potentiometer pin
const int SERVO_PIN           = 9; // Arduino pin connected to Servo Motor's pin
const float VOLTAGE_THRESHOLD = 2.5; // Voltages

Servo servo; // create servo object to control a servo

void setup() {
  servo.attach(SERVO_PIN);   // attaches the servo on pin 9 to the servo object
  servo.write(0);
}

void loop() {
  int analogValue = analogRead(POTENTIOMETER_PIN);      // read the input on analog pin
  float voltage = floatMap(analogValue, 0, 1023, 0, 5); // Rescale to potentiometer's voltage

  if(voltage > VOLTAGE_THRESHOLD)
    servo.write(90); // rotate servo motor to 90 degree
  else
    servo.write(0);  // rotate servo motor to 0 degree
}

float floatMap(float x, float in_min, float in_max, float out_min, float out_max) {
  return (x - in_min) * (out_max - out_min) / (in_max - in_min) + out_min;
}
Working Explanation
The working of the above code is as follows, The setup() function is used to configure the microcontroller, including the Servo library, define the pin numbers for the potentiometer and servo motor, and initialize the serial communication.
The loop() function is then used to continuously read the potentiometer value, check if it exceeds the threshold value, control the servo motor’s position, post the status on the serial monitor, and add a delay.
Applications
- Robotics & Automation
- Camera stabilization
- Prosthetics
- Measuring instruments
- Musical instruments
- Modeling and simulation
- Industrial control
Conclusion.
We hope you have found this Potentiometer Triggers Servo Motor Circuit very useful. If you feel any difficulty in making it feel free to ask anything in the comment section.