Introduction
Interfacing a NeoPixel LED strip with an Arduino UNO is a popular project for electronics and DIY enthusiasts. NeoPixels are programmable LEDs that can be used to create a wide range of lighting effects, from simple blinking patterns to more complex animations. The Arduino UNO is a versatile microcontroller that can be easily programmed to control NeoPixel strips. By combining the two, you can create custom lighting projects, such as decorative lighting for your home, wearable electronics, or even a light-up costume for Halloween.
NeoPixel LED strips are a type of addressable LED strip that consist of individual LEDs that can be controlled independently. These LED strips use a one-wire interface to communicate with a microcontroller and can be daisy-chained together to form long strips or arrays. Each LED on a NeoPixel strip contains three color channels (red, green, and blue) and a built-in controller that allows it to be individually addressed and set to a specific color. The LEDs are controlled using the pulse-width modulation (PWM) technique to vary the brightness of each color channel, allowing for a wide range of colors and effects.
Hardware Components
You will require the following hardware for InterfacingNeoPixel LED Strip with Arduino.
| S.no | Component | Value | Qty |
|---|---|---|---|
| 1. | Arduino UNO | – | 1 |
| 2. | USB Cable Type A to B | – | 1 |
| 3. | NeoPixel RGB LED Strip | – | 1 |
| 4. | Capacitor | 1000uF | 1 |
| 5. | Power Adapter | 5V | 1 |
| 6. | Resistor | 470Ω | 1 |
| 7. | DC Power Jack | – | 1 |
| 8. | Power Adapter for Arduino | 9V | 1 |
| 9. | Jumper Wires | – | 1 |
Steps Interfacing NeoPixel LED Strip with Arduino UNO
- The code includes the Adafruit_NeoPixel library and defines some constants for the Arduino pin that connects to the NeoPixel strip and the number of pixels on the strip:
#include <Adafruit_NeoPixel.h>
#ifdef __AVR__
#include <avr/power.h> // Required for 16 MHz Adafruit Trinket
#endif

#define PIN_NEO_PIXEL  4   // Arduino pin that connects to NeoPixel
#define NUM_PIXELS     30  // The number of LEDs (pixels) on NeoPixel
- An instance of the Adafruit_NeoPixel class is created with the specified number of pixels and pin number. The NEO_GRB + NEO_KHZ800 parameter sets the color order and data rate for the NeoPixel strip:
Adafruit_NeoPixel NeoPixel(NUM_PIXELS, PIN_NEO_PIXEL, NEO_GRB + NEO_KHZ800);
- In the
setup()function, the NeoPixel strip is initialized:
void setup() {
  NeoPixel.begin(); // INITIALIZE NeoPixel strip object (REQUIRED)
}
- In the
loop()function, the NeoPixel strip is cleared (all pixels set to off) usingNeoPixel.clear(). Thepixels.show()function is not called yet, so the changes are not yet visible on the strip:
void loop() {
  NeoPixel.clear(); // set all pixel colors to 'off'. It only takes effect if pixels.show() is called
- Next, the code loops through each pixel on the strip and sets it to green using
NeoPixel.setPixelColor(). Thepixels.show()function is called after each pixel is set, so the changes are immediately visible on the strip. A delay ofDELAY_INTERVAL(not defined in this code snippet) is added between each pixel to create a chase effect:
for (int pixel = 0; pixel < NUM_PIXELS; pixel++) {
    NeoPixel.setPixelColor(pixel, NeoPixel.Color(0, 255, 0));
    NeoPixel.show();

    delay(DELAY_INTERVAL);
}
- After all pixels have been turned on and off in a chase pattern, the NeoPixel strip is cleared again and the
pixels.show()function is called to turn off all pixels. A delay of 2 seconds is added to keep the strip off:
NeoPixel.clear();
NeoPixel.show();
delay(2000);
- The code then turns all pixels on to red by looping through each pixel and setting it to red using
NeoPixel.setPixelColor(). Thepixels.show()function is not called yet, so the changes are not yet visible on the strip:
for (int pixel = 0; pixel < NUM_PIXELS; pixel++) {
  NeoPixel.setPixelColor(pixel, NeoPixel.Color(255, 0, 0));
}
- After all pixels have been set to red, the
pixels.show()function is called to update the strip and make the changes visible. A delay of 2 seconds is added to keep the strip on:
NeoPixel.show();
delay(2000);
- The code then clears the strip again and adds a delay of 2 seconds to turn off the strip:
NeoPixel.clear();
NeoPixel.show();
delay(2000);
Schematic
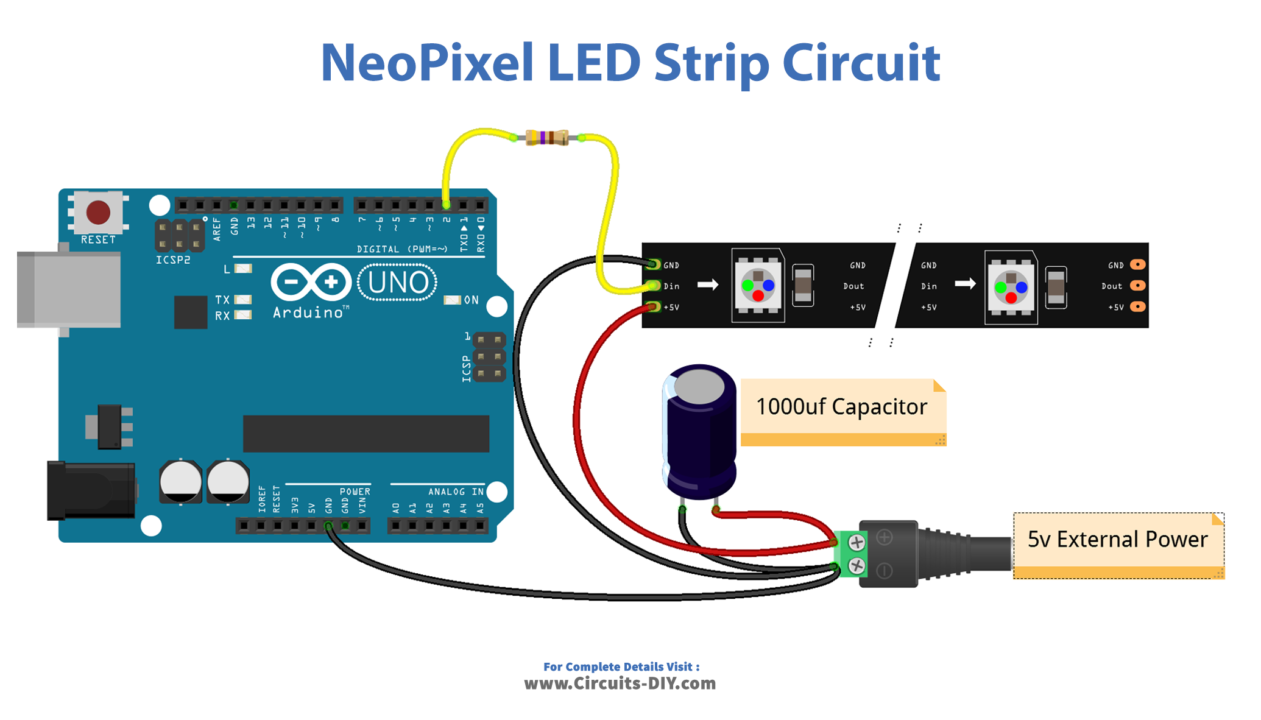
Make connections according to the circuit diagram given below.
Wiring / Connections
| Arduino | NeoPixel Led Strip | 5V External |
|---|---|---|
| 5V | 5V | |
| GND | GND | GND |
| D2 | DIN |
Installing Arduino IDE
First, you need to install Arduino IDE Software from its official website Arduino. Here is a simple step-by-step guide on “How to install Arduino IDE“.
Installing Libraries
Before you start uploading a code, download and unzip the following libraries at /Progam Files(x86)/Arduino/Libraries (default), in order to use the sensor with the Arduino board. Here is a simple step-by-step guide on “How to Add Libraries in Arduino IDE“.
Code
Now copy the following code and upload it to Arduino IDE Software.
#include <Adafruit_NeoPixel.h>
#ifdef __AVR__
#include <avr/power.h> // Required for 16 MHz Adafruit Trinket
#endif

#define PIN_NEO_PIXEL  4   // Arduino pin that connects to NeoPixel
#define NUM_PIXELS     30  // The number of LEDs (pixels) on NeoPixel

Adafruit_NeoPixel NeoPixel(NUM_PIXELS, PIN_NEO_PIXEL, NEO_GRB + NEO_KHZ800);

void setup() {
  NeoPixel.begin(); // INITIALIZE NeoPixel strip object (REQUIRED)
}

void loop() {
  NeoPixel.clear(); // set all pixel colors to 'off'. It only takes effect if pixels.show() is called

  // turn pixels to green one by one with delay between each pixel
  for (int pixel = 0; pixel < NUM_PIXELS; pixel++) { // for each pixel
    NeoPixel.setPixelColor(pixel, NeoPixel.Color(0, 255, 0)); // it only takes effect if pixels.show() is called
    NeoPixel.show();   // send the updated pixel colors to the NeoPixel hardware.

    delay(DELAY_INTERVAL); // pause between each pixel
  }

  // turn off all pixels for two seconds
  NeoPixel.clear();
  NeoPixel.show(); // send the updated pixel colors to the NeoPixel hardware.
  delay(2000);     // off time

  // turn on all pixels to red at the same time for two seconds
  for (int pixel = 0; pixel < NUM_PIXELS; pixel++) { // for each pixel
    NeoPixel.setPixelColor(pixel, NeoPixel.Color(255, 0, 0)); // it only takes effect if pixels.show() is called
  }
  NeoPixel.show(); // send the updated pixel colors to the NeoPixel hardware.
  delay(2000);     // on time

  // turn off all pixels for one seconds
  NeoPixel.clear();
  NeoPixel.show(); // send the updated pixel colors to the NeoPixel hardware.
  delay(2000);     // off time
}
Working Explanation
First, the program defines the pin to which the NeoPixel strip is connected (PIN_NEO_PIXEL) and the number of LEDs on the strip (NUM_PIXELS). Then, an object of the Adafruit_NeoPixel class is created, passing in the number of pixels, pin number, and LED type.
In the setup() function, the NeoPixel strip is initialized using the begin() method of the Adafruit_NeoPixel object. In the loop() function, the program first turns off all the LEDs on the strip by calling the clear() method of the Adafruit_NeoPixel object. Then, the program turns on each LED one by one, by setting the color of each pixel using the setPixelColor() method and then calling the show() method to update the LED strip. A delay is added between each LED to make the animation visible.
Next, the program turns off all the LEDs for two seconds by again calling the clear() method followed by the show() method. Then, the program turns on all the LEDs to red color at the same time for two seconds by setting the color of each pixel to red and then calling the show() method to update the LED strip. Finally, the program turns off all the LEDs again for one second, followed by another iteration of the loop.
Applications
- Decorative lighting
- Wearable technology
- Art installations
- Signage and displays
- Robotics
- Home automation
- Gaming peripherals
- Music visualizers
Conclusion.
We hope you have found this NeoPixel LED Strip Circuit very useful. If you feel any difficulty in making it feel free to ask anything in the comment section.


