Introduction
Earthquakes produce disasters. It not only destroys and harms areas, but it also kills people. Moreover, because we live in a period when there are many high-rise structure buildings and therefore, there is a greater chance that they may get harmed during earthquake events. Hence, precautions must be taken. To that response, in this post, we’ll show you how to build a simple low-Cost Earth Quake Alarm using Arduino
There are several earthquake detectors available on the market. There are also several applications for smartphones. Making one at home, though, would be better for your learning. So let’s start!
What is Earth Quake Alarm?
An earthquake alarm, sometimes known as an earthquake detector, is a device designed to detect earthquakes a few seconds before they occur. As a result, it detects earthquakes and alerts people.
Hardware Components
You will require the following hardware for Low-Cost Earth Quake Alarm using Arduino.
| S.no | Component | Value | Qty |
|---|---|---|---|
| 1. | Arduino UNO | – | 1 |
| 2. | Vibration Tilt Switch | – | 1 |
| 3. | Buzzer | – | 1 |
| 4. | Resistor | 1KΩ | 1 |
| 5. | Breadboard | – | 1 |
| 6. | Jumper Wires | – | 1 |
Steps for Making Earth Quake Alarm
This Low-Cost Earth Quake Alarm requires very few components alongside Arduino. All the components are listed above in the hardware section. Once you get them, follow the further steps:
Schematic
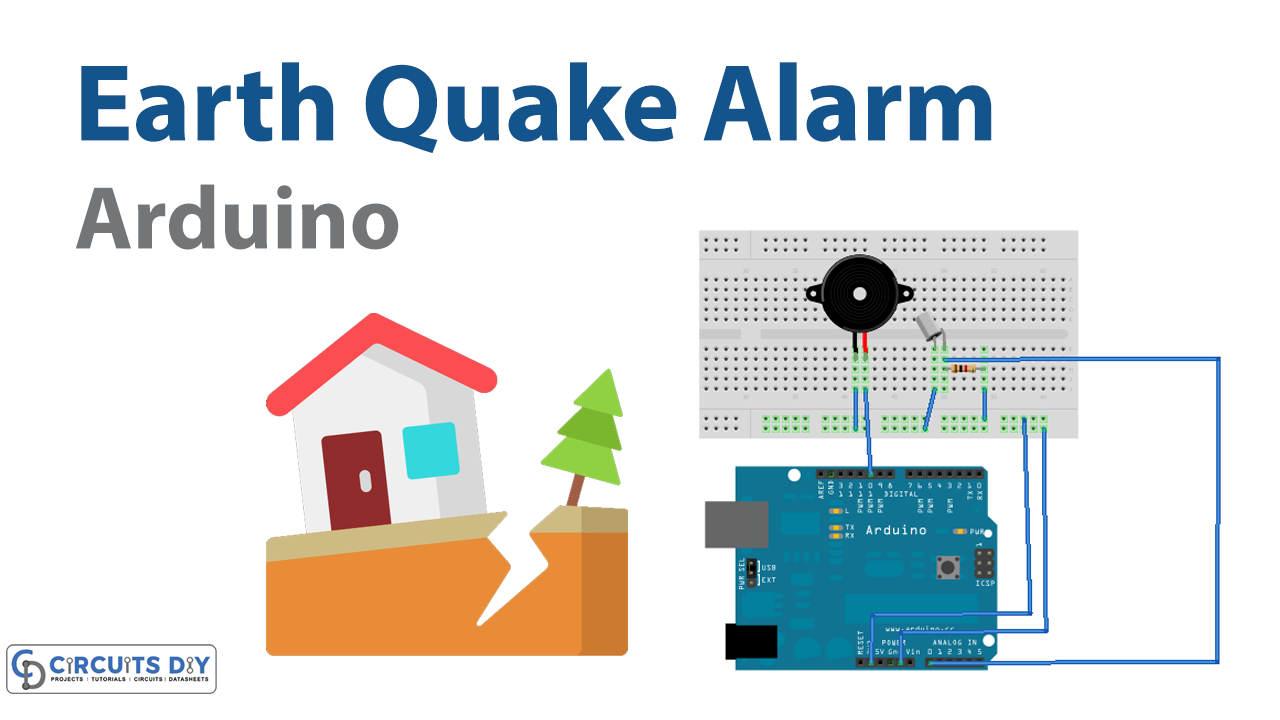
Make connections according to the circuit diagram given below.
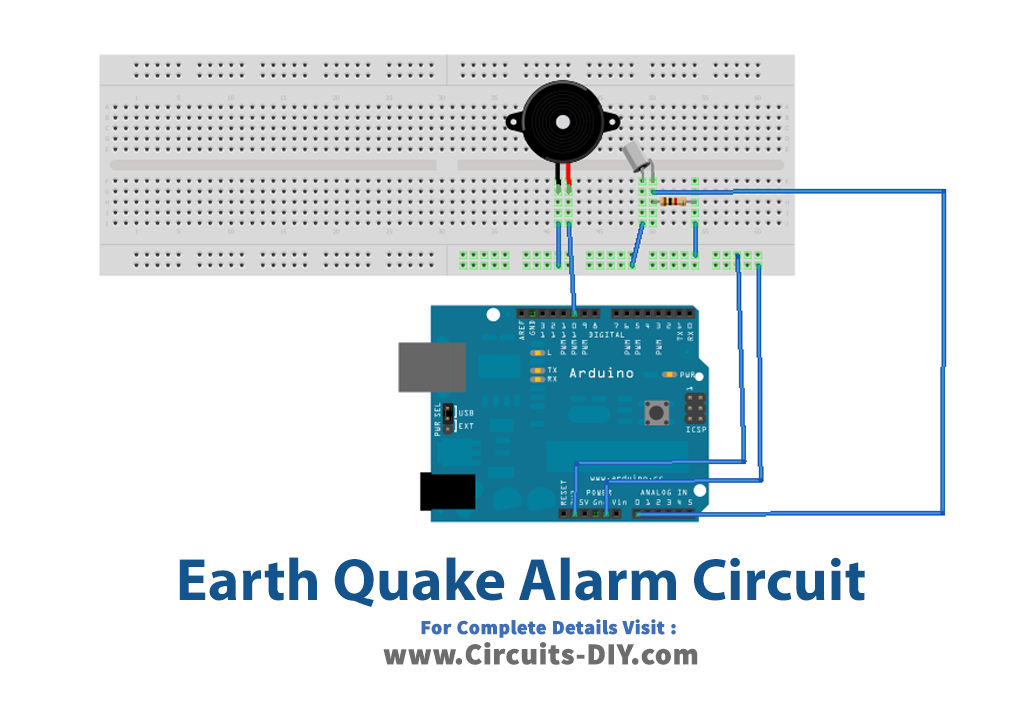
Wiring / Connections
| Arduino | Tilt Switch | Buzzer |
|---|---|---|
| 5V | VCC | |
| GND | GND | -Ve |
| A0 | A0 | |
| D10 | +Ve |
Installing Arduino IDE
First, you need to install Arduino IDE Software from its official website Arduino. Here is a simple step-by-step guide on “How to install Arduino IDE“.
Code
Now copy the following code and upload it to Arduino IDE Software.
#define TILT_SWITCH_PIN A0
#define BUZZER_PIN 10
#define MAX 100
int tiltValue = 0;
int previousTiltValue = 0;
int valueThreshold = 5;
int timeThreshold = 2 ;
int time = 0;

void setup()
{
   pinMode(BUZZER_PIN, OUTPUT);
}

void loop()
{
  tiltValue = analogRead(TILT_SWITCH_PIN);
  if(abs(tiltValue - previousTiltValue) >= valueThreshold)
  {
    time = time + 1;
  }
  else
  {
    reset();
  }
  if(time >= timeThreshold)
  {
   analogWrite(BUZZER_PIN, MAX);
   delay(500);
   reset();
  }
  previousTiltValue = tiltValue;
  delay(500);
}

void reset()
{
 time = 0;
 previousTiltValue = 0;
 analogWrite(BUZZER_PIN, 0);
}
Let’s Test It
Finally, It’s time to put everything to the test. After uploading the code to the Arduino, give it a few gentle vibrations and it should function. The alert will sound until the shaking ends entirely.
Working Explanation
- First, we define the digital pins of the Arduino that are connected to the buzzer and the sensor. Also, we define some variables:
- tiltValue to store value read by the sensor
- previousTiltValue to store the previous value of the sensor
- valueThreshold and timeThreshold to provide threshold values to the sensor.
- time to store the time value
- In the setup, we declare the buzzer as the output
- In the void loop, we first give the function to read the values coming from the sensor, then we provide a condition to calculate time. Then we provide another condition that if the time is greater than timeThreshold, the buzzer would beep, and after some delay, the code will be reset
- previousTiltValue becomes the tiltValue.
- void reset() is there to reset the circuit.
Applications
- Earthquake detection and prevention system.
Conclusion
We hope you have found this Low-Cost Earth Quake Alarm Circuit very useful. If you feel any difficulty in making it feel free to ask anything in the comment section.


