Introduction
Logging data with timestamps is a common task in many applications, such as monitoring environmental conditions or tracking the performance of a system over time. With the advent of small, low-cost microcontrollers like the Arduino UNO and SD card modules, it has become easier than ever to log data and store it for later analysis. By combining the real-time clock (RTC) functionality of an RTC module with the data storage capabilities of an SD card module, it is possible to create a reliable and accurate system for logging data with timestamps.
An Arduino SD card module is an add-on board for Arduino microcontrollers that allows for easy data storage on a Secure Digital (SD) card. The module provides a simple interface for reading and writing data to an SD card, making it an ideal solution for data logging and data acquisition projects where data needs to be stored for later analysis. The SD card module typically includes an SD card slot, an SPI interface for communication with the Arduino, and sometimes a built-in voltage regulator to provide power to the SD card.
Hardware Components
You will require the following hardware for Log Data with Timestamp to SD Card with Arduino.
| S.no | Component | Value | Qty |
|---|---|---|---|
| 1. | Arduino UNO | – | 1 |
| 2. | USB Cable Type A to B | – | 1 |
| 3. | Micro SD Card | – | 1 |
| 4. | Micro SD Card Module | – | 1 |
| 5. | USB 3.0 SD Card Reader | – | 1 |
| 6. | Power Adapter for Arduino | 9V | 1 |
| 7. | Real-Time Clock Module | DS3231 | 1 |
| 8. | Battery | CR2032 | 1 |
| 9. | Jumper Wires | – | 1 |
Steps Log Data with Timestamp to SD Card
- First, the necessary libraries are included in the code using the #include preprocessor directive. In this case, the SD and RTClib libraries are included:
#include <SD.h>
#include <RTClib.h>
- Next, some constants are defined using the #define preprocessor directive. These constants are used to specify the SPI chip select pin to use for the SD card module and the name of the file to write to on the SD card:
#define PIN_SPI_CS 4
#define FILE_NAME "log.txt"
- The RTC module is initialized in the
setup()function using thertc.begin()method. If the RTC module is not found, the program will stop with an error message:
if (!rtc.begin()) {
  Serial.println(F("Couldn't find RTC"));
  while (1);
}
- The SD card module is initialized in the
setup()function using theSD.begin()method. If the SD card module is not found, the program will stop with an error message:
if (!SD.begin(PIN_SPI_CS)) {
  Serial.println(F("SD CARD FAILED, OR NOT PRESENT!"));
  while (1);
}
- In the
loop()function, theSD.open()method is used to open the file specified byFILE_NAMEfor writing:
myFile = SD.open(FILE_NAME, FILE_WRITE);
- If the file was successfully opened, data is written to it. First, the current timestamp is obtained from the RTC module using the
rtc.now()method. The timestamp is then formatted and written to the file using themyFile.print()method:
DateTime now = rtc.now();
myFile.print(now.year(), DEC);
myFile.print('-');
myFile.print(now.month(), DEC);
myFile.print('-');
myFile.print(now.day(), DEC);
myFile.print(' ');
myFile.print(now.hour(), DEC);
myFile.print(':');
myFile.print(now.minute(), DEC);
myFile.print(':');
myFile.print(now.second(), DEC);
- A delimiter is added between the timestamp and the data using the
myFile.print()method:
myFile.print(" ");
- Analog data is read from two analog pins (
A0andA1) using theanalogRead()function:
int analog_1 = analogRead(A0);
int analog_2 = analogRead(A1);
- The analog data is written to the file using the
myFile.print()method:
myFile.print("analog_1 = ");
myFile.print(analog_1);
myFile.print(", ");
myFile.print("analog_2 = ");
myFile.print(analog_2);
- A newline character is written to the file using the
myFile.write()method:
myFile.write("\n");
- Finally, the file is closed using the
myFile.close()method:
myFile.close();
- The loop then waits for 2 seconds using the
delay()function before starting again:
delay(2000);Schematic
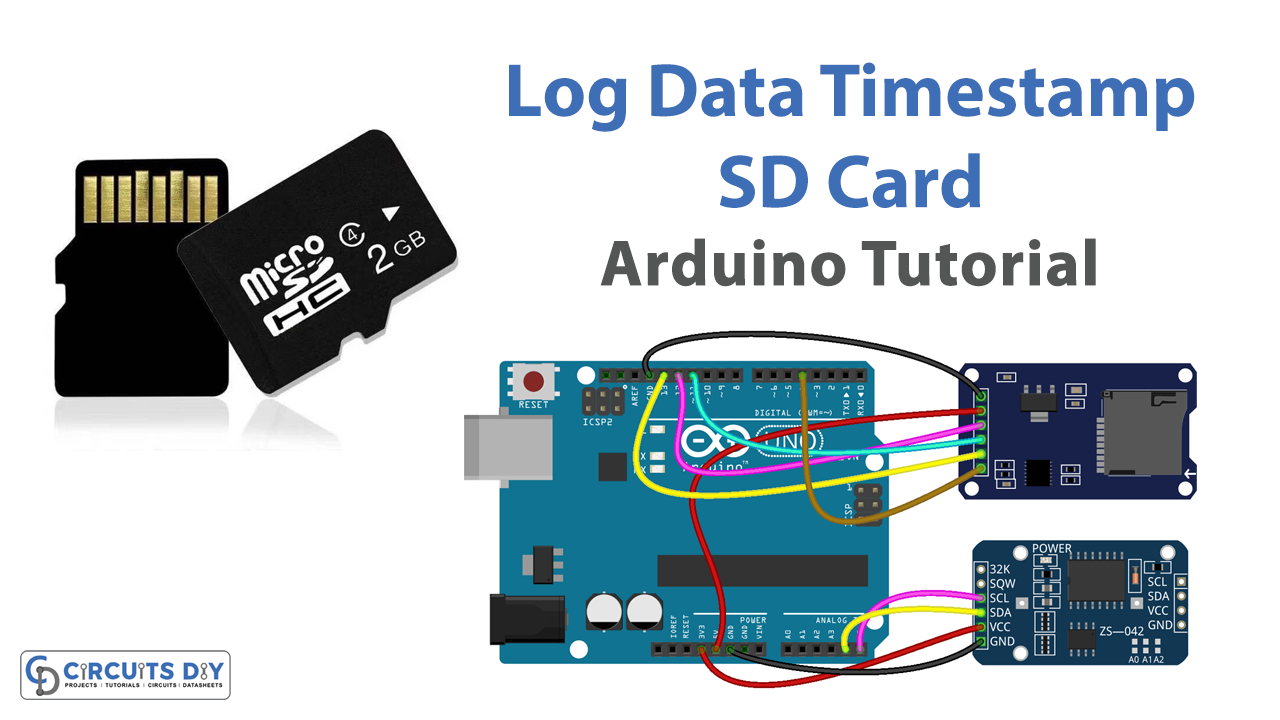
Make connections according to the circuit diagram given below.

Wiring / Connections
| Arduino | SD Card Module | RTC |
|---|---|---|
| 5V | VCC | |
| GND | GND | GND |
| D12 | MISO | |
| D11 | MOSI | |
| D13 | SCK | |
| D4 | CS | |
| 3V3 | VCC | |
| A5 | SCL | |
| A4 | SDA |
Installing Arduino IDE
First, you need to install Arduino IDE Software from its official website Arduino. Here is a simple step-by-step guide on “How to install Arduino IDE“.
Installing Libraries
Before you start uploading a code, download and unzip the following libraries at /Progam Files(x86)/Arduino/Libraries (default), in order to use the sensor with the Arduino board. Here is a simple step-by-step guide on “How to Add Libraries in Arduino IDE“.
Code
Now copy the following code and upload it to Arduino IDE Software.
#include <SD.h>
#include <RTClib.h>

#define PIN_SPI_CS 4
#define FILE_NAME "log.txt"

RTC_DS3231 rtc;

File myFile;

void setup() {
  Serial.begin(9600);

  // SETUP RTC MODULE
  if (!rtc.begin()) {
    Serial.println(F("Couldn't find RTC"));
    while (1);
  }

  if (!SD.begin(PIN_SPI_CS)) {
    Serial.println(F("SD CARD FAILED, OR NOT PRESENT!"));
    while (1); // don't do anything more:
  }

  Serial.println(F("SD CARD INITIALIZED."));
  Serial.println(F("--------------------"));
}

void loop() {
  // open file for writing
  myFile = SD.open(FILE_NAME, FILE_WRITE);

  if (myFile) {
    Serial.println(F("Writing log to SD Card"));

    // write timestamp
    DateTime now = rtc.now();
    myFile.print(now.year(), DEC);
    myFile.print('-');
    myFile.print(now.month(), DEC);
    myFile.print('-');
    myFile.print(now.day(), DEC);
    myFile.print(' ');
    myFile.print(now.hour(), DEC);
    myFile.print(':');
    myFile.print(now.minute(), DEC);
    myFile.print(':');
    myFile.print(now.second(), DEC);

    myFile.print("  "); // delimiter between timestamp and data

    // read data
    int analog_1 = analogRead(A0);
    int analog_2 = analogRead(A1);

    // write data
    myFile.print("analog_1 = ");
    myFile.print(analog_1);
    myFile.print(", "); // delimiter between data
    myFile.print("analog_2 = ");
    myFile.print(analog_2);

    myFile.write("\n"); // new line

    myFile.close();
  } else {
    Serial.print(F("SD Card: error on opening file "));
    Serial.println(FILE_NAME);
  }

  delay(2000); // delay 2 seconds
}
Working Explanation
The code first initializes the necessary libraries and defines some constants for the SPI chip select pin and the name of the file to write to on the SD card. In the setup() function, the RTC module and SD card module are initialized.
In the loop() function, the SD.open() method is used to open the file specified by FILE_NAME for writing, and if successful, data is written to it. First, the current timestamp is obtained from the RTC module and formatted to write to the file along with the analog data from two analog pins. The timestamp and data are separated by a delimiter and a newline character is added to the end. Finally, the file is closed and the loop waits for 2 seconds before repeating the process.
Applications
- Home automation and smart home systems
- Industrial automation and process control
- Internet of Things (IoT) devices and projects
- Scientific research and experimentation
- Robotics and automation
- Security and surveillance systems
- Agriculture and farming applications
- Energy management and monitoring
Conclusion.
We hope you have found this Log Data with Timestamp to SD Card Circuit very useful. If you feel any difficulty in making it feel free to ask anything in the comment section.