Introduction
Interfacing an LM35 temperature sensor with an Arduino UNO is a process of connecting the LM35, a precision centigrade temperature sensor, to the Arduino board. This allows the temperature data to be captured and processed by the microcontroller for various temperature-related applications. Interfacing the LM35 with an Arduino UNO provides a simple, cost-effective solution for measuring temperature in various applications like home automation, environmental monitoring, and industrial control systems
The LM35 is a precision integrated-circuit temperature sensor, whose output voltage is linearly proportional to the Celsius (Centigrade) temperature. It provides a functional range from -55°C to 150°C and has a typical accuracy of ±0.5°C at room temperature. The LM35 is available in a compact TO-92 transistor package, which makes it easy to use with a variety of microcontrollers and other electronic devices.
Hardware Components
You will require the following hardware for Interfacing LM35 Temperature Sensor with Arduino.
| S.no | Component | Value | Qty |
|---|---|---|---|
| 1. | Arduino UNO | – | 1 |
| 2. | USB Cable Type A to B | – | 1 |
| 3. | Temperature Sensor | LM35 | 1 |
| 4. | Power Adapter for Arduino | 9V | 1 |
| 5. | Breadboard | – | 1 |
| 6. | Jumper Wires | – | 1 |
LM35 Temperature Sensor with Arduino
- First, the analog input pin that the LM35 is connected to (in this case, A0) and two variables to store the temperature measurements in Celsius and Fahrenheit are declared:
int sensorPin = A0;  // LM35 connected to Analog Pin A0
float temperatureC;   // variable to store temperature in Celsius
float temperatureF;   // variable to store temperature in Fahrenheit
- In the
setup()function, serial communication is initiated:
void setup() {
  Serial.begin(9600);   // initialize serial communication
}
- In the
loop()function, the analog value of the LM35 is read using theanalogRead()function and stored in thesensorValuevariable:
int sensorValue = analogRead(sensorPin); // read the sensor value
- Next, the value of
sensorValueis used to calculate the temperature in Celsius and Fahrenheit:
temperatureC = (sensorValue * 5.0) / 1023 * 100;   // convert to temperature in Celsius
temperatureF = (temperatureC * 9 / 5) + 32;   // convert to temperature in Fahrenheit
- The temperature measurements are then printed on the serial monitor:
Serial.print("Temperature in Celsius: ");
Serial.print(temperatureC);
Serial.print("°C");

Serial.print("  |  ");

Serial.print("Temperature in Fahrenheit: ");
Serial.print(temperatureF);
Serial.println("°F");
- Finally, the program waits for a second before repeating the loop:
delay(1000); // wait for a secondSchematic
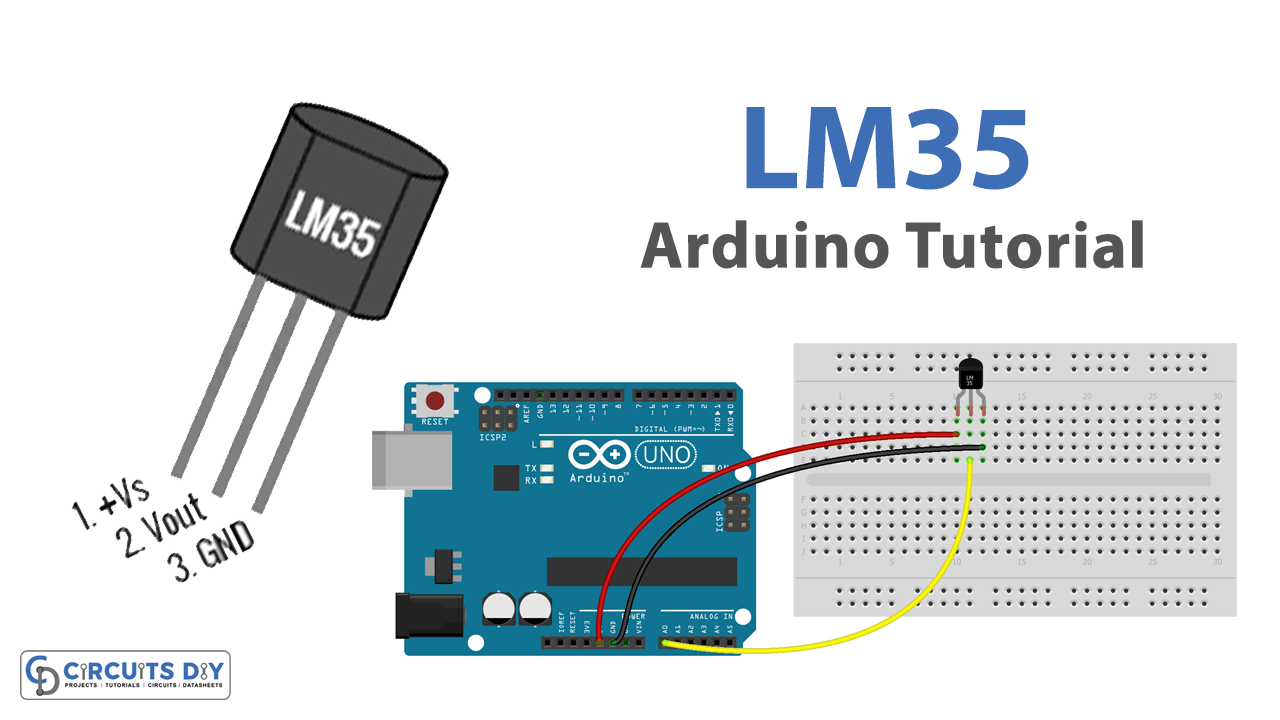
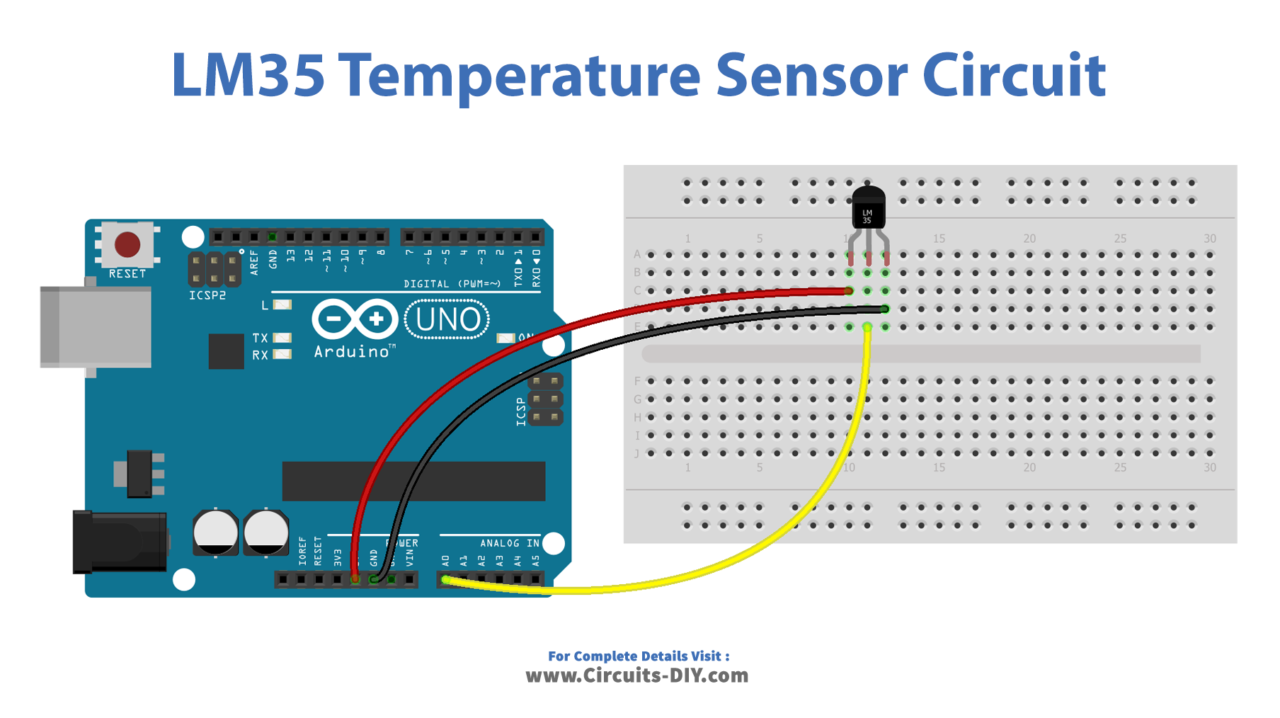
Make connections according to the circuit diagram given below.
Wiring / Connections
| Arduino | Sensor |
|---|---|
| 5V | VCC |
| GND | GND |
| A0 | OUT |
Installing Arduino IDE
First, you need to install Arduino IDE Software from its official website Arduino. Here is a simple step-by-step guide on “How to install Arduino IDE“.
Code
Now copy the following code and upload it to Arduino IDE Software.
#define ADC_VREF_mV    5000.0 // in millivolt
#define ADC_RESOLUTION 1024.0
#define PIN_LM35       A0

void setup() {
  Serial.begin(9600);
}

void loop() {
  // get the ADC value from the temperature sensor
  int adcVal = analogRead(PIN_LM35);
  // convert the ADC value to voltage in millivolt
  float milliVolt = adcVal * (ADC_VREF_mV / ADC_RESOLUTION);
  // convert the voltage to the temperature in Celsius
  float tempC = milliVolt / 10;
  // convert the Celsius to Fahrenheit
  float tempF = tempC * 9 / 5 + 32;

  // print the temperature in the Serial Monitor:
  Serial.print("Temperature: ");
  Serial.print(tempC);   // print the temperature in Celsius
  Serial.print("°C");
  Serial.print("  ~  "); // separator between Celsius and Fahrenheit
  Serial.print(tempF);   // print the temperature in Fahrenheit
  Serial.println("°F");

  delay(1000);
}
Working Explanation
This code uses an Arduino UNO microcontroller to interface with an LM35 precision temperature sensor. The sensor is connected to Analog Pin A0, and the ADC resolution is set to 1024. The program first initializes serial communication and then enters the loop where it reads the ADC value from the temperature sensor.
This value is then converted to voltage in millivolts, and then to the temperature in Celsius. The temperature in Fahrenheit is then calculated from the temperature in Celsius. Finally, the temperature in Celsius and Fahrenheit are printed in the Serial Monitor with a delay of 1 second between each reading.
Applications
- Industrial process temperature control
- HVAC temperature monitoring
- Refrigeration temperature monitoring
- Greenhouse temperature monitoring
- Weather monitoring stations
- Temperature data logging systems
- Thermostatic control systems.
Conclusion.
We hope you have found this LM35 Temperature Sensor Circuit very useful. If you feel any difficulty in making it feel free to ask anything in the comment section.


