
Introduction
Temperature and humidity sensors are like the mood rings of the modern world: they can tell us exactly how hot and sticky it is outside and even gives us a glimpse into the future of our weather forecast. These little devices may seem simple at first glance, but they play a crucial role in a wide range of applications, from monitoring the air quality in our homes to helping farmers grow the perfect crop.
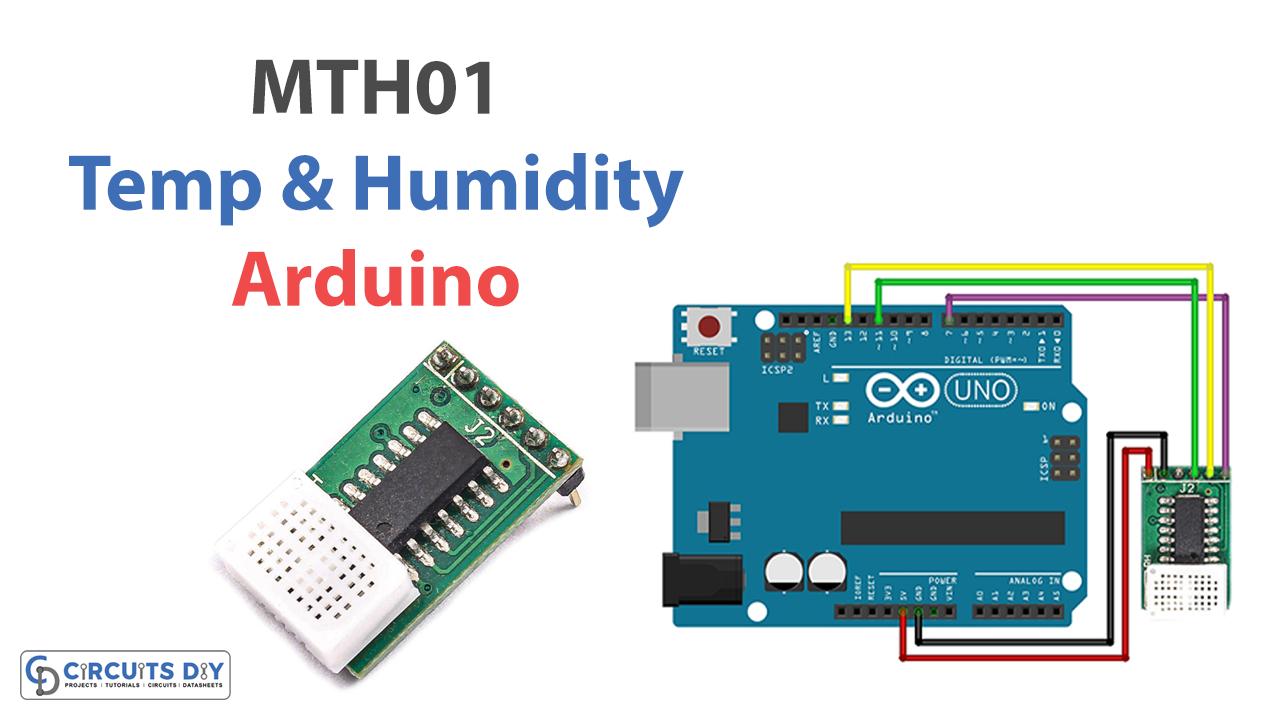
But how do these sensors work? And how can we use them to gather data and make informed decisions? This blog will dive deep into the MTH01 temperature and humidity sensor. We’ll also discuss how to connect it to an Arduino board and discuss some of its applications. So grab your MTH01 sensor, and let’s get started!
What is Temperature and Humidity Sensor?
A device or gadget that can convert temperature and humidity into electrical signals that can be readily detected and processed is referred to as a temperature and humidity sensor.
A temperature sensor and a humidity sensor are often the two primary elements that make up a sensor that measures both temperature and humidity. The temperature sensor determines the temperature of the air around it, and the humidity sensor determines the air’s relative humidity by using either a hygrometer or a capacitive sensor. The sensor can connect to a microcontroller like an Arduino to further analyze the data.
Hardware Components
You will require the following hardware for Interfacing the MTH01 Temperature and Humidity Sensor with Arduino.
| S.no | Component | Value | Qty |
|---|---|---|---|
| 1. | Arduino | UNO | 1 |
| 2. | Temperature and Humidity Sensor | MTH01 | 1 |
| 3. | Breadboard | – | 1 |
| 4. | Jumper Wires | – | 1 |
MTH01 Temperature and Humidity Sensor with Arduino
Once you get all the components, you need to follow the three main steps:
- Building a circuit using schematic
- Uploading a code in Arduino
- Testing the circuit
Schematic
Make connections according to the circuit diagram given below.

Wiring / Connections
| Arduino | MTH01 Sensor |
|---|---|
| 5V | VCC |
| GND | GND |
| D11 | SDAT |
| D13 | SCK |
| D7 | CS |
Installing Arduino IDE
First, you need to install Arduino IDE Software from its official website Arduino. Here is a simple step-by-step guide on “How to install Arduino IDE“.
Installing Libraries
Before you start uploading a code, download and unzip the following libraries at /Progam Files(x86)/Arduino/Libraries (default), in order to use the sensor with the Arduino board. Here is a simple step-by-step guide on “How to Add Libraries in Arduino IDE“.
- Arduino
- MTH01
Code
Now copy the following code and upload it to Arduino IDE Software.
//  Sensor top view
//  CS     -  On/Off   1|°     --------------   [][][][]
//  SCK    -  CLK      2|°    [              ] [][][][]
//  SDAT   -  MOSI     3|°    [              ]  [][][][]
//  Reset  -  Reset    4|°    [              ] [][][][]
//  VSS    -  GND      5|°     --------------   [][][][]
//  VDD    -  +5V      6|°                       °    °
//                        -----------------------------

//Arduino connections
// CS    ->  7
// SCK   ->  13
// SDAT  ->  11
// Reset ->  NC
// VSS   ->  GND
// VDD   ->  5V


#include <Arduino.h>
#include "MTH01.h"

#define mth01_pin 7   // define CS pin

MTH01 mth01;
void setup()
{
  Serial.begin(9600);
  Serial.println("MTH-01 High Sensitivity Humidity & Temperature Sensor Module");
  mth01.begin(mth01_pin);   // Start the Sensor
}

void loop()
{
  Serial.print(" T = ");
  Serial.print(mth01.getTemperature());
  Serial.write("\xC2\xB0");   // The Degree symbol
  Serial.print("C");
  Serial.print("\t H = ");
  Serial.print(mth01.getHumidity());
  Serial.println("%");
  delay(5000);
}
Let’s Test It
Now it’s time to test the circuit. Once you upload the code and Arduino gets the power, the temperature and humidity readings will appear on the Serial monitor.
Working Explanation
Let’s dive into the coding to grasp the working of this circuit!
- The code first includes the necessary libraries and defines the pin to which the MTH01 sensor is connected. Then, it creates an object of the MTH01 class and initializes the sensor in the setup function.
- In the loop function, the code reads the temperature and humidity values coming from the sensor and prints them to the serial monitor. The temperature value is printed in degrees Celsius, and the humidity value is printed as a percentage. The code then waits for 5 seconds before repeating the process.
It is worth noting that the MTH01 sensor needs to be calibrated to measure humidity and temperature accurately. Calibration is typically done by adjusting the offset and slope parameters in the MTH01 library. You can find more information about the calibration of the MTH01 sensor in the documentation for the MTH01 library.
Applications
- Industrial process control
- Air quality monitoring
- Farming and agriculture, etc.
Conclusion.
We hope you have found this “Interfacing MTH01 Temperature and Humidity Sensor with Arduino Circuit” very useful. If you feel any difficulty making it feel free to ask anything in the comment section.


really amazing work here, I am looking for a humidity and temperature sensor with displays to show the values and a control circuit to switch on and off a fan based on humidity percentage