Introduction
Unleash the power of touch with the MPR121 capacitive touch sensor module and Arduino. This dynamic pair empowers you to build projects that respond to the slightest touch. The MPR121 can detect a touch on up to 12 separate pads, providing endless opportunities for your imagination to run wild.
So, the world of touch sensing is waiting for you to explore it with the MPR121 capacitive touch sensor module and Arduino as your trusty companions.
Hardware Components
You will require the following hardware for Interfacing MPR121 Capacitive Touch Sensor Module with Arduino.
| S.no | Component | Value | Qty |
|---|---|---|---|
| 1. | Arduino UNO | – | 1 |
| 2. | Proximity Capacitive Touch Sensor Module | MPR121 | 1 |
| 3. | Breadboard | – | 1 |
| 4. | Jumper Wires | – | 1 |
MPR121 Touch Sensor with Arduino
Now proceed as detailed below to connect this capacitive touch sensor to Arduino.
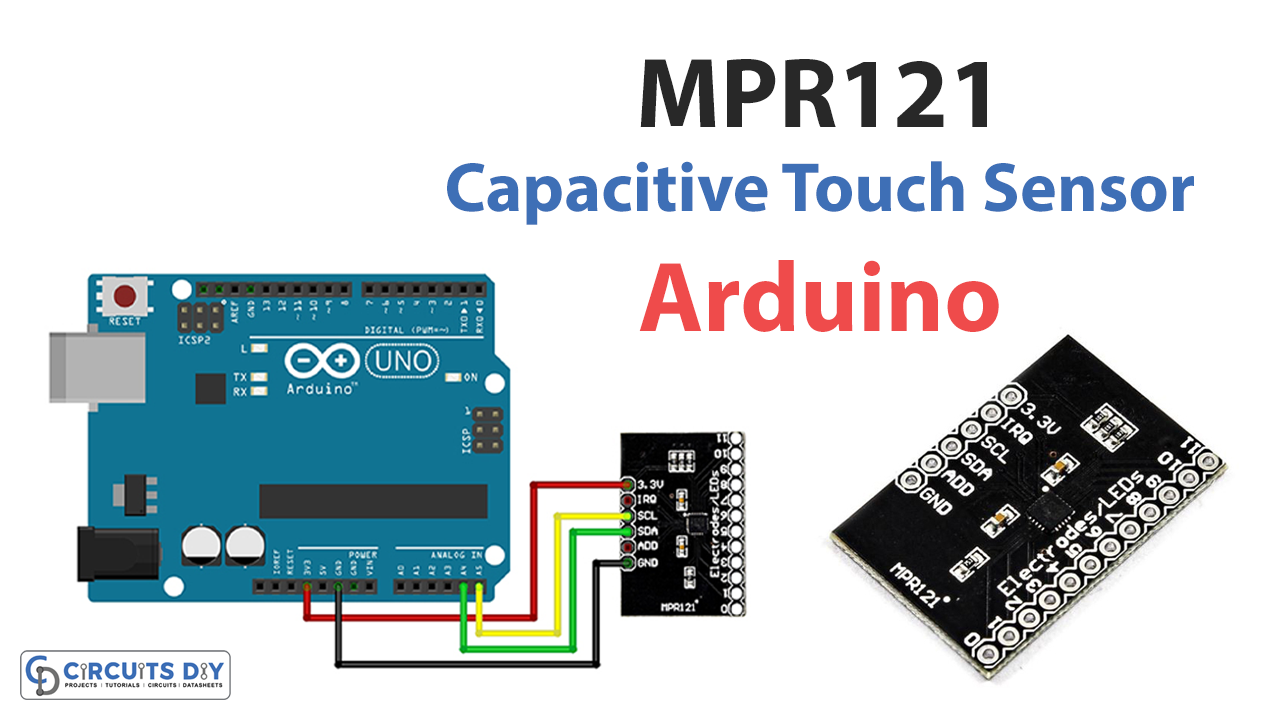
Schematic
Make connections according to the circuit diagram given below.

Wiring / Connections
| Arduino | Sensor |
|---|---|
| 5V | VCC |
| GND | GND |
| A4 | SDA |
| A5 | SCL |
Installing Arduino IDE
First, you need to install Arduino IDE Software from its official website Arduino. Here is a simple step-by-step guide on “How to install Arduino IDE“.
Installing Libraries
Before you start uploading a code, download and unzip the following libraries at /Progam Files(x86)/Arduino/Libraries (default), in order to use the sensor with the Arduino board. Here is a simple step-by-step guide on “How to Add Libraries in Arduino IDE“.
Code
Now copy the following code and upload it to Arduino IDE Software.
#include <Wire.h>#include "Adafruit_MPR121.h"#ifndef _BV#define _BV(bit) (1 << (bit))#endif// You can have up to 4 on one i2c bus but one is enough for testing!Adafruit_MPR121 cap = Adafruit_MPR121();// Keeps track of the last pins touched// so, we know when buttons are 'released'uint16_t lasttouched = 0;uint16_t currtouched = 0;void setup () {Serial.begin(9600);while (!Serial) // was needed to keep Leonardo and Micro from starting too fast!delay(10);}Serial.println("Adafruit MPR121 Capacitive Touch sensor test");// Default address is 0x5A, if tied to 3.3V its 0x5B// If tied to SDA its 0x5C and if SCL then 0x5Dif (!cap.begin(0x5A)) {Serial.println("MPR121 not found, check wiring?");while (1);}Serial.println("MPR121 found!");}void loop() {// Get the currently touched padscurrtouched = cap.touched();for (uint8_t i = 0; i < 12; i++) {// it if *is* touched and *wasnt* touched before, alert!if ((currtouched & _BV(i)) && !(lasttouched & _BV(i)) ) {Serial.print(i); Serial.print(" touched");}// if it *was* touched and now *isnt*, alert!if (!(currtouched & _BV(i)) && (lasttouched & _BV(i)) ) {Serial.println(" released");}}// reset our statelasttouched = currtouched;Comment out this line for detailed data from the sensor!return;// debugging info, whatSerial.print("\t\t\t\t\t\t\t\t\t\t\t\t\t 0x"); Serial.println(cap.touched(), HEX);Serial.print("Filt: ");for (uint8_t i = 0; i < 12; i++) {Serial.print(cap.filteredData(i)); Serial.print("\t");}Serial.println();Serial.print("Base: ");for (uint8_t i = 0; i < 12; i++) {Serial.print(cap.baselineData(i)); Serial.print("\t");}Serial.println();// put a delay so it isn't overwhelmingdelay(1000);}
Let’s Test It
When testing the MPR121 capacitive touch sensor module with Arduino, it is essential to pay attention to the output on the serial monitor. The code will print “MPR121 found!” if the sensor is connected and communicating with the Arduino. If the sensor is not found, the code will print “MPR121 not found; check to wire?” and stay in a loop.
To test the touch pads, touch each pad one at a time and observe the output on the serial monitor. The code should print the number of the pad that is touched.
Working Explanation
The above code reads the state of the touch pads and detects touch events on the touch pads.
- The above code uses the Adafruit_MPR121 library, which provides functions to interact with the sensor. The first thing the code does is to include the necessary libraries, Wire.h and Adafruit_MPR121.h.
- Then, the code creates an object of the Adafruit_MPR121 class, which is used to interact with the sensor. The code then checks if the sensor is connected and communicating with the Arduino. If the sensor is not found, the code will print “MPR121 not found.
- In the loop function, the code reads the current state of the sensor by calling the ‘touched()‘ function. This function returns the state of all 12 touch pads on the sensor. The code then checks if a touchpad was touched and prints the touchpad number and the state of touch.
Applications
- Motion detection devices
- Security devices, etc
Conclusion.
We hope you have found this Interfacing MPR121 Capacitive Touch Sensor Module with Arduino Circuit very useful. If you feel any difficulty in making it feel free to ask anything in the comment section.