Introduction
Imagine a world where the intensity of UV radiation can be measured in real-time, and you can be alerted when it’s time to apply sunscreen or seek shade. That’s precisely what the GUVA-S12SD UV sensor module and an Arduino board can help you achieve. By the end of this tutorial, you will be able to read the UV light intensity and write code to control other devices based on the UV light intensity.
So, let’s embark on this journey together and unlock the secrets of UV sensing technology with the GUVA-S12SD UV sensor module and an Arduino board!
What is GUVA-S12SD UV Sensor?
An analog UV light to voltage converter, the GUVA-S12SD UV Light Sensor Module, is used to determine the intensity of UV light present. The GUVA-S12SD is a realistic UV detector that can detect light with wavelengths between 240 nm and 370 nm.

Hardware Components
You will require the following hardware for Interfacing GUVA-S12SD UV Sensor Module with Arduino.
| S.no | Component | Value | Qty |
|---|---|---|---|
| 1. | Arduino UNO | – | 1 |
| 2. | UV Detection Sensor Module | GUVA-S12SD | 1 |
| 3. | Breadboard | – | 1 |
| 4. | Jumper Wires | – | 1 |
GUVA-S12SD UV Sensor with Arduino
Now that you have got an idea about the module and its working, it’s time to interface the circuit. Hence, for that, you need to follow the given steps:
Schematic
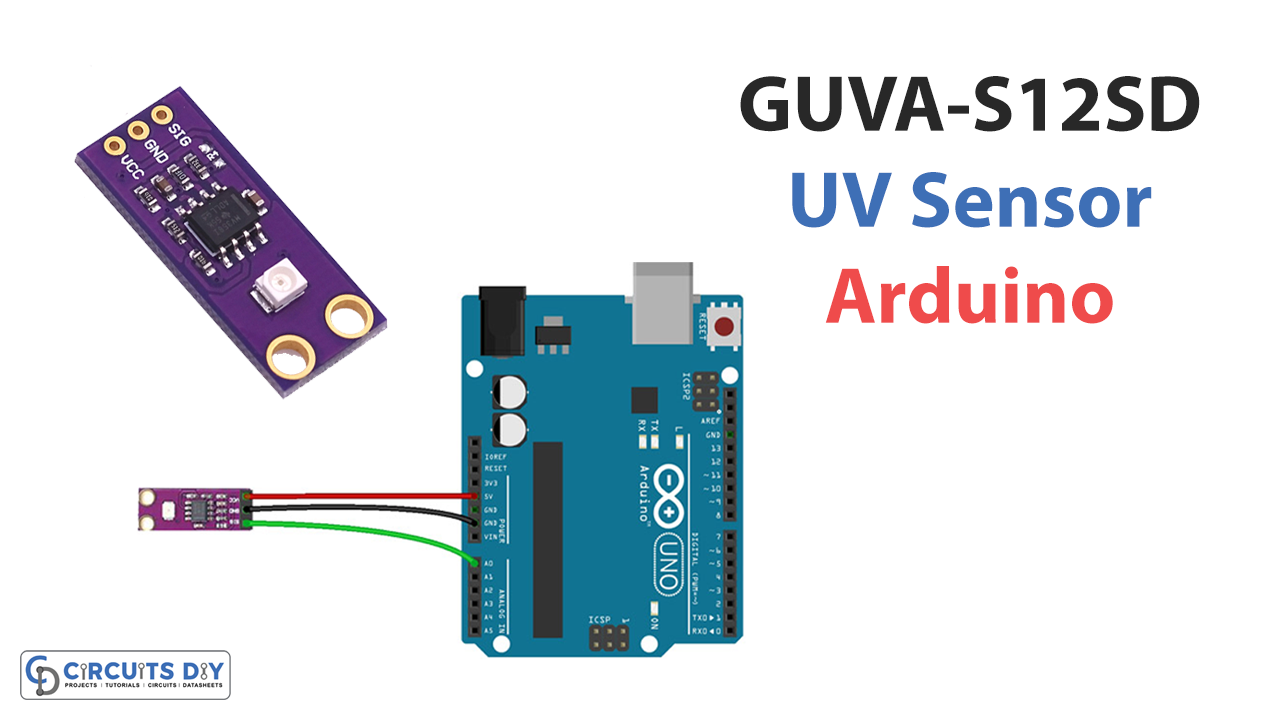
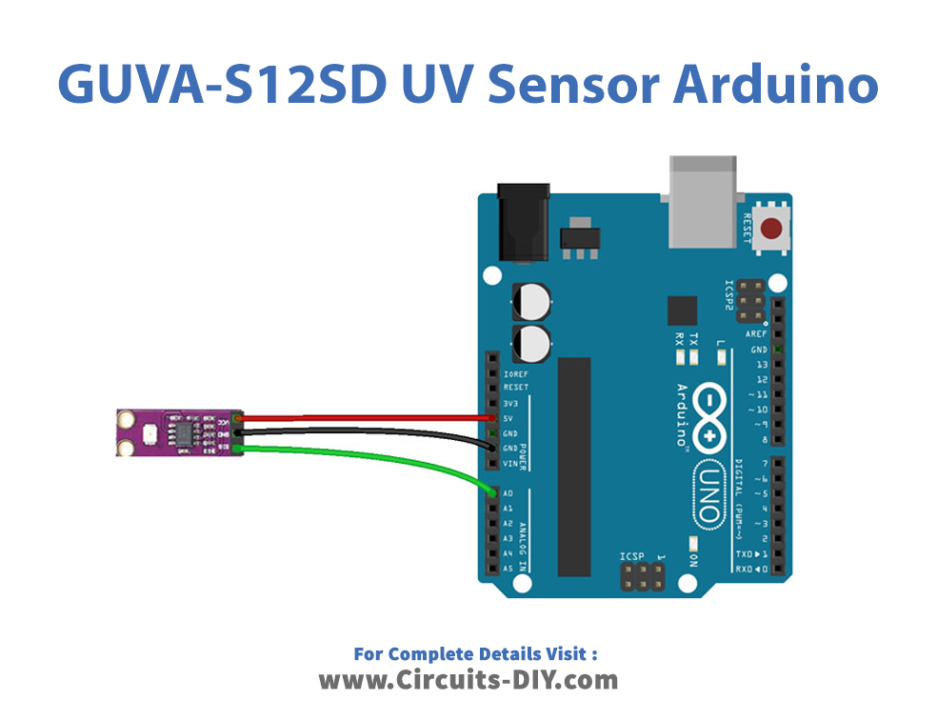
Make connections according to the circuit diagram given below.
Wiring / Connections
| Arduino | UV Detection Sensor |
|---|---|
| 5V | VCC |
| GND | GND |
| A0 | SIG |
Installing Arduino IDE
First, you need to install Arduino IDE Software from its official website Arduino. Here is a simple step-by-step guide on “How to install Arduino IDE“.
Code
Now copy the following code and upload it to Arduino IDE Software.
void setup()
{
  Serial.begin(9600);
}

void loop()
{
  float sensorVoltage;
  float sensorValue;

  sensorValue = analogRead(A0);
  sensorVoltage = sensorValue/1024*5.0;
  Serial.print("sensor reading = ");
  Serial.print(sensorValue);
  Serial.print("        sensor voltage = ");
  Serial.print(sensorVoltage);
  Serial.println(" V");
  delay(1000);
}
Let’s Test It
It’s time to test the circuit once you upload the code. As the Arduino gets the power, the code will cause the Arduino to continuously read the voltage on analog pin 0 and print it out in V.
Working Explanation
Let’s dive into the code to understand how it works:
- The code starts by initializing the serial communication in the void setup.
- In the void loop, the code starts by declaring a variable for the sensor reading.
- The code then reads the value from the analog input 0 and converts it to a voltage using the formula V=sensorValue/1024*5.0.
- The following line of code prints out “sensor reading =” followed by whatever was read from A0.
- Then it prints out “sensor voltage =” followed by what was calculated earlier.
- Finally, it prints out “V” to represent the voltage.
- The sensorValue variable stores the result of the conversion, which is then printed out on the Serial Monitor.
Applications
- Pharmaceuticals
- Automobiles
- Robotics.
- Printing industry
- Automation systems, etc
Conclusion.
We hope you have found this Interfacing GUVA-S12SD UV Sensor Module with Arduino Circuit very useful. If you feel any difficulty in making it feel free to ask anything in the comment section.


