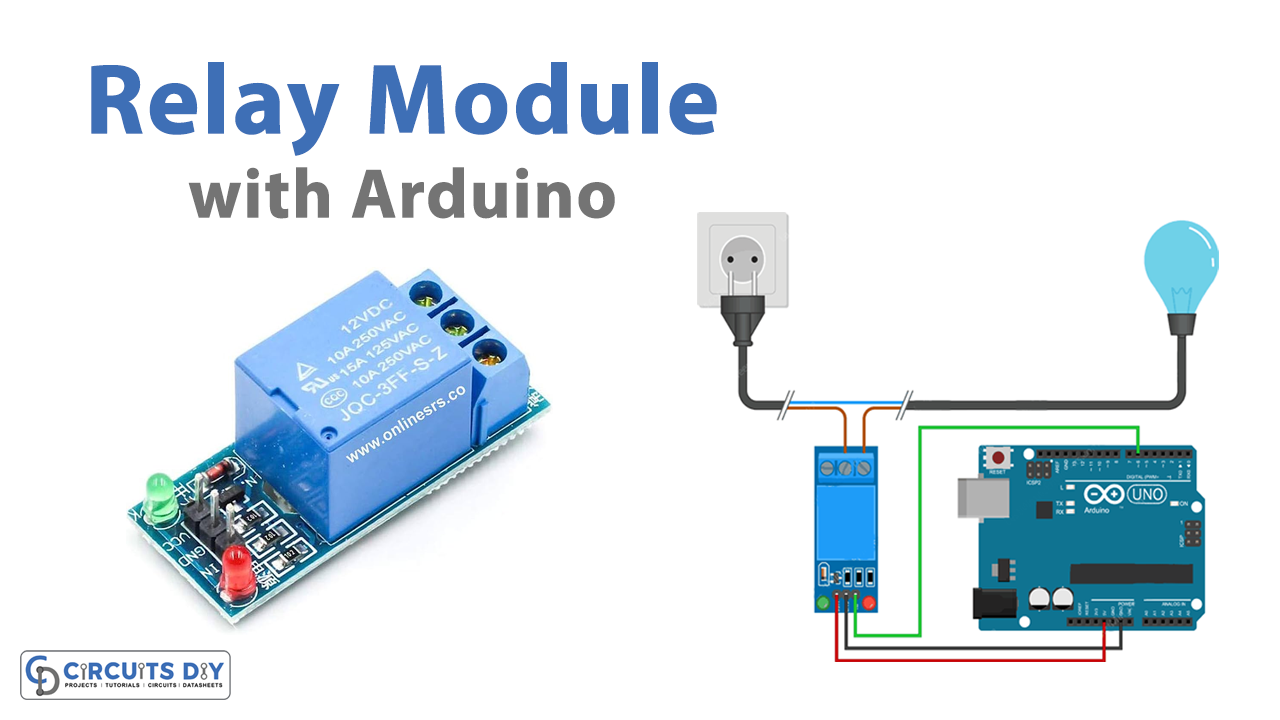
In this tutorial, we are going to interface ” One Channel Relay with Arduino UNO”. The one Channel Relay Module is a handy board for controlling high supply voltage, high current loads such as lights, and AC loads. It’s made to get easily interface with a microcontroller like Arduino. Because there is power isolation between the coil and the switching pins, we can easily power the coils from Arduino by connecting the VCC and GND pins from the Arduino board to the relay module. Next, we select Arduino output pins based on the number of relays required in the project and set these pins to output and make them high (5 V) to control the coil.
One Channel Relay Module Features
- Contact current 10A and 250V AC or 30V DC.
- Each channel has an indicator LED.
- Coil voltage 12V per channel.
- Kit operating voltage 5-12 V
- Input signal 3-5 V for each channel.
- Three pins for normally open and closed for each channel.

Hardware Required
| S.no | Components | Value | Qty |
|---|---|---|---|
| 1 | Arduino UNO | – | 1 |
| 2 | USB Cable Type A to B | – | 1 |
| 3 | Jumper Wires | – | – |
| 4 | One Channel Relay | – | 1 |
| 5 | Bulb | – | 1 |
| 6 | Switch | – | 1 |
Circuit Diagram

Connection Table
| Arduino | One Channel Relay |
|---|---|
| GND | GND |
| 5V | VCC |
| D6 | IN |
| – | NC |
| – | COMM |
| – | NO |
Arduino Code
int RelayPin = 6;

void setup() {
	// Set RelayPin as an output pin
	pinMode(RelayPin, OUTPUT);
}

void loop() {
	// Let's turn on the relay...
	digitalWrite(RelayPin, LOW);
	delay(3000);

	// Let's turn off the relay...
	digitalWrite(RelayPin, HIGH);
	delay(3000);
}
Working Explanation
To Interface One Channel Relay Module with Arduino, when you connect the circuit and upload the code in Arduino, your appliance remains off for a while and then it gets turned on because of the given code.
Code Explanation
- Firstly, define the relay pin that is connected to the Arduino.
- In the void setup, define that pin as the output pin to take the output.
- In the void loop, use the function digitalWrite to give low logic to the relay pin to turn the relay off. Give some delay after that. Then use the same function, and give the high logic to turn ON the relay.
Applications
- Home, office, and industrial automation.
- To turn ON/OFF the AC appliances.


