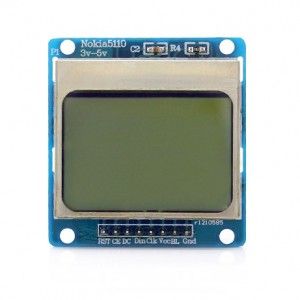
Almost every one of us has used the Nokia phone; there was even a time when these phones got the fame. Some of those phones used the graphic LCD module. This module was designed to work with the classic Nokia 5110 mobile phone, as the name indicates. As a result, it can show alphanumeric characters, draw lines and different shapes, and even show a bitmap picture. This tutorial will interface “Nokia 5110 Graphic LCD with Arduino UNO”.
This LCD uses the PCD8544 controller. The PCD8544 is a low-power CMOS LCD controller with 48 rows and 84 columns of graphic display. All the display’s functionalities are included on a single chip, including the production of LCD supply and bias voltages on-chip, resulting in fewer external components and lower power usage. A serial bus interface is there to connect the PCD8544 to the microcontroller.
Hardware Required
| S.no | Component | Value | Qty |
|---|---|---|---|
| 1. | Arduino UNO | – | 1 |
| 2. | USB Cable Type A to B | – | 1 |
| 3. | Jumper Wires | – | 1 |
| 4. | Graphic LCD | Nokia 5110 | 1 |
| 5. | Bread Board | – | 1 |
| 6. | Resistor | – | 6 |
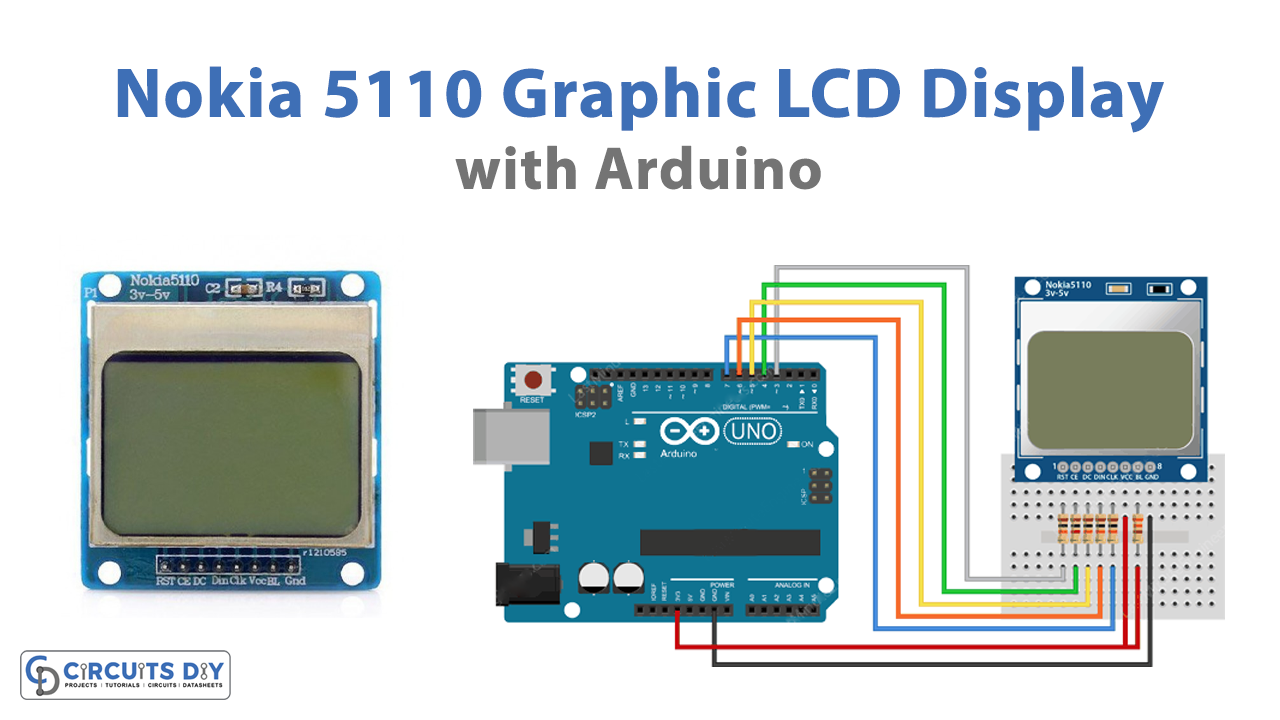
Circuit Diagram

Pinouts of 5110 Graphic LCD Display
| Pin | Name | Description |
| Pin6 | VCC | The power pin to power up the LCD |
| Pin7 | BL | The backlight is the internal color of the LCD. |
| Pin8 | GND | Ground pins. Needs to connect with the common ground with external power and devices. |
| Pin1 | Reset | The reset pins are to reset the Nokia5110 display. |
| Pin2 | CE | Chip enable pin. The enable pin in SPI helps select the device in multiple devices. |
| Pin3: | DC | Data or command pin Pin3 helps to switch between the command/data mode. |
| Pin4 | DIN | The “Serial In” pin will send the data from the Arduino to the LCD Nokia5110. |
| Pin5 | CLK | clock pin The LCD and microcontroller require a standard clock because of their SPI communication. |
Connection Table
| Arduino | Nokia 5110 Graphic LCD |
|---|---|
| D3 | RST |
| D4 | CE |
| D5 | DC |
| D6 | DIN |
| D7 | CLK |
| 3V | VCC |
| 3V | BL |
| GND | GND |
Arduino Code
#include <SPI.h>
#include <Adafruit_GFX.h>
#include <Adafruit_PCD8544.h>

// Declare LCD object for software SPI
// Adafruit_PCD8544(CLK,DIN,D/C,CE,RST);
Adafruit_PCD8544 display = Adafruit_PCD8544(7, 6, 5, 4, 3);

int rotatetext = 1;

void setup()   {
	Serial.begin(9600);

	//Initialize Display
	display.begin();

	// you can change the contrast around to adapt the display for the best viewing!
	display.setContrast(57);

	// Clear the buffer.
	display.clearDisplay();

	// Display Text
	display.setTextSize(1);
	display.setTextColor(BLACK);
	display.setCursor(0,0);
	display.println("Hello world!");
	display.display();
	delay(2000);
	display.clearDisplay();


	// Display Inverted Text
	display.setTextColor(WHITE, BLACK); // 'inverted' text
	display.setCursor(0,0);
	display.println("Hello world!");
	display.display();
	delay(2000);
	display.clearDisplay();

	// Scaling Font Size
	display.setTextColor(BLACK);
	display.setCursor(0,0);
	display.setTextSize(2);
	display.println("Hello!");
	display.display();
	delay(2000);
	display.clearDisplay();

	// Display Numbers
	display.setTextSize(1);
	display.setCursor(0,0);
	display.println(123456789);
	display.display();
	delay(2000);
	display.clearDisplay();

	// Specifying Base For Numbers
	display.setCursor(0,0);
	display.print("0x"); display.print(0xFF, HEX);
	display.print("(HEX) = ");
	display.print(0xFF, DEC);
	display.println("(DEC)");
	display.display();
	delay(2000);
	display.clearDisplay();

	// Display ASCII Characters
	display.setCursor(0,0);
	display.setTextSize(2);
	display.write(3);
	display.display();
	delay(2000);
	display.clearDisplay();

	// Text Rotation
	while(1)
	{
	display.clearDisplay();
	display.setRotation(rotatetext);  // rotate 90 degrees counter clockwise, can also use values of 2 and 3 to go further.
	display.setTextSize(1);
	display.setTextColor(BLACK);
	display.setCursor(0,0);
	display.println("Text Rotation");
	display.display();
	delay(1000);
	display.clearDisplay();
	rotatetext++;
	}
}

void loop() {}
Working Explanation
To interface Nokia 5110 Graphic LCD Display with Arduino, connect the circuit according to the circuit diagram, and upload the code in your Arduino. You will then observe the following on the screen.
- First, it will print the Hello World message on the screen.
- Then you will observe the Inverted text. You will see a hello world filled with black background
- After that, the word hello appears in big size, because of the scaling code.
- Then the screen shows the Numbers 123456789
- Then, numbers with bases like hex, and dec will show up.
- ASCII symbols would appear.
- Rotating text will happen
Code Explanation
- SPI.h, Adafruit GFX.h, and Adafruit PCD8544.h are the libraries we have added to our code. The next step is to make an LCD object. The CLK, Din, D/C, CE, and RST pins of the LCD are connected to the Arduino pins CLK, Din, D/C, CE, and RST. We also defined the rotatetext variable.
Void Setup
- In the void setup, we have initialized the LCD using the begin( ). Then, the contrast of the display is modified using the setContrast(value) , with values ranging from 0-100. However, a number of 50-60 produces excellent outcomes. Hence, we have given the number 57. Now, before publishing our first message on the screen, we must have to empty the buffer. Therefore, we have given the function clearDisplay( ). Then there is a code to display the simple text, for example, hello world in our case. Then there is a program for inverted text. Here SetTextColor(BLACK, WHITE) will show black text on a white backdrop in our scenario. After that, we scaled the font size. We used the setTextSize() earlier in this article to change the font size and gave 1 as a parameter. Here you can resize the font by giving any non-negative number to this function. Then to display numbers, we have just called the print() or println() function. After that, to specify base numbers, BIN (binary, or base 2), OCT (octal, or base 8), DEC (decimal, or base 10), and HEX (hexadecimal, or base 10) (hexadecimal, or base 16) has been used. This option determines the number of decimal places to utilize for floating-point numbers. Now, to display ASCII symbols the print() and println() functions are there to display data as human-readable ASCII text, whereas the write() function displays binary data. Then, vby executing the setRotation() , we have rotated the contents on the display. It allows you to see your screen in portrait or landscape mode, as well as flip it upside down.
Application and Uses
- It was created with the intention of being used as a phone screen.
- It can be used for a variety of things, including displaying alphanumeric text, drawing lines and shapes, and even showing bitmap pictures.
- It’s used to make statements, create designs, and draw pictures. As a result, this circuit may be used by any device that requires these features.


