
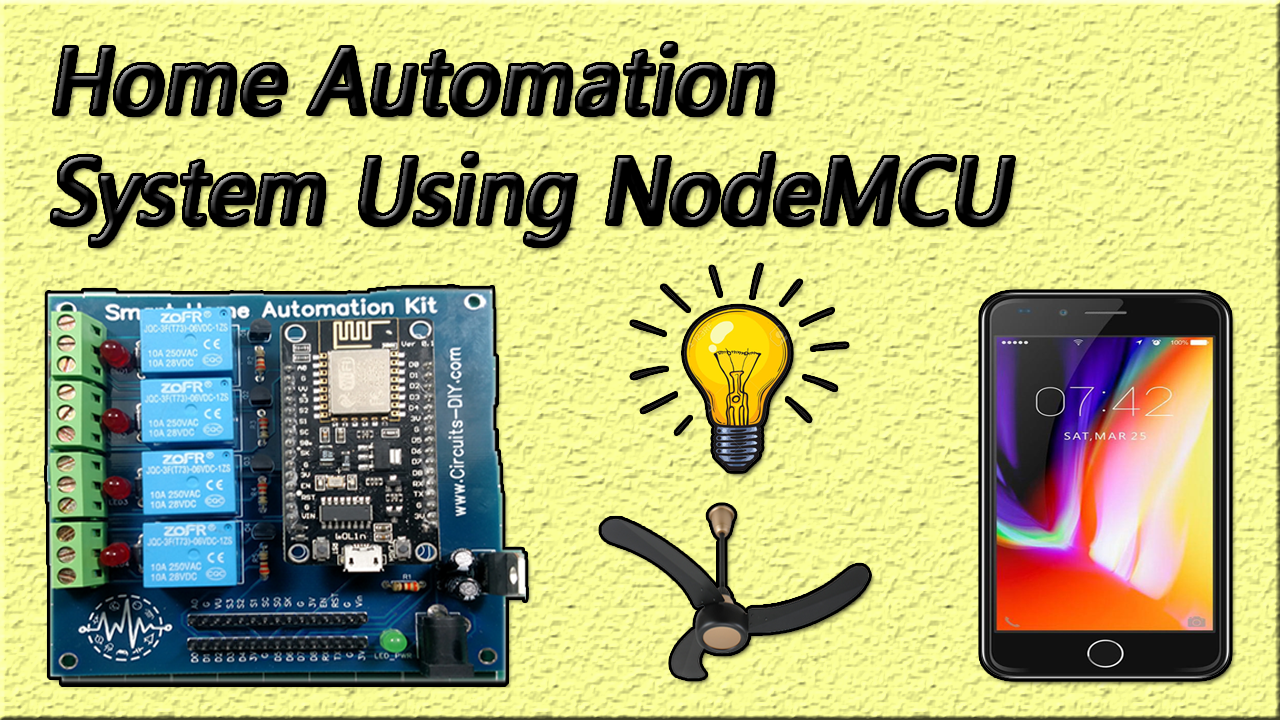
Home automation evolution starts with some basic ideas. It minimizes the human efforts and it can be deployed in a lot of fields like military, surveillance application is developed in the modern world.
In this tutorial, we’ll learn how to build a basic automation system using NodeMCU ESP8266. Lets began with step by step guide that describes in this video:
Hardware Components
You need the following hardware assets for your automation project:
| S.NO | Components | Value | Qty |
| 1. | PCB For Home Automation Circuit | – | 1 |
| 2. | Relays | 5v/6v | 4 |
| 3. | Male/Female Header | – | 1 |
| 4. | 5mm Terminal block | – | 4 |
| 5. | NPN Transistor | BC547 | 4 |
| 6. | Diode | 1N4007 | 4 |
| 7. | Resistor | 330ohm | 5 |
| 8. | Electrolyte Capacitor | 1uF | 1 |
| 9. | LED | 5mm | 5 |
| 10. | Nodemcu | ESP8266 | 1 |
| 11. | 5v Regulator IC | LM7805 | 1 |
Useful Steps
(1) Soldering of PCB
- Solder Terminal Block
- Solder Output LED’s and Diode’s
- Solder Relay’s
- Solder Transistors and 330 Ohm Resistors
- Solder Male and Female Header’s
- Solder DC Connector, Regulator, Capacitors, etc
(2) Setting Up Arduino IDE
- Download both libraries and include it in Arduino IDE
(3) Setting Up Firebase
- Search for Firebase
- Log in with your G mail ID
- Add New Project
- Goto Database ➞ Rules ➞ and define Read/Write rules as public
- Copy Database URL and Update in Arduino Code .. remove https & /
- Now go to project overview ➞ project setting ➞ service accounts ➞ database secrets
- Copy Authentication code and update it in Arduino IDE
- Update Wifi SSID and Password
- Upload Code to NodeMCU
(4) Making an IoT App
- Search for MIT App Inventor 2
- Login with your Gmail id
- Upload AI file from the link in the description
- Click on Firebase Icon
- Update Firebase URL & Authentication code
- Now make changes according to your requirement and Export APK file
(5) Test Circuit
- Power Up the circuit with DC-12V Adapter
- Connect AC load at the output of terminal blocks
Code:
#include#include #define FIREBASE_HOST "basic-2db74.firebaseio.com" // Your Firebase Project URL goes here without "http:" , "\" and "/" #define FIREBASE_AUTH "WljQ8JpTdYqUAnp7VCPgcOshaL90zJtvW83NHAov" // Your Firebase Database Secret goes here #define WIFI_SSID "TP-LINK_CD2ED6" // your WiFi SSID for which yout NodeMCU connects #define WIFI_PASSWORD "20244064" // your WiFi PASSWORD #define Relay1 D0 int val1; #define Relay2 D1 int val2; #define Relay3 D2 int val3; #define Relay4 D3 int val4; void setup() { Serial.begin(115200); // Select the same baud rate if you want to see the datas on Serial Monitor pinMode(Relay1,OUTPUT); pinMode(Relay2,OUTPUT); pinMode(Relay3,OUTPUT); pinMode(Relay4,OUTPUT); digitalWrite(Relay1,HIGH); digitalWrite(Relay2,HIGH); digitalWrite(Relay3,HIGH); digitalWrite(Relay4,HIGH); WiFi.begin(WIFI_SSID,WIFI_PASSWORD); Serial.print("connecting"); while (WiFi.status()!=WL_CONNECTED){ Serial.print("."); delay(500); } Serial.println(); Serial.print("connected:"); Serial.println(WiFi.localIP()); Firebase.begin(FIREBASE_HOST); Firebase.setInt("S1",0); //Here the varialbe"S1","S2","S3" and "S4" needs to be the one which is used in our Firebase and MIT App Inventor Firebase.setInt("S2",0); Firebase.setInt("S3",0); Firebase.setInt("S4",0); } void firebasereconnect() { Serial.println("Trying to reconnect"); Firebase.begin(FIREBASE_HOST); } void loop() { if (Firebase.failed()) { Serial.print("setting number failed:"); Serial.println(Firebase.error()); firebasereconnect(); return; } val1=Firebase.getString("S1").toInt(); //Reading the value of the varialble Status from the firebase if(val1==1) // If, the Status is 1, turn on the Relay1 { digitalWrite(Relay1,LOW); Serial.println("Relay 1 ON"); } else if(val1==0) // If, the Status is 0, turn Off the Relay1 { digitalWrite(Relay1,HIGH); Serial.println("Relay 1 OFF"); } val2=Firebase.getString("S2").toInt(); //Reading the value of the varialble Status from the firebase if(val2==1) // If, the Status is 1, turn on the Relay2 { digitalWrite(Relay2,LOW); Serial.println("Relay 2 ON"); } else if(val2==0) // If, the Status is 0, turn Off the Relay2 { digitalWrite(Relay2,HIGH); Serial.println("Relay 2 OFF"); } val3=Firebase.getString("S3").toInt(); //Reading the value of the varialble Status from the firebase if(val3==1) // If, the Status is 1, turn on the Relay3 { digitalWrite(Relay3,LOW); Serial.println("Relay 3 ON"); } else if(val3==0) // If, the Status is 0, turn Off the Relay3 { digitalWrite(Relay3,HIGH); Serial.println("Relay 3 OFF"); } val4=Firebase.getString("S4").toInt(); //Reading the value of the varialble Status from the firebase if(val4==1) // If, the Status is 1, turn on the Relay4 { digitalWrite(Relay4,LOW); Serial.println("Relay 4 ON"); } else if(val4==0) // If, the Status is 0, turn Off the Relay4 { digitalWrite(Relay4,HIGH); Serial.println("Relay 4 OFF"); } }
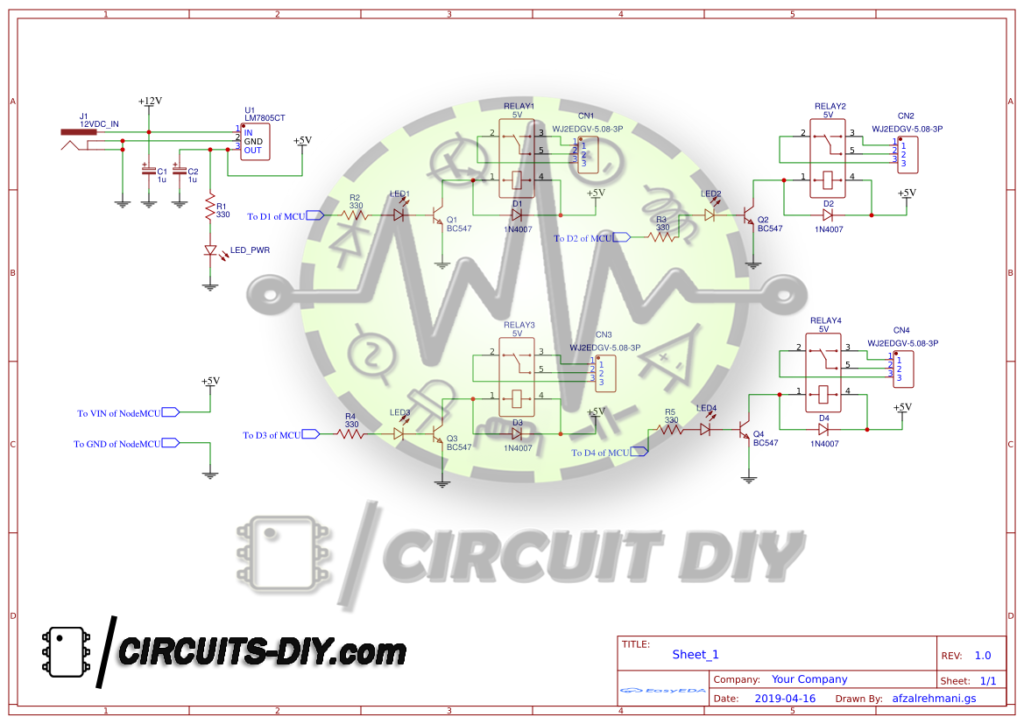
Circuit Diagram
Download all important files & useful materials for this project from the link below.
Related posts:
 Simple IR Audio Transmitter & Receiver Using Solar Cells
 Automatic Water Pump Controller (Transistor Based)
 LED Audio Level Meter Circuit Using 2N4401 Transistors
 How to Make a Simple Fire Alarm Circuit using LM358 IC - Electronics Projects
 Temperature Controlled DC Fan - Electronics Projects
 How to make Audio Level Indicator - VU meter using LM3914 IC


