
Introduction
Are you a person who is lazy enough to close the water motor wired in your home? Or, are you a person who forgets to close the motor? Or, are you the one who is searching for some projects for home automation for water level control? If you belong to any of the above-defined categories this project is definitely is for you. Because in this tutorial we are going to interface ” Water Level Sensor with Arduino UNO”. A sensor has a series of conductors that are basically resistors. hence, the resistance varies according to the different levels of the water.
How does Water level work?
The resistance and the levels of water are inversely proportional to each other. at higher levels of water, the conductivity of the sensor gets high. Hence, the resistance gets low. In the same vein, at the lower levels, the conductivity is low. And the resistance is higher. According to this resistance, the sensor estimates the voltage, which then helps to measure the water level.

Hardware Required
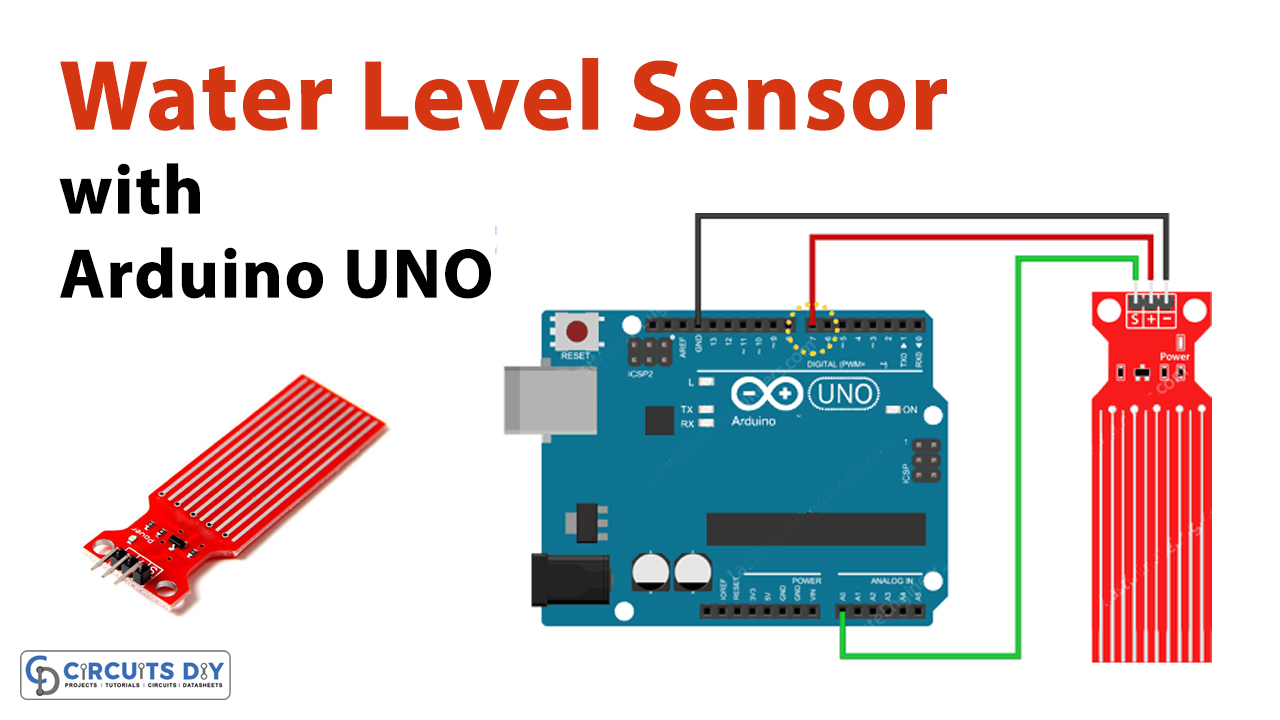
Circuit Diagram
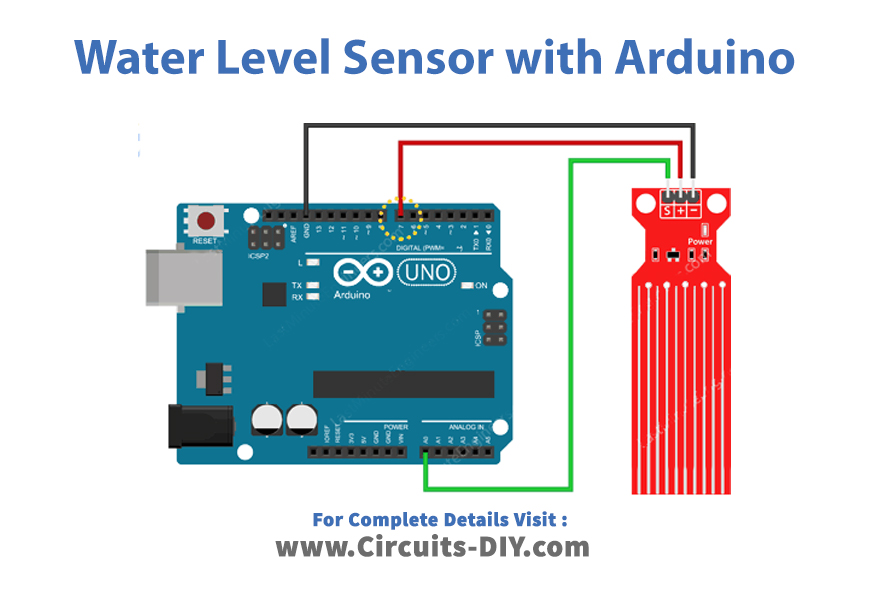
Connection Table
| Arduino | Water Level Sensor |
|---|---|
| A0 | Signal |
| D7 | VCC |
| GND | GND |
Arduino Code
// Sensor pins
#define sensorPower 7
#define sensorPin A0

// Value for storing water level
int val = 0;

void setup() {
	// Set D7 as an OUTPUT
	pinMode(sensorPower, OUTPUT);

	// Set to LOW so no power flows through the sensor
	digitalWrite(sensorPower, LOW);

	Serial.begin(9600);
}

void loop() {
	//get the reading from the function below and print it
	int level = readSensor();

	Serial.print("Water level: ");
	Serial.println(level);

	delay(1000);
}

//This is a function used to get the reading
int readSensor() {
	digitalWrite(sensorPower, HIGH);	// Turn the sensor ON
	delay(10);							// wait 10 milliseconds
	val = analogRead(sensorPin);		// Read the analog value form sensor
	digitalWrite(sensorPower, LOW);		// Turn the sensor OFF
	return val;							// send current reading
}
Working Explanation
Interface water level sensor with Arduino UNO by following the diagram and uploading the above-mentioned code in the Arduino UNO. Now, when the module detected the readings above from the defined threshold reading, it would send the message on the serial monitor. As a result, you will see that message.
Code Explanation
- First, define the sensor pins that are connected with the Arduino. after that declares the variable value that stores the water level.
- In the void setup, define the pin modes of the sensor. also, define that initial sensor power is low by using digital write( ). initialize the serial monitor by serial.begin( ).
- In the void loop, define the variable level to get the readings. Print those readings. Noe, call readSensor( ) and formulate the function to get the readings.
Application and Uses
- In home automation devices.
- For oil tank control.
- In irrigation control systems.
- In fuel tank level control, etc.
Related posts:
 Button Long / Short Press - Arduino Tutorial
 How to Interface Tilt Sensor (Inclinometer) with Arduino UNO
 Control Stepper Motor with L298N Motor Driver & Arduino
 Displaying Sensor Values on LCD 16x2
 How to Decode and Send 433 MHz RF Signals with Arduino UNO
 Ultrasonic Range Detector Using Arduino and SR-04F


