Introduction
Every computing device utilizes internet connections. And, every device that accesses those connections need some kind of storage. However, not every device has a considerable internal storage source. And that’s why the devices like smartphones, laptops, computers, tablets need some external source to store the data. Here comes, the SD cards. SD cards are the external storage sources to store files, applications data, etc. As the name implies, the Secure Digital (SD) cards are used to secure the digital data of certain devices. In short, it’s a compact and removable external source used to secure the data of portable devices. This tutorial is about interfacing “SD Card Module with Arduino UNO”.
To use the SD card with Arduino in your electronic projects, one must need an SD card module for this purpose. An SD card module that is used for electronic projects has different models. But, almost every model works in the same way.

Hardware Required
Circuit Diagram
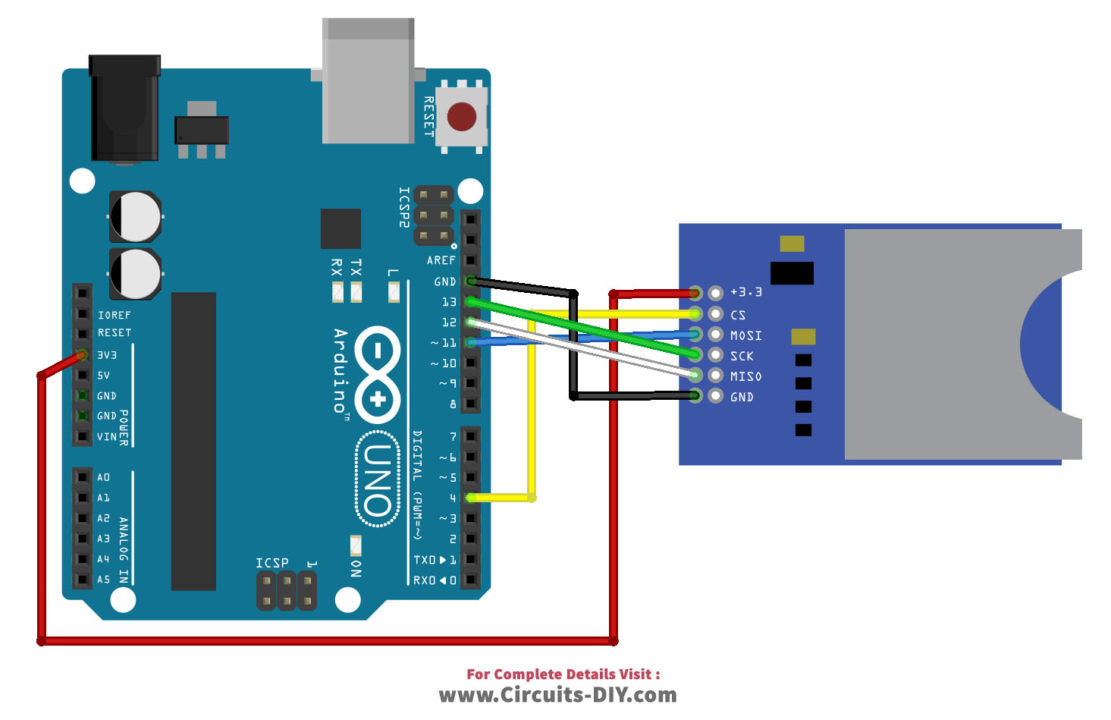
Connection Table
| Arduino | SD card module |
|---|---|
| 3.3V or 5V | VCC Pin |
| D4 | CS Pin |
| D11 | MOSI Pin |
| D13 | CLK Pin |
| D12 | MISO Pin |
| GND | GND |
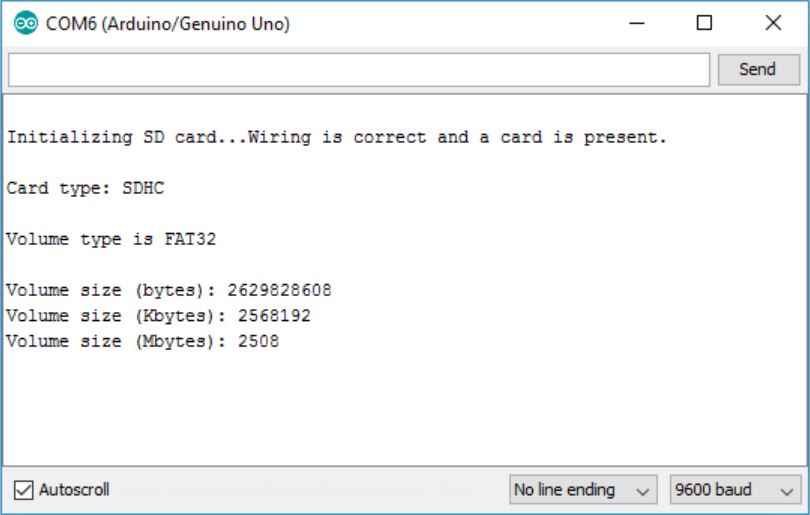
To make sure everything is wired correctly and the SD card is working properly, in the Arduino IDE window go to File> Examples > SD > CardInfo.
Upload the code & Open the Serial Monitor at a baud rate of 9600 and you should see your SD card information.
Arduino Example Code
// Circuits DIY // For Complete Details Visit -> https://circuits-diy.com // include the SD library: #include#include // set up variables using the SD utility library functions: Sd2Card card; SdVolume volume; SdFile root; // change this to match your SD shield or module; // Arduino Ethernet shield: pin 4 // Adafruit SD shields and modules: pin 10 // Sparkfun SD shield: pin 8 // MKRZero SD: SDCARD_SS_PIN const int chipSelect = 4; void setup() { // Open serial communications and wait for port to open: Serial.begin(9600); while (!Serial) { ; // wait for serial port to connect. Needed for native USB port only } Serial.print("\nInitializing SD card..."); // we'll use the initialization code from the utility libraries // since we're just testing if the card is working! if (!card.init(SPI_HALF_SPEED, chipSelect)) { Serial.println("initialization failed. Things to check:"); Serial.println("* is a card inserted?"); Serial.println("* is your wiring correct?"); Serial.println("* did you change the chipSelect pin to match your shield or module?"); while (1); } else { Serial.println("Wiring is correct and a card is present."); } // print the type of card Serial.println(); Serial.print("Card type: "); switch (card.type()) { case SD_CARD_TYPE_SD1: Serial.println("SD1"); break; case SD_CARD_TYPE_SD2: Serial.println("SD2"); break; case SD_CARD_TYPE_SDHC: Serial.println("SDHC"); break; default: Serial.println("Unknown"); } // Now we will try to open the 'volume'/'partition' - it should be FAT16 or FAT32 if (!volume.init(card)) { Serial.println("Could not find FAT16/FAT32 partition.\nMake sure you've formatted the card"); while (1); } Serial.print("Clusters: "); Serial.println(volume.clusterCount()); Serial.print("Blocks x Cluster: "); Serial.println(volume.blocksPerCluster()); Serial.print("Total Blocks: "); Serial.println(volume.blocksPerCluster() * volume.clusterCount()); Serial.println(); // print the type and size of the first FAT-type volume uint32_t volumesize; Serial.print("Volume type is: FAT"); Serial.println(volume.fatType(), DEC); volumesize = volume.blocksPerCluster(); // clusters are collections of blocks volumesize *= volume.clusterCount(); // we'll have a lot of clusters volumesize /= 2; // SD card blocks are always 512 bytes (2 blocks are 1KB) Serial.print("Volume size (Kb): "); Serial.println(volumesize); Serial.print("Volume size (Mb): "); volumesize /= 1024; Serial.println(volumesize); Serial.print("Volume size (Gb): "); Serial.println((float)volumesize / 1024.0); Serial.println("\nFiles found on the card (name, date and size in bytes): "); root.openRoot(volume); // list all files in the card with date and size root.ls(LS_R | LS_DATE | LS_SIZE); } void loop(void) { }
Working Explanation
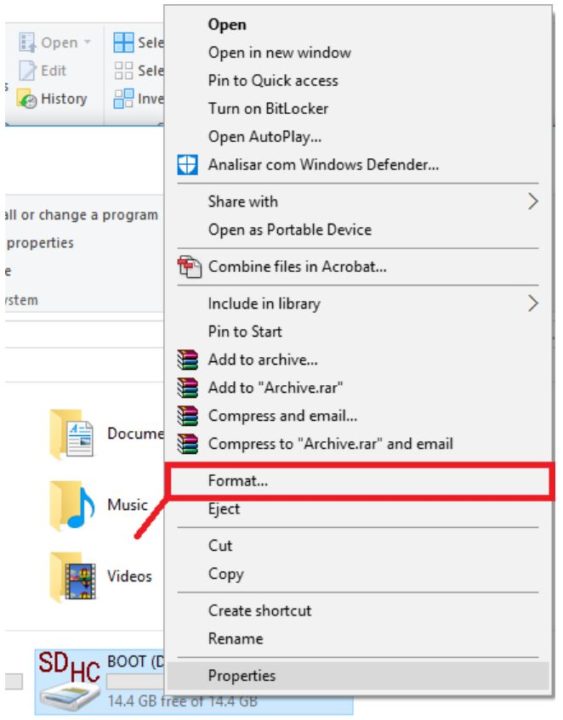
First, you need to format the SD card. Insert the card into your laptop or computer. In my computer file, right-click the SD-card, click on the Format option. It will appear in the new window on your laptop. Select the option FAT32, and then click the start. This will initialize the formatting. After when the formatting would be done, insert the card in the module. And, connect the circuit according to the above-mentioned diagram and pin connections. Insert the code in the Arduino board. Open the serial monitor. Now, you can see your SD card information.

Code Explanation
To communicate with the SD card, include the SPI library in the code. Since it’s a synchronous serial data protocol, therefore, it helps to communicate with the device easily over a short distance. Also, include the SD library to read or write from the SD card. Now, initialize the module at the CS, that is chip select pin. here we are using pin 4 for this purpose. Create a file to open a new file in your SD card. Now, it’s time to read and write into the file. In the code, data.txt is the name of the file. If this file already exists, then Arduino will open that file. If not, Arduino will create this file. FILE_WRITE allows you to read or write into the file.
If you want to write in the currently opened file, write dataFile. write(data). Now use print and println functions to print the data into a file. If you want to read your saved data, write dataFile. read ( ). Close the file by using the command SD. close (“data.txt”).
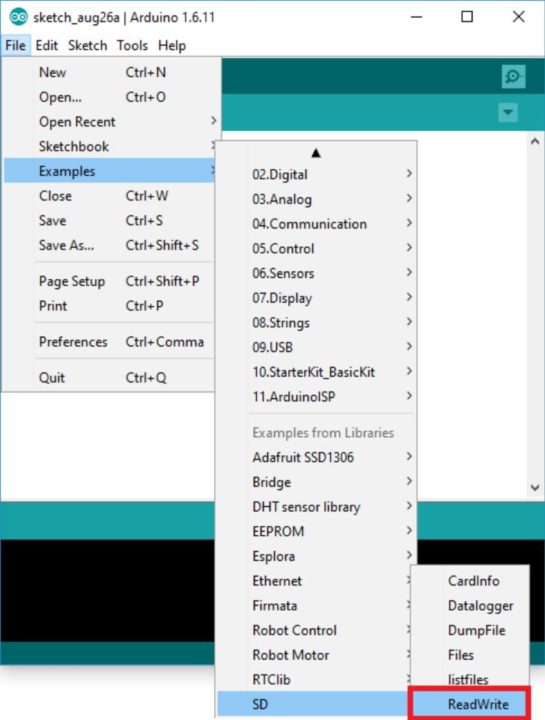
For a complete sketch on how to read and write, in your Arduino IDE go to File> Examples > SD > ReadWrite.
Application and Uses
This interfacing is basically used in projects that need data logging. It enables the user to communicate with the memory card. So, if any project that requires the data stored in the memory card can use this interfacing and can easily read the stored data from this portable SD card.