Introduction
Barometer if pressure, that is the air pressure is the weight of pushing down on earth. Since it generates a great effect on the weather conditions. Therefore, it is crucial to measure the biometric pressure of an environment. For example, high pressure is the reason for clear and promising weather conditions. On the other hand, low pressure supports the cloudy and rainy weather. The measurement of this pressure is don’t by some sensors.BMP180 is of those sensors which measure biometric pressure reliably. Therefore, we have decided, in this tutorial, we are going to interface “BMP180 Barometric Sensor with Arduino UNO”.
BMP180 Barometric Sensor
The electronic pressure sensor or the electronic barometer unit measures the pressure using a force collector to determine the strain due to an applied force over a particular area. Its working voltage range is from 3.3Vo to 5 Volts. The best part is that it’s expensive. Since it is very compact, therefore easy to handle and interface.

Hardware Required
| S.no | Component | Value | Qty |
|---|---|---|---|
| 1. | Arduino | UNO | 1 |
| 2. | USB Cable Type A to B | – | 1 |
| 3. | Jumper Wires | – | – |
| 4. | Barometric Sensor | BMP180 | – |
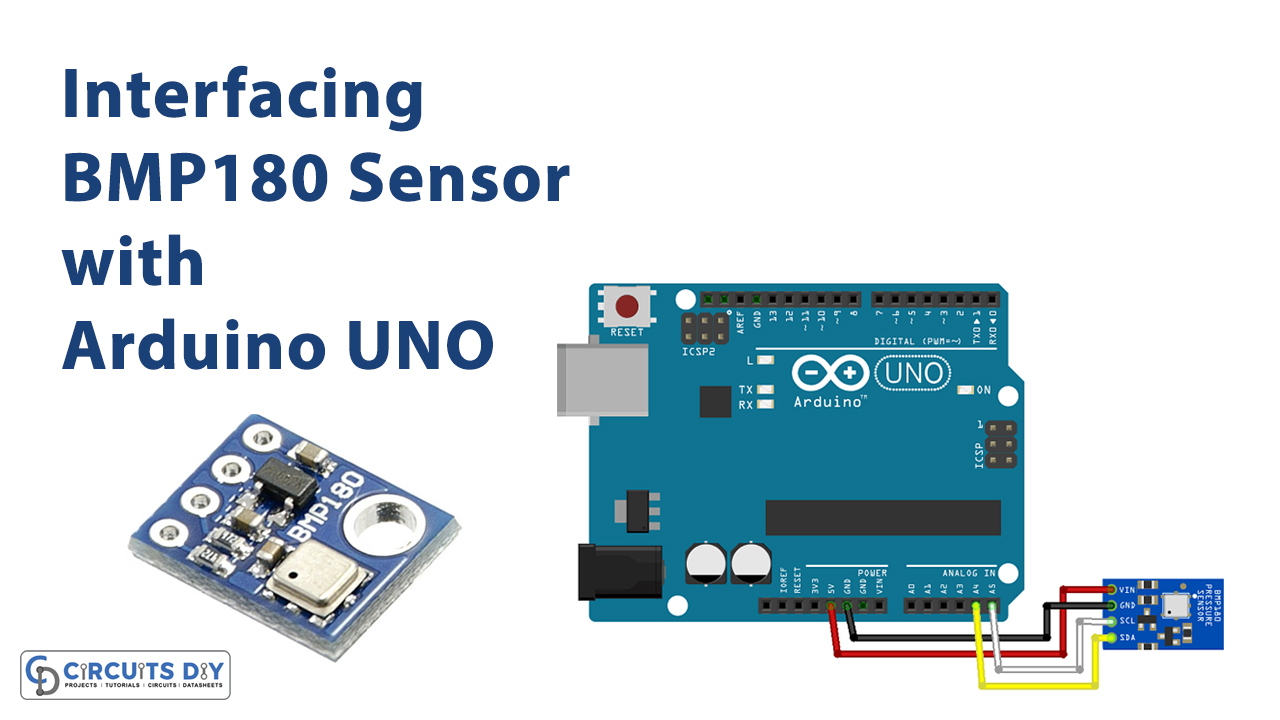
Circuit Diagram
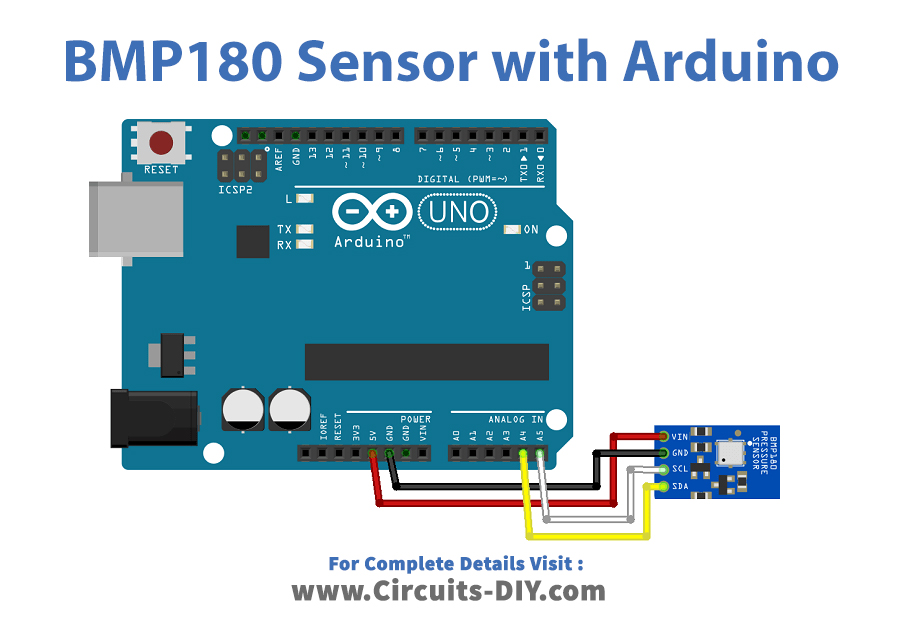
Connection Table
| Arduino | BMP180 Barometric Sensor |
|---|---|
| 5V | Vin |
| GND | GND |
| A5 | SCL |
| A4 | SDA |
Arduino Code
// Circuits DIY
 // For Complete Details Visit -> https://circuits-diy.com
#include <SFE_BMP180.h>
#include <Wire.h>

// You will need to create an SFE_BMP180 object, here called "pressure":

SFE_BMP180 pressure;

#define ALTITUDE 1655.0 // Altitude of SparkFun's HQ in Boulder, CO. in meters

void setup()
{
  Serial.begin(9600);
  Serial.println("REBOOT");

  // Initialize the sensor (it is important to get calibration values stored on the device).

  if (pressure.begin())
    Serial.println("BMP180 init success");
  else
  {
    // Oops, something went wrong, this is usually a connection problem,
    // see the comments at the top of this sketch for the proper connections.

    Serial.println("BMP180 init fail\n\n");
    while(1); // Pause forever.
  }
}

void loop()
{
  char status;
  double T,P,p0,a;

  // Loop here getting pressure readings every 10 seconds.

  // If you want sea-level-compensated pressure, as used in weather reports,
  // you will need to know the altitude at which your measurements are taken.
  // We're using a constant called ALTITUDE in this sketch:

  Serial.println();
  Serial.print("provided altitude: ");
  Serial.print(ALTITUDE,0);
  Serial.print(" meters, ");
  Serial.print(ALTITUDE*3.28084,0);
  Serial.println(" feet");

  // If you want to measure altitude, and not pressure, you will instead need
  // to provide a known baseline pressure. This is shown at the end of the sketch.

  // You must first get a temperature measurement to perform a pressure reading.

  // Start a temperature measurement:
  // If request is successful, the number of ms to wait is returned.
  // If request is unsuccessful, 0 is returned.

  status = pressure.startTemperature();
  if (status != 0)
  {
    // Wait for the measurement to complete:
    delay(status);

    // Retrieve the completed temperature measurement:
    // Note that the measurement is stored in the variable T.
    // Function returns 1 if successful, 0 if failure.

    status = pressure.getTemperature(T);
    if (status != 0)
    {
      // Print out the measurement:
      Serial.print("temperature: ");
      Serial.print(T,2);
      Serial.print(" deg C, ");
      Serial.print((9.0/5.0)*T+32.0,2);
      Serial.println(" deg F");

      // Start a pressure measurement:
      // The parameter is the oversampling setting, from 0 to 3 (highest res, longest wait).
      // If request is successful, the number of ms to wait is returned.
      // If request is unsuccessful, 0 is returned.

      status = pressure.startPressure(3);
      if (status != 0)
      {
        // Wait for the measurement to complete:
        delay(status);

        // Retrieve the completed pressure measurement:
        // Note that the measurement is stored in the variable P.
        // Note also that the function requires the previous temperature measurement (T).
        // (If temperature is stable, you can do one temperature measurement for a number of pressure measurements.)
        // Function returns 1 if successful, 0 if failure.

        status = pressure.getPressure(P,T);
        if (status != 0)
        {
          // Print out the measurement:
          Serial.print("absolute pressure: ");
          Serial.print(P,2);
          Serial.print(" mb, ");
          Serial.print(P*0.0295333727,2);
          Serial.println(" inHg");

          // The pressure sensor returns abolute pressure, which varies with altitude.
          // To remove the effects of altitude, use the sealevel function and your current altitude.
          // This number is commonly used in weather reports.
          // Parameters: P = absolute pressure in mb, ALTITUDE = current altitude in m.
          // Result: p0 = sea-level compensated pressure in mb

          p0 = pressure.sealevel(P,ALTITUDE); // we're at 1655 meters (Boulder, CO)
          Serial.print("relative (sea-level) pressure: ");
          Serial.print(p0,2);
          Serial.print(" mb, ");
          Serial.print(p0*0.0295333727,2);
          Serial.println(" inHg");

          // On the other hand, if you want to determine your altitude from the pressure reading,
          // use the altitude function along with a baseline pressure (sea-level or other).
          // Parameters: P = absolute pressure in mb, p0 = baseline pressure in mb.
          // Result: a = altitude in m.

          a = pressure.altitude(P,p0);
          Serial.print("computed altitude: ");
          Serial.print(a,0);
          Serial.print(" meters, ");
          Serial.print(a*3.28084,0);
          Serial.println(" feet");
        }
        else Serial.println("error retrieving pressure measurement\n");
      }
      else Serial.println("error starting pressure measurement\n");
    }
    else Serial.println("error retrieving temperature measurement\n");
  }
  else Serial.println("error starting temperature measurement\n");

  delay(5000);  // Pause for 5 seconds.
}
Working Explanation
First, connect BMP180 Barometric Sensor with Arduino. After that, upload the above-mentioned code. And, open the serial monitor to see the readings. Certainly, the working is not very difficult. When the pressure of air gets changed, the resistance of the piezo sensor present in the sensor gets changes. But, the value is in analog which will get changed into digital through an analog to digital converter. At last, it sends to the controller.
Code Explanation
First, you need to install the library SFE_BMP180.h. You can download the library from:
https://github.com/LowPowerLab/SFE_BMP180
The code described above has included this library. It then defines the variable and the altitude in meters. Further, in the void setup, it has initialized the sensor. And, if the sensor gets initialized, it will print BM810 init success. If not, then it will print BM810 init fail. After that, in the void loop, before the pressure, it measures the temperature. And, then it prints that measurement. Then, there is a code to measure pressure. The pressure sensor returns absolute pressure that varies with the altitude.
Application and Uses
- It can be used in the weather stations
- It can be utilized to detect the altitude
- Also, to estimate the vertical velocity
- In the weather balloons, etc