Introduction
In radiofrequency or wireless communication, it’s not feasible to transmit the data directly. Therefore, the transmitter encodes the data and transfers it to the receiver. The receiver then collects the data and before sending it further, it decodes the data to send it. The decoding can be done with the help of any microprocessor chip or microcontroller. Since decoding is necessary to understand the data. Therefore, In this tutorial, we are going to interface “433 MHz RF Module with Arduino UNO”.
The RF receiver module transfers data of 433HZ. However, it has the nod to change the frequency. The frequency can be adjusted between 315Mhz to 433Mhz. Moreover, the module also contains some operational amplifiers to increase the magnitude of the coming signal. Remember, that the Module only receives the data. Further, it is the Arduino that decodes the data through programming.
RF Reciever Specifications
- The operating voltage of the module is from 3 Volts to 12 Volts.
- The module draws a current of 5.5 mA.
- Its operating frequency is 433Hz.
- The module can receive the data within the vicinity from 3 to 100 meters.
- RF receiver module used the amplitude shift key technique.
- The module is cheap and affordable.
Hardware Required
| S.no | Components | Value | Qty |
|---|---|---|---|
| 1. | Arduino UNO | – | 1 |
| 2. | USB Cable Type A to B | – | 1 |
| 3. | Jumper Wires | – | – |
| 4. | RF Modules | 433 MHz | – |
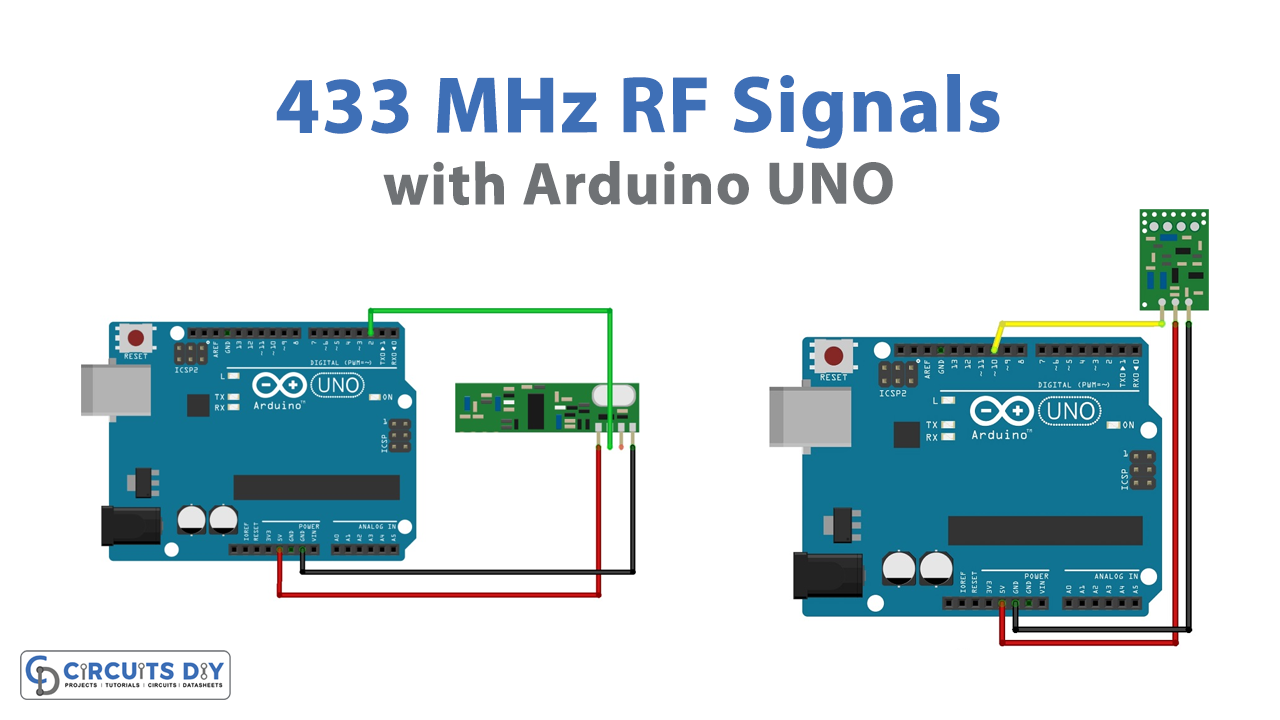
Receiver Circuit

Connection Table
| Arduino | Decoder |
|---|---|
| VCC | VCC |
| GND | GND |
| D2 | Data |
Transmitter Circuit
Connection Table
| Arduino | Sender |
|---|---|
| VCC | VCC |
| GND | GND |
| D10 | Data |
Arduino Code
// Circuits DIY
// For Complete Details Visit -> https://circuits-diy.com
#include <RCSwitch.h>
RCSwitch mySwitch = RCSwitch();

void setup() {
  Serial.begin(9600);

  // Transmitter is connected to Arduino Pin #10
  mySwitch.enableTransmit(10);

  // Optional set pulse length.
  mySwitch.setPulseLength(REPLACE_WITH_YOUR_PULSE_LENGTH);

  // Optional set protocol (default is 1, will work for most outlets)
  mySwitch.setProtocol(REPLACE_WITH_YOUR_PROTOCOL);

  // Optional set number of transmission repetitions.
  // mySwitch.setRepeatTransmit(15);
}

void loop() {
  // Binary code - button 3
  mySwitch.send("000101010101000101010101");
  delay(1000);
  mySwitch.send("000101010101000101010100");
  delay(1000);

  // Binary code - button 4
  mySwitch.send("000101010101010001010101");
  delay(1000);
  mySwitch.send("000101010101010001010100");
  delay(1000);
}
Working Explanation
To Decode and Send 433 MHz RF Signals with Arduino UNO, assemble the circuit according to the schematic. Now, first, you need to open the decoder sketch on IDE. So, for this purpose, go on files. Then go on examples. Go on RC_Switch, and open RecieveDemo_Advanced. Upload that particular code in Arduino. Open the Serial monitor. Press the remote buttons. For our example, we have used buttons 3 and 4. You can use any button on the remote. Press 3 and you will see the information on the serial monitor. Now, press button 4. Hence, you will see its information on the Serial monitor. From the serial monitor, note the pulse length and binary codes for both buttons.
After that copy the above-mentioned code and paste it into the Arduino IDE. Replace the pulse length and binary code with the ones that you have noted before and upload them in Arduino. This will decode and send the message.
Code Explanation
- Download the RCSwitch library in your Arduino IDE. You can download the library from:
- Now, we have included this library in IDE. Then, we defined the variable mySwitch
- In the void setup, we have initialized the Serail monitor by Serial. begin( ). then, we enabled the transmitter on Arduino by using enableTransmit( ). we have used pin 10 for this purpose. Then we have given the function SetPulseLength ( ) to set the pulse length that you have noted before. Write your required length in the bracket. Then we have defined the protocol by Setprotocol( ). Since the default protocol is 1. Therefore it’s optional to set it there.
- In the void loop, we have sent the binary code by using send function. Write binary codes for your remote buttons in the bracket. Give some delay so that it sends the message with some delay
Application and Uses
- It is used in remote controls.
- It can be utilized in-car security systems.
- For home automation systems.
- For wireless communication.