Introduction
You’ve probably seen a lot of times in current robotics that practically every robot changes its path when it encounters obstacles. And if you’re interested in robotics, you already know that this is due to the robot’s ultrasonic sensor, a sensor that is wired within the device. This article is about Getting Started with HC-SR04.
Due to their features, cost, and versatility, ultrasonic sensors have been in use for many years and still retain a significant market share in the sensing industry. An ultrasonic sensor is the best choice for integrating a distance measurement or detecting feature into a product.
What is Ultrasonic Sensor?
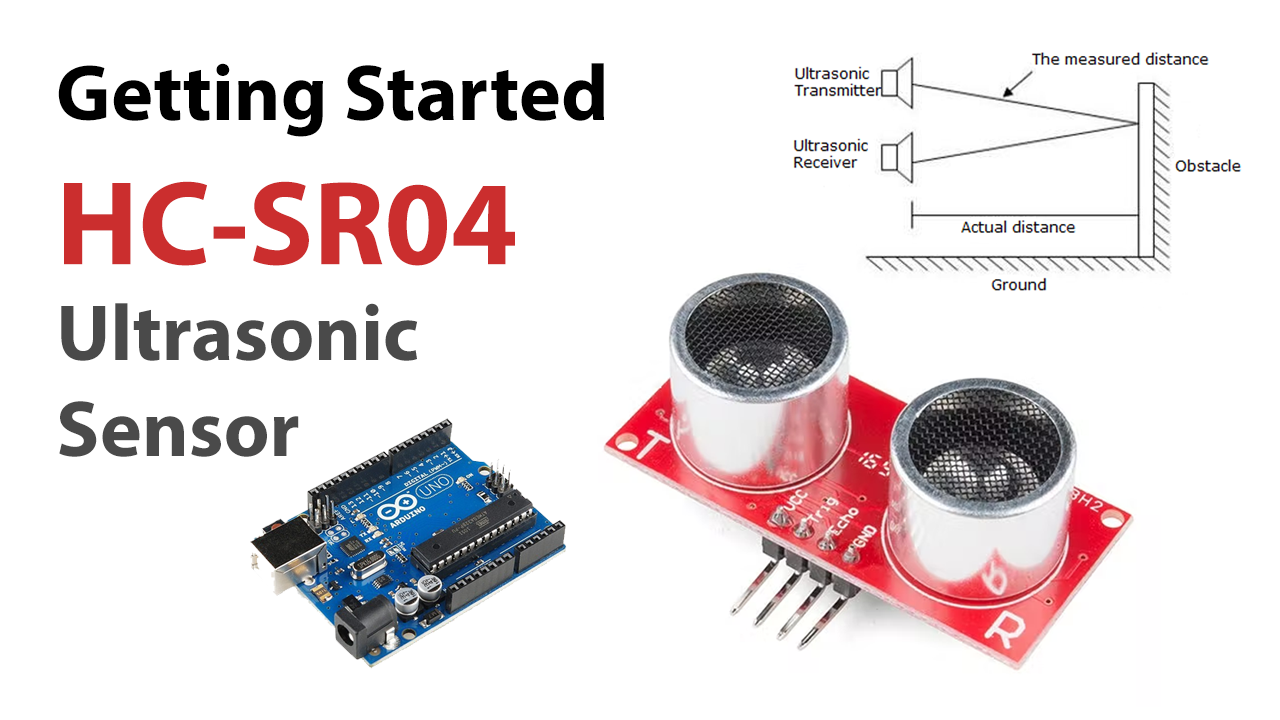
Ultrasonic sensors, as the name implies, use ultrasonic waves to measure distance. This electronic gadget determines the distance to the target by emitting ultrasonic sound waves and converting those waves into electronic signals. . The two basic components of ultrasonic sensors are the transmitter, which generates sound employing piezoelectric crystals, and the receiver, which receives the sound after it has traveled to and from the target.

Hardware Components
You will require the following hardware to Interfacing the HC-SR04 Ultrasonic sensor with Arduino.
Steps Interfacing HC-SR04 with Arduino
As we are getting started with HC-SR04, so simply need Arduino, HC-SR04, a breadboard, and some wires. Once you have them, follow to given steps :
Schematic
Make connections according to the circuit diagram given below.

Wiring / Connections
| Arduino | Ultrasonic Sensor |
|---|---|
| 5V | VCC |
| GND | GND |
| PIN 9 | Trig |
| PIN 10 | Echo |
Installing Arduino IDE
First, you need to install Arduino IDE Software from its official website Arduino. Here is a simple step-by-step guide on “How to install Arduino IDE“.
Code
Now copy the following code and upload it to Arduino IDE Software.
const int trigPin = 9;
const int echoPin = 10;

float duration, distance;

void setup() {
  pinMode(trigPin, OUTPUT);
  pinMode(echoPin, INPUT);
  Serial.begin(9600);
}

void loop() {
  digitalWrite(trigPin, LOW);
  delayMicroseconds(2);
  digitalWrite(trigPin, HIGH);
  delayMicroseconds(10);
  digitalWrite(trigPin, LOW);

  duration = pulseIn(echoPin, HIGH);
  distance = (duration*.0343)/2;
  Serial.print("Distance: ");
  Serial.println(distance);
  delay(100);
}
Let’s Test It
The moment has come to test our circuit! Therefore, turn on the Arduino. Objects should be placed in front of the ultrasonic sensor as the serial monitor is opened. The estimated reading is now displayed. If the sensor is not functioning correctly or there is nothing in front of it, the reading will be zero. Analyze the results after experimenting with various materials.
Working Explanation
Let’s dig into the coding to understand the working:
- Assign the trig and echo pins of the HC-SR04 (SONAR sensor) to the digital Arduino pins.
- Declare the trig and echo pins to be the output pins in the void setup.
- Send a strong pulse with a duration of 2 microns to activate the SONAR in the void loop. Send a low pulse first, though, to make sure the high pulse you are receiving is clear. Read the sensor’s signal right now. After that, all that is left to do is use the formula to convert the duration to a distance. On the serial monitor, print those results.
Applications
- It is used in robotics applications
- Alarm and security devices
- EV vehicles
- Drones; etc
Conclusion.
We hope you have found this Getting Started with the HC-SR04 Ultrasonic sensor” Circuit very useful. If you feel any difficulty in making it feel free to ask anything in the comment section.