Introduction
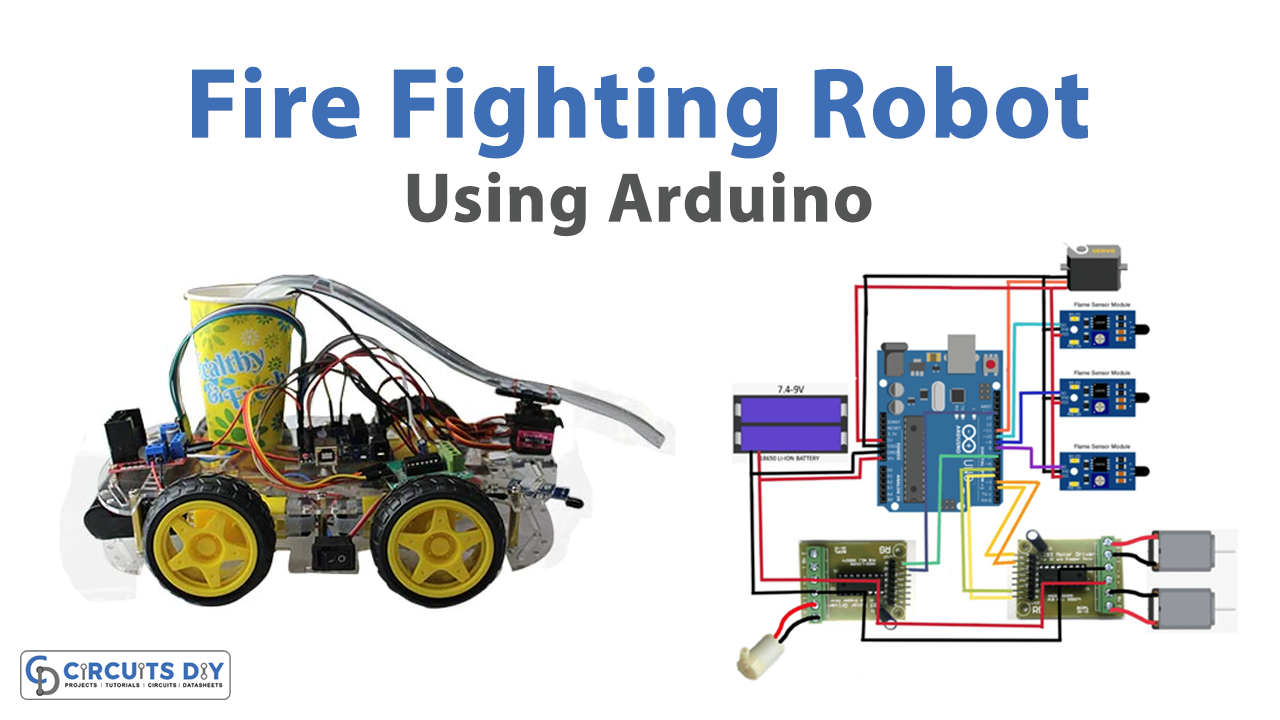
Designing a Fire Fighter Robot using Arduino Uno and a flame IR Sensor is an innovative approach to combat fire hazards. This project involves building a robotic device that can detect flames and extinguish them using a water pump. The Arduino Uno microcontroller board is the brain of the robot, which receives input signals from the flame IR sensor and controls the water pump’s operation.
The flame IR sensor detects the heat signature of the fire and sends a signal to the Arduino, which triggers the water pump to start extinguishing the fire. This project is a great example of how technology can be used to save lives and prevent property damage in emergency situations.
Hardware Components
You will require the following hardware for the Fire Fighter Robot.
| Components | Value | Qty |
|---|---|---|
| Arduino UNO | – | 1 |
| Flame IR Sensor | – | 3 |
| Robot Chassis | – | 1 |
| Nozzle for water | – | 1 |
| Water pump | 5V | 1 |
| Relay | Single Channel | 1 |
| Battery | 7.4 – 9V | 1 |
| Servo Motor | – | 1 |
| DC Motor | – | 2 |
| Resistor | Ω | 1 |
| Breadboard | – | 1 |
| Jumper Wires | – | 1 |
Code Explanation
- Include the Servo library:
#include <Servo.h>
This line includes the Servo library which provides functions for controlling a servo motor.
- Create a Servo object:
Servo myservo;
This line creates a Servo object called myservo which will be used to control the servo motor.
- Initialize a variable:
int pos = 0;
This line initializes an integer variable called pos and sets its initial value to 0.
- Set up the initial conditions in the setup() function:
void setup() {
  myservo.attach(11);
  pinMode(2, OUTPUT);
  pinMode(3, OUTPUT);
  pinMode(4, OUTPUT);
  pinMode(5, OUTPUT);
  pinMode(6, OUTPUT);
  pinMode(A0, INPUT);
  pinMode(A1, INPUT);
  pinMode(A2, INPUT);
  Serial.begin(9600);
  digitalWrite(6, HIGH);
}
This block of code sets up the initial conditions for the program. It attaches the servo to pin 11, sets up pins 2-5 and 6 as outputs, sets up analog pins A0-A2 as inputs, initializes serial communication at 9600 baud, and sets pin 6 to a HIGH output.
- Implement the main code in the loop() function:
void loop() {
  int a = analogRead(A0);
  int b = analogRead(A1);
  int c = analogRead(A2);
  Serial.print(a);
  Serial.print("    ");
  Serial.print(b);
  Serial.print("    ");
  Serial.print(c);
  Serial.println("    ");
  delay(50);

  if (a<=250) {
    // do something
  }
  else if (b<=450) {
    // do something else
  }
  // add more conditions here as needed
}
This is the main code of the program which runs repeatedly. It reads the values from analog pins A0-A2, prints them to the serial monitor, and adds a small delay. It then checks the value of a and b and executes different code depending on their values.
- Write code for the first if statement:
if (a<=250) {
  digitalWrite(2, LOW);
  digitalWrite(3, LOW);
  digitalWrite(4, LOW);
  digitalWrite(5, LOW);
  digitalWrite(6, LOW);

  for (pos = 60; pos <= 120; pos += 1) {
    myservo.write(pos);
    delay(15);
  }
  // add more for loops as needed
}
If the value of a is less than or equal to 250, this block of code is executed. It sets pins 2-6 to a LOW output, then runs a for loop to move the servo motor back and forth between 60 and 120 degrees.
- Write code for the second if statement:
else if (b<=450) {
  digitalWrite(2, LOW);
  digitalWrite(3, LOW);
  digitalWrite(4, LOW);
  digitalWrite(5, LOW);
  digitalWrite(6, LOW);

  for (pos = 60; pos <= 120; pos += 1) {
    myservo.write(pos);
    delay(15);
  }
  // add more for loops as needed
}
8. The first section uses a for loop to rotate a servo motor back and forth between 0 and 180 degrees, in steps of 1 degree. This operation is repeated three times, with a delay of 15ms between each step.
for (pos = 60; pos <= 120; pos += 1) {
    myservo.write(pos);
    delay(15);
  }
  for (pos = 120; pos >= 60; pos -= 1) {
    myservo.write(pos);
    delay(15);
  }
  // Repeat the above two for loops two more times
9. The next section contains a conditional statement that checks if a certain variable a is less than or equal to 250. If this condition is true, the program sets the digital output pins 2, 3, 4, and 5 to LOW and also sets the servo motor to rotate back and forth as before.
if (a <= 250) {
  digitalWrite(2, LOW);
  digitalWrite(3, LOW);
  digitalWrite(4, LOW);
  digitalWrite(5, LOW);

  for (pos = 60; pos <= 120; pos += 1) {
    myservo.write(pos);
    delay(15);
  }
  for (pos = 120; pos >= 60; pos -= 1) {
    myservo.write(pos);
    delay(15);
  }
  // Repeat the above two for loops two more times
}
10. The next section contains another conditional statement that checks if the variable a is between 251 and 700. If this condition is true, the program sets the output pins in a specific pattern and delays for 500ms.
else if (a >= 251 && a <= 700) {
  digitalWrite(6, HIGH);

  digitalWrite(2, LOW);
  digitalWrite(3, HIGH);
  digitalWrite(4, HIGH);
  digitalWrite(5, LOW);

  delay(500);

  digitalWrite(6, HIGH);

  digitalWrite(2, HIGH);
  digitalWrite(3, LOW);
  digitalWrite(4, HIGH);
  digitalWrite(5, LOW);
  delay(500);
}
11. The next section contains two conditional statements that check if b and c are within certain ranges. If these conditions are true, the program sets the output pins in a specific pattern.
else if (b >= 251 && b <= 800) {
  digitalWrite(2, LOW);
  digitalWrite(3, HIGH);
  digitalWrite(4, HIGH);
  digitalWrite(5, LOW);

  digitalWrite(6, HIGH);
}

else if (c >= 251 && c <= 800) {
  digitalWrite(2, HIGH);
  digitalWrite(3, LOW);
  digitalWrite(4, LOW);
  digitalWrite(5, HIGH);

  digitalWrite(6, HIGH);
  delay(500);
  digitalWrite(6, HIGH);

  digitalWrite(2, HIGH);
  digitalWrite(3, LOW);
  digitalWrite(4, HIGH);
  digitalWrite(5, LOW);
  delay(500);
}
12. Finally, there is an else statement that is executed if none of the previous conditions are true. This section sets the output pin 6 to HIGH, and sets the other output pins to LOW.
else {
digitalWrite(6, HIGH);

  digitalWrite(2, HIGH);
  digitalWrite(3, LOW);
  digitalWrite(4, HIGH);
  digitalWrite(5, LOW);

  }
  }
Schematic
Make connections according to the circuit diagram given below.

Installing Arduino IDE
First, you need to install Arduino IDE Software from its official website Arduino. Here is a simple step-by-step guide on “How to install Arduino IDE“.
Installing Libraries
Before you start uploading a code, download and unzip the following libraries at /Program Files(x86)/Arduino/Libraries (default), in order to use the sensor with the Arduino board. Here is a simple step-by-step guide on “How to Add Libraries in Arduino IDE“.
Code
Now copy the following code and upload it to Arduino IDE Software.
#include <Servo.h>

Servo myservo;  // create servo object to control a servo
// twelve servo objects can be created on most boards
int pos = 0;
void setup() {
  // put your setup code here, to run once:
 myservo.attach(11);
pinMode(2, OUTPUT);
pinMode(3, OUTPUT);
pinMode(4, OUTPUT);
pinMode(5, OUTPUT);
pinMode(6, OUTPUT);
pinMode(A0, INPUT);
pinMode(A1, INPUT);
pinMode(A2, INPUT);
Serial.begin(9600);
digitalWrite(6, HIGH);
}
void loop() {
  // put your main code here, to run repeatedly:

int a = analogRead(A0);
int b = analogRead(A1);
int c = analogRead(A2);
Serial.print(a);
Serial.print("    ");
Serial.print(b);
Serial.print("    ");
Serial.print(c);
Serial.println("    ");
delay(50);

if (a<=250)

{
  digitalWrite(2, LOW);
  digitalWrite(3, LOW);
  digitalWrite(4, LOW);
  digitalWrite(5, LOW);

  digitalWrite(6, LOW);

  for (pos = 60; pos <= 120; pos += 1) { // goes from 0 degrees to 180 degrees
    // in steps of 1 degree
    myservo.write(pos);              // tell servo to go to position in variable 'pos'
    delay(15);                       // waits 15 ms for the servo to reach the position
  }
  for (pos = 120; pos >= 60; pos -= 1) { // goes from 180 degrees to 0 degrees
    myservo.write(pos);              // tell servo to go to position in variable 'pos'
    delay(15);                       // waits 15 ms for the servo to reach the position
  }
  //delay(200);

  }
  else if(b<=450)
{
digitalWrite(2, LOW);
  digitalWrite(3, LOW);
  digitalWrite(4, LOW);
  digitalWrite(5, LOW);

  digitalWrite(6, LOW);
for (pos = 60; pos <= 120; pos += 1) { // goes from 0 degrees to 180 degrees
    // in steps of 1 degree
    myservo.write(pos);              // tell servo to go to position in variable 'pos'
    delay(15);                       // waits 15 ms for the servo to reach the position
  }
  for (pos = 120; pos >= 60; pos -= 1) { // goes from 180 degrees to 0 degrees
    myservo.write(pos);              // tell servo to go to position in variable 'pos'
    delay(15);                       // waits 15 ms for the servo to reach the position
  }
  for (pos = 60; pos <= 120; pos += 1) { // goes from 0 degrees to 180 degrees
    // in steps of 1 degree
    myservo.write(pos);              // tell servo to go to position in variable 'pos'
    delay(15);                       // waits 15 ms for the servo to reach the position
  }
  for (pos = 120; pos >= 60; pos -= 1) { // goes from 180 degrees to 0 degrees
    myservo.write(pos);              // tell servo to go to position in variable 'pos'
    delay(15);                       // waits 15 ms for the servo to reach the position
  }

  }
  else if(c<=250)
{
digitalWrite(2, LOW);
  digitalWrite(3, LOW);
  digitalWrite(4, LOW);
  digitalWrite(5, LOW);
  digitalWrite(6, LOW);
for (pos = 60; pos <= 120; pos += 1) { // goes from 0 degrees to 180 degrees
    // in steps of 1 degree
    myservo.write(pos);              // tell servo to go to position in variable 'pos'
    delay(15);                       // waits 15 ms for the servo to reach the position
  }
  for (pos = 120; pos >= 60; pos -= 1) { // goes from 180 degrees to 0 degrees
    myservo.write(pos);              // tell servo to go to position in variable 'pos'
    delay(15);                       // waits 15 ms for the servo to reach the position
  }
  for (pos = 60; pos <= 120; pos += 1) { // goes from 0 degrees to 180 degrees
    // in steps of 1 degree
    myservo.write(pos);              // tell servo to go to position in variable 'pos'
    delay(15);                       // waits 15 ms for the servo to reach the position
  }
  for (pos = 120; pos >= 60; pos -= 1) { // goes from 180 degrees to 0 degrees
    myservo.write(pos);              // tell servo to go to position in variable 'pos'
    delay(15);                       // waits 15 ms for the servo to reach the position
  }
  for (pos = 60; pos <= 120; pos += 1) { // goes from 0 degrees to 180 degrees
    // in steps of 1 degree
    myservo.write(pos);              // tell servo to go to position in variable 'pos'
    delay(15);                       // waits 15 ms for the servo to reach the position
  }
  for (pos = 120; pos >= 60; pos -= 1) { // goes from 180 degrees to 0 degrees
    myservo.write(pos);              // tell servo to go to position in variable 'pos'
    delay(15);                       // waits 15 ms for the servo to reach the position
  }
  }
else if(a>=251 && a<=700)

{
 digitalWrite(6, HIGH);

digitalWrite(2, LOW);
  digitalWrite(3,HIGH);
  digitalWrite(4, HIGH);
  digitalWrite(5, LOW);

  delay(500);
  digitalWrite(6, HIGH);

digitalWrite(2, HIGH);
  digitalWrite(3, LOW);
  digitalWrite(4, HIGH);
  digitalWrite(5, LOW);
  delay(500);
  }
else if(b>=251 && b<=800)
{
digitalWrite(2, LOW);
  digitalWrite(3,HIGH);
  digitalWrite(4, HIGH);
  digitalWrite(5, LOW);
  digitalWrite(6, HIGH);
  }
else if(c>=251 && c<=800)
{
  digitalWrite(2, HIGH);
  digitalWrite(3, LOW);
  digitalWrite(4, LOW);
  digitalWrite(5, HIGH);

  digitalWrite(6, HIGH);
delay(500);
  digitalWrite(6, HIGH);

digitalWrite(2, HIGH);
  digitalWrite(3, LOW);
  digitalWrite(4, HIGH);
  digitalWrite(5, LOW);
  delay(500);
  }
else
{
digitalWrite(6, HIGH);
digitalWrite(2, HIGH);
  digitalWrite(3, LOW);
  digitalWrite(4, HIGH);
  digitalWrite(5, LOW);
  }
}
Working Explanation
The code uses the Servo library to create a myservo object that is used to control a servo motor. The pos variable is used to hold the position of the servo motor.
In the setup() function, the attach() method is used to attach the servo motor to pin 11 of the Arduino board. Additionally, digital pins 2, 3, 4, 5, and 6 are set as output pins, and analog pins A0, A1, and A2 are set as input pins. The serial communication is initiated with a baud rate of 9600, and pin 6 is set high. In the loop() function, the analog values of pins A0, A1, and A2 are read using the analogRead() function and stored in the variables a, b, and c, respectively. These values are then printed to the serial monitor.
If the value of a is less than or equal to 250, the digital output pins 2, 3, 4, and 5 are set low, and the digital output pin 6 is set low. The servo motor is then moved in a pattern of going from 60 degrees to 120 degrees in steps of 1 degree, then going back to 60 degrees from 120 degrees in steps of 1 degree, and repeating this pattern three times. If the value of b is less than or equal to 450, the same pattern of movement is executed for the servo motor, and the same digital output pins are set low.
Applications
- Firefighting operations in hazardous areas
- Industrial fire prevention and control
- Rescue missions in disaster-prone areas
- Military applications for combating fire outbreaks in combat zones