Overview
The precise and accurate control of servo motors is an important aspect of electronics and instrumentation. Having absolute control over the operations of a servo motor allows an engineer to correctly adjust process control procedures, allowing for more robust control. Combining this with the IoT communication protocols offered by the ESP platform allows anybody to get a comprehensive foothold in the world of process automation. In today’s tutorial, we will go over controlling an SG50 servo motor using a pushbutton and an ESP32-WROOM microcontroller.
What is a Servo Motor?
A servo motor is a type of electromechanical device that is widely used in various applications to control the position, speed, and acceleration of mechanical components. It’s designed to provide precise control over the rotation angle of the output shaft. Servo motors find applications in domains such as robotics, automation, aerospace, etc.
Hardware Components
you’ll need the following hardware components to get started:
| Components | Value / Model | Qty |
|---|---|---|
| ESP32 | – | 1 |
| Servo Motor | – | 1 |
| Button | – | 1 |
| Power Adapter | 5V | 1 |
| DC Power Jack | – | 1 |
| Breadboard | – | 1 |
| Jumper Wires | – | 1 |
| DC Power for ESP32 | – | 1 |
Steps-by-Step Guide
(1) Setting up Arduino IDE
Download Arduino IDE Software from its official site. Here is a step-by-step guide on “How to install Arduino IDE“.
(2) ESP32 in Arduino IDE
There’s an add-on that allows you to program the ESP32 using the Arduino IDE. Here is a step-by-step guide on “How to Install ESP32 on Arduino IDE“.
(3) Include Libraries
Before you start uploading a code, download and unzip the Servo.h, ezButton.h library at /Program Files(x86)/Arduino/Libraries (default). Here is a step-by-step guide on “How to Add Libraries in Arduino IDE“.
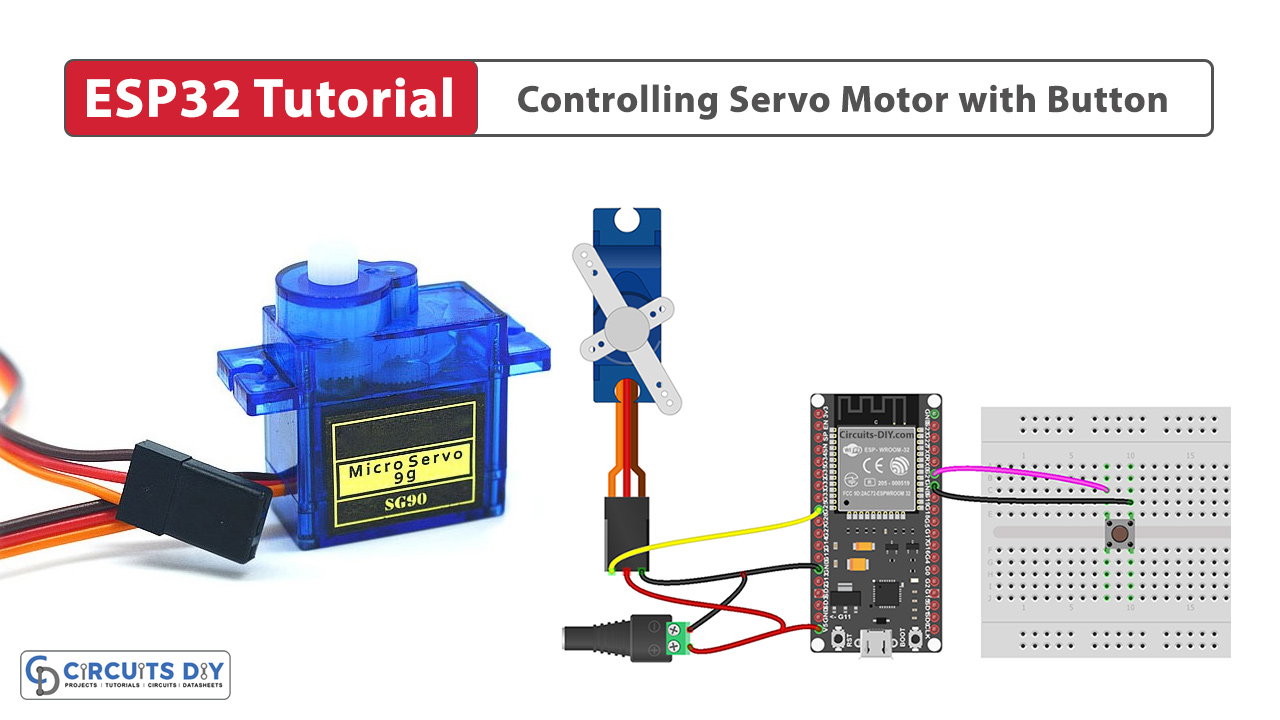
(4) Schematic
Make connections according to the circuit diagram given below.
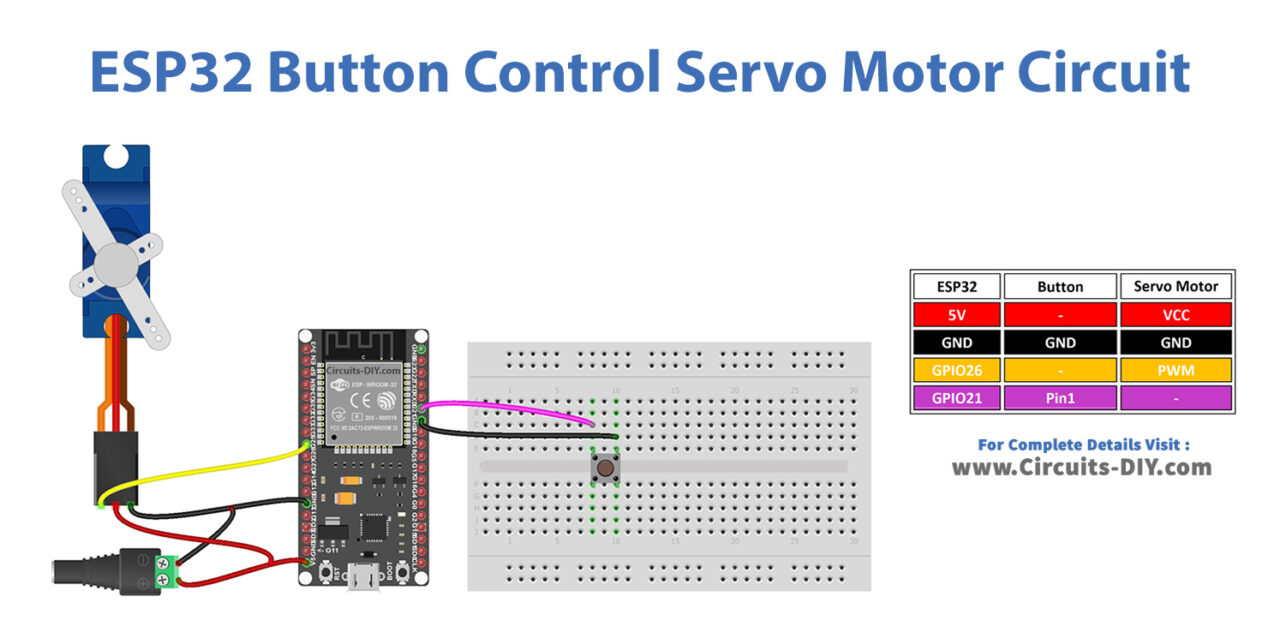
Wiring / Connections
| ESP32 | Button | Servo Motor |
|---|---|---|
| 5V | VCC | |
| GND | GND | GND |
| GIOP21 | Pin 1 | |
| GIOP26 | PWM |
(5) Uploading Code
Now copy the following code and upload it to Arduino IDE Software.
#include <Servo.h>
#include <ezButton.h>

#define BUTTON_PIN 21 // ESP32 pin GIOP21 connected to button's pin
#define SERVO_PIN  26 // ESP32 pin GIOP26 connected to servo motor's pin

ezButton button(BUTTON_PIN); // create ezButton object that attach to pin 7;
Servo servo;                 // create servo object to control a servo

// variables will change:
int angle = 0; // the current angle of servo motor

void setup() {
  Serial.begin(9600);         // initialize serial
  button.setDebounceTime(50); // set debounce time to 50 milliseconds
  servo.attach(SERVO_PIN);    // attaches the servo on pin 9 to the servo object

  servo.write(angle);
}

void loop() {
  button.loop(); // MUST call the loop() function first

  if (button.isPressed()) {
    // change angle of servo motor
    if (angle == 0)
      angle = 90;
    else if (angle == 90)
      angle = 0;

    // control servo motor arccoding to the angle
    Serial.print("The button is pressed => rotate servo to ");
    Serial.print(angle);
    Serial.println("°");
    servo.write(angle);
  }
}

