Introduction
Interfacing a DS3231 Real-Time Clock (RTC) module with an Arduino UNO is a common way to add accurate timekeeping to a project. An RTC module can provide a constant reference to the current date and time, even in the event of power outages or interruptions, which can be critical for applications such as data logging or precise scheduling. By interfacing the DS3231 RTC module with an Arduino UNO, developers can create projects with accurate timekeeping functionality, such as alarm clocks, data loggers, and many other time-based applications.
The DS3231 is a low-cost, extremely accurate I2C real-time clock (RTC) module. It is capable of keeping time with an accuracy of ±2 ppm (parts per million) which translates to an error of only a few seconds per year. The DS3231 module features a built-in temperature-compensated crystal oscillator (TCXO), which ensures that the clock’s accuracy is not affected by temperature changes. The module also includes a small rechargeable battery, which keeps the RTC running even when the main power supply is turned off.
Hardware Components
You will require the following hardware for Interfacing RTC with Arduino.
| S.no | Component | Value | Qty |
|---|---|---|---|
| 1. | Arduino UNO | – | 1 |
| 2. | USB Cable Type A to B | – | 1 |
| 3. | Real-Time Clock Module | DS3231 | 1 |
| 4. | Battery | CR2032 | 1 |
| 5. | Power Adapter for Arduino | 9V | 1 |
| 6. | Jumper Wires | – | 1 |
Steps Interfacing RTC with Arduino UNO
- Include the RTClib library and create an instance of the RTC_DS3231 class:
#include <RTClib.h>
RTC_DS3231 rtc;
- Create an array to hold the days of the week in string format:
char daysOfTheWeek[7][12] = {
  "Sunday",
  "Monday",
  "Tuesday",
  "Wednesday",
  "Thursday",
  "Friday",
  "Saturday"
};
- In the
setup()function, initialize the serial communication and RTC module:
void setup() {
  Serial.begin(9600);

  if (!rtc.begin()) {
    Serial.println("Couldn't find RTC");
    Serial.flush();
    while (1);
  }

  rtc.adjust(DateTime(F(__DATE__), F(__TIME__)));
}
- The
begin()function of the RTC module initializes communication with the RTC module over the I2C bus. If the RTC module is not detected, the program prints an error message and enters an infinite loop. - The
adjust()function sets the RTC’s date and time to the current date and time on the PC at the time the code was compiled. - In the
loop()function, read the current date and time from the RTC module and print it to the serial monitor in a human-readable format:
void loop() {
  DateTime now = rtc.now();
  Serial.print("Date & Time: ");
  Serial.print(now.year(), DEC);
  Serial.print('/');
  Serial.print(now.month(), DEC);
  Serial.print('/');
  Serial.print(now.day(), DEC);
  Serial.print(" (");
  Serial.print(daysOfTheWeek[now.dayOfTheWeek()]);
  Serial.print(") ");
  Serial.print(now.hour(), DEC);
  Serial.print(':');
  Serial.print(now.minute(), DEC);
  Serial.print(':');
  Serial.println(now.second(), DEC);

  delay(1000);
}
- The
now()function of the RTC module returns the current date and time as aDateTimeobject. - The current date and time are printed to the serial monitor in a human-readable format, including the day of the week.
- The
delay()function is called to wait for 1 second before repeating the loop. This ensures that the output is not flooded with too much data too quickly.
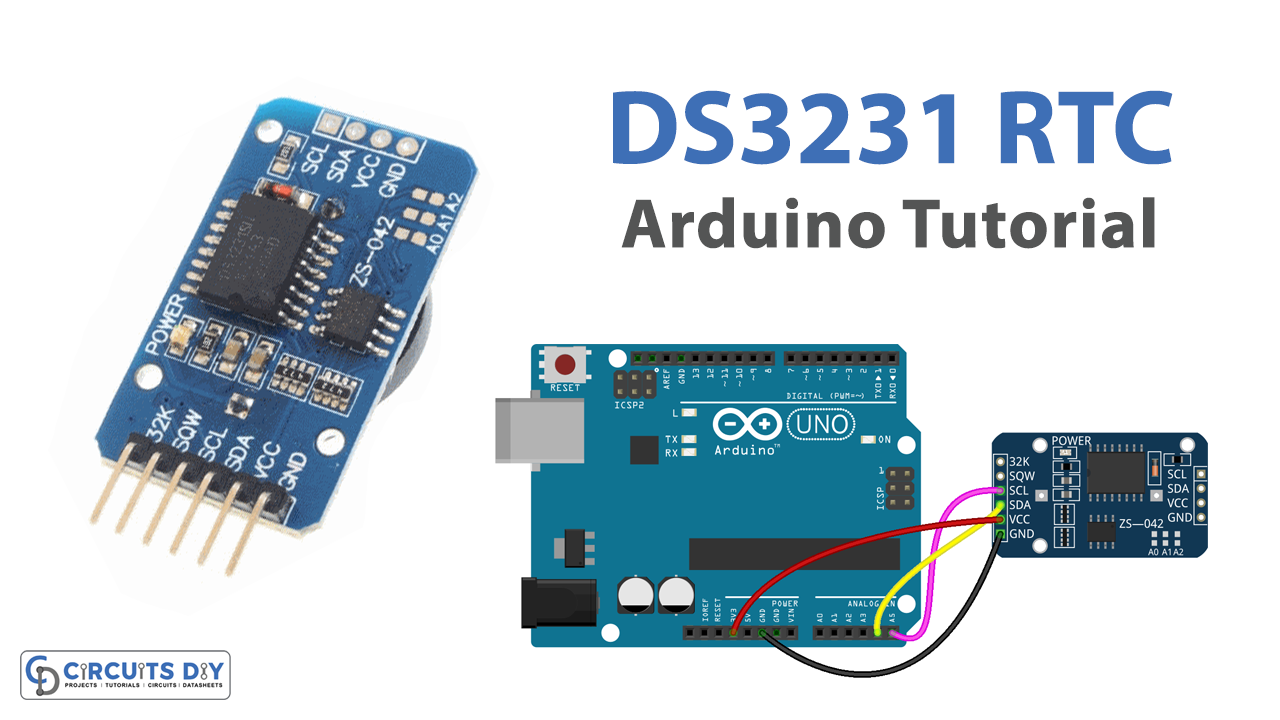
Schematic
Make connections according to the circuit diagram given below.

Wiring / Connections
| Arduino | RTC MODULE |
|---|---|
| 3V3 | VCC |
| GND | GND |
| A4 | SDA |
| A5 | SCL |
Installing Arduino IDE
First, you need to install Arduino IDE Software from its official website Arduino. Here is a simple step-by-step guide on “How to install Arduino IDE“.
Installing Libraries
Before you start uploading a code, download and unzip the following libraries at /Progam Files(x86)/Arduino/Libraries (default), in order to use the sensor with the Arduino board. Here is a simple step-by-step guide on “How to Add Libraries in Arduino IDE“.
Code
Now copy the following code and upload it to Arduino IDE Software.
#include <RTClib.h>

RTC_DS3231 rtc;
char daysOfTheWeek[7][12] = {
  "Sunday",
  "Monday",
  "Tuesday",
  "Wednesday",
  "Thursday",
  "Friday",
  "Saturday"
};

void setup () {
  Serial.begin(9600);

  // SETUP RTC MODULE
  if (! rtc.begin()) {
    Serial.println("Couldn't find RTC");
    Serial.flush();
    while (1);
  }

  // automatically sets the RTC to the date & time on PC this sketch was compiled
  rtc.adjust(DateTime(F(__DATE__), F(__TIME__)));

  // manually sets the RTC with an explicit date & time, for example to set
  // January 21, 2021 at 3am you would call:
  // rtc.adjust(DateTime(2021, 1, 21, 3, 0, 0));
}

void loop () {
  DateTime now = rtc.now();
  Serial.print("Date & Time: ");
  Serial.print(now.year(), DEC);
  Serial.print('/');
  Serial.print(now.month(), DEC);
  Serial.print('/');
  Serial.print(now.day(), DEC);
  Serial.print(" (");
  Serial.print(daysOfTheWeek[now.dayOfTheWeek()]);
  Serial.print(") ");
  Serial.print(now.hour(), DEC);
  Serial.print(':');
  Serial.print(now.minute(), DEC);
  Serial.print(':');
  Serial.println(now.second(), DEC);

  delay(1000); // delay 1 seconds
}
Working Explanation
The setup function initializes the Serial Monitor, checks if the RTC module is connected, and sets the RTC to the current date and time on the PC using the DATE and TIME macros. Alternatively, the RTC can be set manually by uncommenting the rtc.adjust line and entering the desired date and time.
The loop function retrieves the current date and time from the RTC using the rtc.now() function and prints it on the Serial Monitor in the format “Date & Time: yyyy/mm/dd (Day of the week) hh:mm:ss”. The delay function is used to wait for 1 second before retrieving the next reading from the RTC.
Applications
- Data loggers
- Timers
- Alarms
- Home automation systems
- Industrial automation systems
- Robotics
- Remote weather stations
Conclusion.
We hope you have found this RTC Circuit very useful. If you feel any difficulty in making it feel free to ask anything in the comment section.