Introduction
Interfacing a DS1307 Real-Time Clock (RTC) Module with an Arduino Uno is a technical procedure that enables the use of a compact and reliable RTC module with an Arduino board. This procedure can be very useful for individuals or organizations that require precise and accurate timing functionality in their Arduino projects. With the DS1307 RTC Module, users can have access to real-time clock and calendar information that can be used for a wide range of applications such as time-based control systems, automated data logging, and alarm systems.
The DS1307 is a real-time clock (RTC) module that uses I2C communication to interface with microcontrollers. The module is designed to provide accurate timekeeping for devices such as microcontrollers or single-board computers. The DS1307 has a built-in 56-byte non-volatile RAM and an oscillator that maintains timekeeping accuracy even when the module is not powered. The module has the ability to store time and date information in BCD format, and it can be programmed to generate interrupts at specified times.
Hardware Components
You will require the following hardware for DS1307 RTC Module with Arduino.
| S.no | Component | Value | Qty |
|---|---|---|---|
| 1. | Arduino UNO | – | 1 |
| 2. | USB Cable Type A to B | – | 1 |
| 3. | Real-Time Clock Module | DS1307 | 1 |
| 4. | Battery | CR2032 | 1 |
| 5. | Power Adapter for Arduino | 9V | 1 |
| 6. | Jumper Wires | – | 1 |
DS1307 RTC Module with Arduino
- Include the RTClib library:
#include <RTClib.h>
The RTClib library is used to access the functions of the RTC module.
- Create an object for RTC_DS1307:
RTC_DS1307 rtc;
This line creates an instance of the RTC_DS1307 class and names it rtc.
- Define an array of days of the week:
char daysOfTheWeek[7][12] = {
  "Sunday",
  "Monday",
  "Tuesday",
  "Wednesday",
  "Thursday",
  "Friday",
  "Saturday"
};
This array holds the names of the seven days of the week.
- In the
setupfunction, initialize the serial monitor, begin communication with the RTC module, and set the time to the time the code was compiled:
void setup () {
  Serial.begin(9600);

  // SETUP RTC MODULE
  if (! rtc.begin()) {
    Serial.println("Couldn't find RTC");
    Serial.flush();
    while (1);
  }

  // automatically sets the RTC to the date & time on PC this sketch was compiled
  rtc.adjust(DateTime(F(__DATE__), F(__TIME__)));
}
- In the
loopfunction, get the current time and date from the RTC module, and display it in the serial monitor:
void loop () {
  DateTime now = rtc.now();
  Serial.print("Date & Time: ");
  Serial.print(now.year(), DEC);
  Serial.print('/');
  Serial.print(now.month(), DEC);
  Serial.print('/');
  Serial.print(now.day(), DEC);
  Serial.print(" (");
  Serial.print(daysOfTheWeek[now.dayOfTheWeek()]);
  Serial.print(") ");
  Serial.print(now.hour(), DEC);
  Serial.print(':');
  Serial.print(now.minute(), DEC);
  Serial.print(':');
  Serial.println(now.second(), DEC);

  delay(1000); // delay 1 seconds
}
The DateTime now = rtc.now(); line gets the current time and date from the RTC module and stores it in the now object. Then, it prints the time and date in the serial monitor using the Serial.print() function. Finally, the code waits for 1 second using the delay() function, and the process repeats.
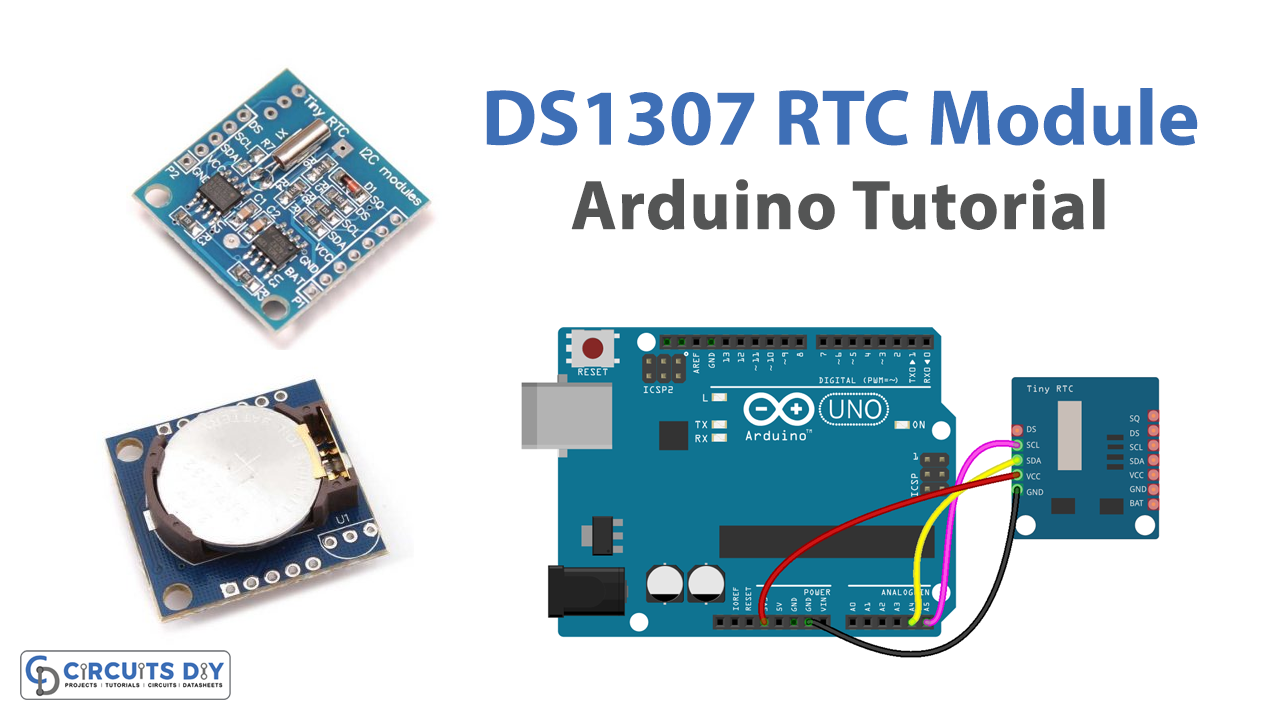
Schematic
Make connections according to the circuit diagram given below.

Wiring / Connections
| Arduino | Sensor |
|---|---|
| 3V3 | VCC |
| GND | GND |
| A4 | SDA |
| A5 | SCL |
Installing Arduino IDE
First, you need to install Arduino IDE Software from its official website Arduino. Here is a simple step-by-step guide on “How to install Arduino IDE“.
Installing Libraries
Before you start uploading a code, download and unzip the following libraries at /Progam Files(x86)/Arduino/Libraries (default), in order to use the sensor with the Arduino board. Here is a simple step-by-step guide on “How to Add Libraries in Arduino IDE“.
Code
Now copy the following code and upload it to Arduino IDE Software.
#include <RTClib.h>

RTC_DS1307 rtc;

char daysOfTheWeek[7][12] = {
  "Sunday",
  "Monday",
  "Tuesday",
  "Wednesday",
  "Thursday",
  "Friday",
  "Saturday"
};

void setup () {
  Serial.begin(9600);

  // SETUP RTC MODULE
  if (! rtc.begin()) {
    Serial.println("Couldn't find RTC");
    Serial.flush();
    while (1);
  }

  // automatically sets the RTC to the date & time on PC this sketch was compiled
  rtc.adjust(DateTime(F(__DATE__), F(__TIME__)));

  // manually sets the RTC with an explicit date & time, for example to set
  // January 21, 2021 at 3am you would call:
  // rtc.adjust(DateTime(2021, 1, 21, 3, 0, 0));
}

void loop () {
  DateTime now = rtc.now();
  Serial.print("Date & Time: ");
  Serial.print(now.year(), DEC);
  Serial.print('/');
  Serial.print(now.month(), DEC);
  Serial.print('/');
  Serial.print(now.day(), DEC);
  Serial.print(" (");
  Serial.print(daysOfTheWeek[now.dayOfTheWeek()]);
  Serial.print(") ");
  Serial.print(now.hour(), DEC);
  Serial.print(':');
  Serial.print(now.minute(), DEC);
  Serial.print(':');
  Serial.println(now.second(), DEC);

  delay(1000); // delay 1 seconds
}
Working Explanation
The setup() function begins by starting serial communication with a baud rate of 9600. It then checks whether the RTC module is connected by calling rtc.begin(). If the module is not found, an error message is printed to the serial monitor. The RTC module’s date and time are then set using the rtc.adjust() method. In this example, the date and time are set to the date and time on the computer at the time of compiling the sketch.
The loop() function runs continuously, reading the current date and time from the RTC module using the rtc.now() method. The date and time are printed to the serial monitor in a formatted string that includes the date, day of the week, and time. The function then waits for 1 second using the delay() function.
Applications
- Time-based data logging
- Accurate time-stamping of events
- Real-time monitoring and control systems
- Digital clocks and calendars
- Timed switching of devices
Conclusion.
We hope you have found this DS1307 RTC Module Circuit very useful. If you feel any difficulty in making it feel free to ask anything in the comment section.