Introduction
Security alarms are no longer a great deal to employ. Everyone now uses alarm systems for their home, office, or workplace; because everyone is aware of rising crimes. One of those devices includes door alarms; which is the main topic of this article’s discussion. Because, in this article, we will make a Door Alarm With Ultrasonic Sensor
Door alarms are among the most effective safety systems. It can be a highly useful home security device and warns you if anybody opens or attempts to access your house’s doors. Hence, door alarms are an essential component of a comprehensive home security system.
What is Door Alarm Sensor
Door alarms are a simple kind of home security device. They are often tiny, wireless sensors that you may install next to the doors in your home, office, workplace, etc. A single main door alarm placed near the entrance door is enough to alert you.
Hardware Components
You will require the following hardware for the Door Alarm.
| S.no | Component | Value | Qty |
|---|---|---|---|
| 1. | Arduino UNO | – | 1 |
| 2. | Ultrasonic Sensor | HC-SR04 | 1 |
| 3. | Buzzer | – | 1 |
| 4. | Breadboard | – | 1 |
| 5. | Jumper Wires | – | 1 |
Steps for Making a Door Alarm
In the making of a Door Alarm With an Ultrasonic Sensor, you only need some simple electronic components alongside Arduino. Once you get them, follow the given steps:
Schematic
Make connections according to the circuit diagram given below.
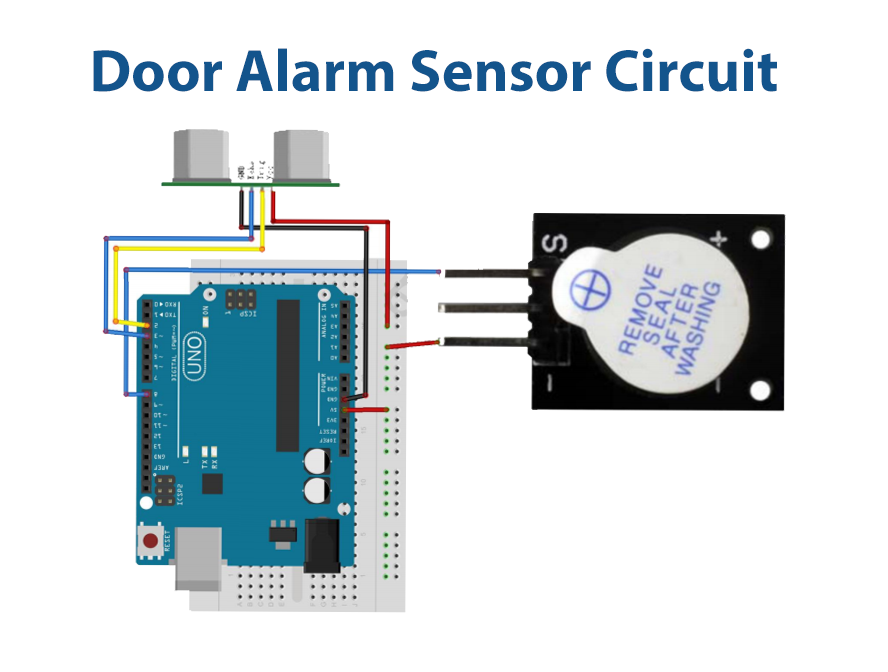
Wiring / Connections
| Arduino | Sensor | Buzzer |
|---|---|---|
| 5V | VCC | Positive |
| GND | GND | |
| D2 | Trig | |
| D3 | Echo | |
| D8 | Negative |
Installing Arduino IDE
First, you need to install Arduino IDE Software from its official website Arduino. Here is a simple step-by-step guide on “How to install Arduino IDE“.
Code
Now copy the following code and upload it to Arduino IDE Software.
const int TrigPin = 2;
const int EchoPin = 3;
const int Data = 8;
float cm;
void setup()
{
  Serial.begin(9600);
  pinMode(TrigPin, OUTPUT);
  pinMode(EchoPin, INPUT);
  pinMode(Data,OUTPUT);
}
void loop()
{
  digitalWrite(TrigPin, LOW);
  delayMicroseconds(2);
  digitalWrite(TrigPin, HIGH);
  delayMicroseconds(10);
  digitalWrite(TrigPin, LOW);
  cm = pulseIn(EchoPin, HIGH) / 58.0; //The echo time is converted into cm
  cm = (int(cm * 100.0)) / 100.0;     //Keep two decimal places
  Serial.println();
  if(cm<15){ //if you are puting the sensor behind the door use ">" sysmbole insted of ">" p.s. make sure tat the door nob is less than 15 cm away
      digitalWrite(Data,HIGH);
      delay(200);
      Serial.print("Door closed");
    }
    else
    {
      digitalWrite(Data,LOW);
      delay(200);
      Serial.print("Door open");
    }
  delay(200);
}
Let’s Test It
It’s time to put the circuit to the test. Start up the Arduino for this. If something enters the circuit’s 15 cm range, you would notice it. An alert message would appear on the serial monitor.
Working Explanation
Let’s examine the coding to comprehend how the circuit operates:
- Firstly, we define three variables:
- The first one describes the Arduino’s digital pin that is connected with a trig pin of the sensor.
- The second describes the Arduino pin that is connected to the echo pin of the sonar sensor
- The third describes the Arduino pin that will provide an output
- we initialize the serial monitor by specifying the baud rate and the declare the status of the pins of the Arduino; i.e, input or output
- We then make the trig pin low for some seconds and then make it high for some seconds. We use the function digitalWrite for that purpose. We then calculate the cm. Once we get the cm, we then give the condition. If the cm is less than 15, the data pin goes high and the serial monitor would print “Door closed”. Otherwise, the data pin does low, and the serial monitor shows the message “Door open”. We then give some delay to get the next readings.
Applications
- Home and office automation systems
Conclusion.
We hope you have found this Door Alarm With Ultrasonic Sensor Circuit very useful. If you feel any difficulty in making it feel free to ask anything in the comment section.