Introduction
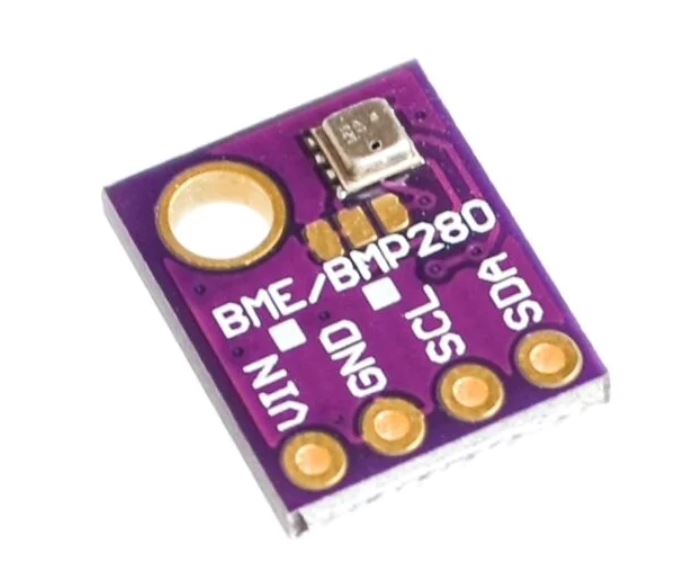
BME280 is a sensor module that packs a punch with its ability to measure temperature, humidity, and pressure in one compact package. This versatile device is perfect for various applications, from weather monitoring to HVAC control. With its high precision and accuracy, you can trust that the data it provides is reliable and accurate.
Using the BME280 with an Arduino microcontroller opens up a world of possibilities. The Arduino’s ability to read and interpret the sensor’s data allows you to create interactive projects that respond efficiently to environmental changes. You could build a weather station that displays the current temperature, humidity, and pressure on an LCD screen or even create an intelligent greenhouse that automatically adjusts humidity and temperature based on the BME280’s readings.
What is BME280 Temperature Sensor?
The BME280 is a little humidity sensor with minimal power requirements, making it ideal for portable apps and wearable tech use. The unit’s low current consumption, long-term stability, and strong EMC resilience make it a practical choice for many applications.
Hardware Components
You will require the following hardware for BME280 Temperature, Humidity, and Pressure Sensor Module with Arduino.
| S.no | Component | Value | Qty |
|---|---|---|---|
| 1. | Arduino UNO | – | 1 |
| 2. | Temperature Sensor | BME280 | 1 |
| 3. | Breadboard | – | 1 |
| 4. | Jumper Wires | – | 1 |
BME280 with Arduino
Now that you understand what the BME280 sensor is, it’s time to interface it with Arduino. So, follow the given steps:
Schematic
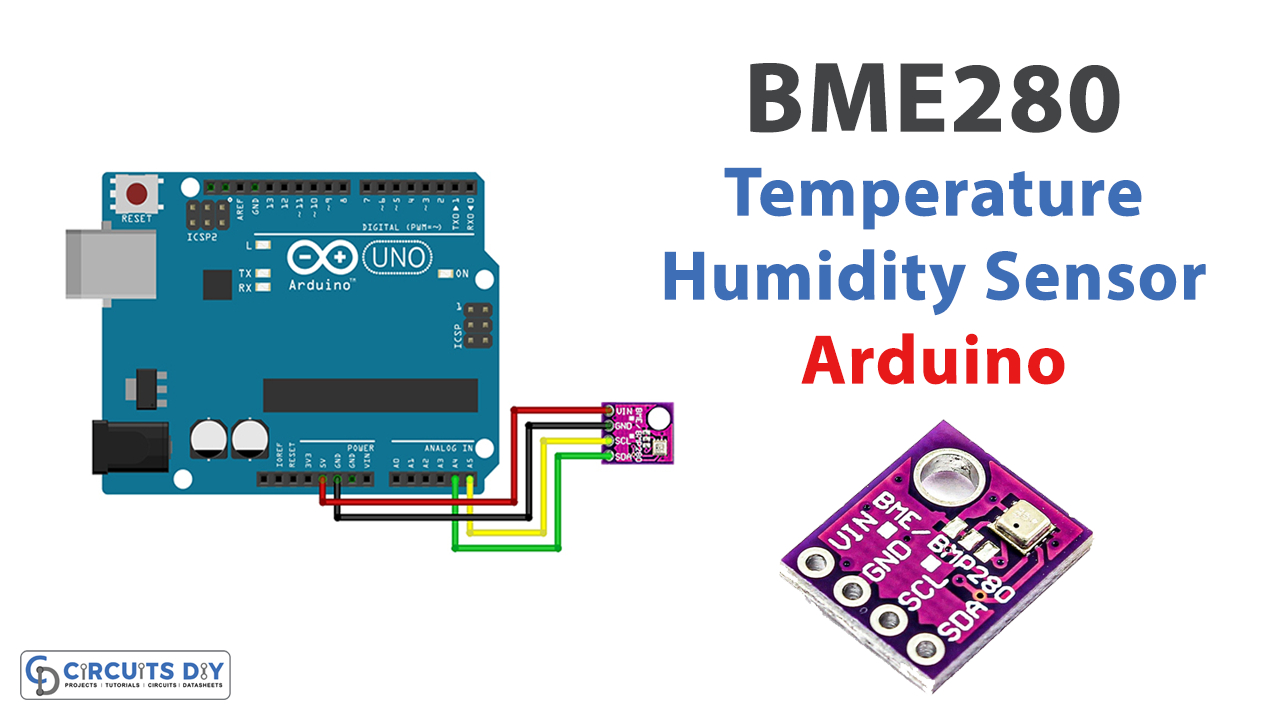
Make connections according to the circuit diagram given below.
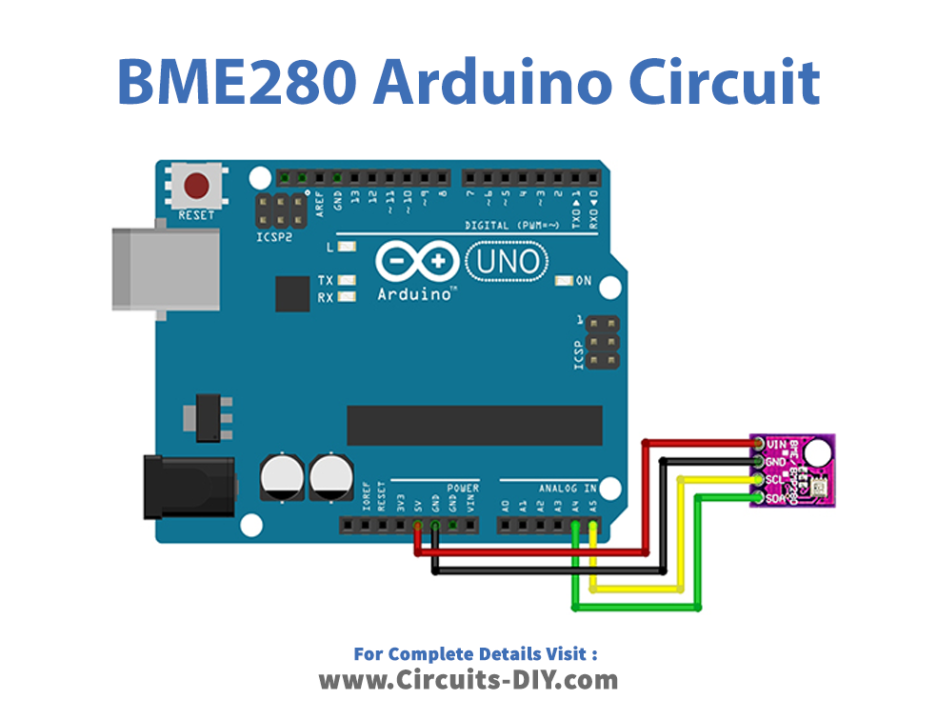
Wiring / Connections
| Arduino | Temperature Sensor |
|---|---|
| 5V | VCC |
| GND | GND |
| A4 | SDA |
| A5 | SCL |
Installing Arduino IDE
First, you need to install Arduino IDE Software from its official website Arduino. Here is a simple step-by-step guide on “How to install Arduino IDE“.
Installing Libraries
Before you start uploading a code, download and unzip the following libraries at /Progam Files(x86)/Arduino/Libraries (default), in order to use the sensor with the Arduino board. Here is a simple step-by-step guide on “How to Add Libraries in Arduino IDE“.
Code
Now copy the following code and upload it to Arduino IDE Software.
#include <Wire.h>
#include <Adafruit_Sensor.h>
#include <Adafruit_BME280.h>

#define SEALEVELPRESSURE_HPA (1013.25)

Adafruit_BME280 bme;

void setup() {
  Serial.begin(9600);

  if (!bme.begin(0x76)) {
    Serial.println("Could not find a valid BME280 sensor, check wiring!");
    while(1);
  }
}

void loop() {
  Serial.print("Temperature = ");
  Serial.print(bme.readTemperature());
  Serial.write("\xC2\xB0");   //The Degree symbol
  Serial.print("C");

  Serial.print("\t Pressure = ");
  Serial.print(bme.readPressure() / 100.0F);
  Serial.print("hPa");

  Serial.print("\t Altitude = ");
  Serial.print(bme.readAltitude(SEALEVELPRESSURE_HPA));
  Serial.print("m");

  Serial.print("\t Humidity = ");
  Serial.print(bme.readHumidity());
  Serial.println("%");

  Serial.println();
  delay(1000);
}
Let’s Test It
Upload the code to the Arduino. Open the Serial Monitor and check that the sensor is found and the values of temperature, pressure, altitude, and humidity are being printed every second
Working Explanation
Let’s dive into the code to understand the working:
- First, the code includes the necessary libraries “Wire.h”, “Adafruit_Sensor.h” and “Adafruit_BME280.h” which are required for communication between the sensor and the Arduino.
- The void setup function starts the serial communication with a baud rate of 9600 and checks whether the sensor is working correctly. If the sensor is not found, it will send an error message, and the code will stop executing.
- The void loop function reads the sensor’s temperature, pressure, altitude, and humidity and prints it on the serial monitor. The readTemperature() function returns the temperature in Celsius, and the readPressure() function returns the pressure in hPa. The readAltitude() function calculates the altitude from the pressure and a known sea-level pressure and returns it in meters. The readHumidity() function returns the humidity in percentage.
Applications
- Weather stations
- Weather Monitoring, etc
Conclusion.
We hope you have found this BME280 Temperature, Humidity and Pressure Sensor Module with Arduino Circuit very useful. If you feel any difficulty in making it feel free to ask anything in the comment section.


