Introduction
Automatic Gate Opening using Arduino UNO, HC SR04, and a servo motor is an innovative project that makes use of advanced technology to automate the opening and closing of gates. With this system, you can eliminate the need for manual gate operations and make your life easier. The system uses an ultrasonic sensor to measure the distance of an object from the sensor and uses a servo motor to open and close the gate based on the distance measurement.
By implementing this system, you can improve the security of your property and reduce the risk of unauthorized access. Additionally, this project is a great way to learn about Arduino programming and working with electronic components, making it an ideal project for beginners and enthusiasts alike.
Hardware Components
You will require the following hardware for the Automatic Gate Opener Circuit.
| Components | Value | Qty |
|---|---|---|
| Arduino UNO | – | 1 |
| Ultrasonic Sensor | HC-SR04 | 1 |
| Servo motor | – | 1 |
| NPN Transistor | – | 1 |
| Potentiometer | – | 1 |
| LCD | 16×2 | 1 |
| Resistor | Ω | 2 |
| Breadboard | – | 1 |
| Jumper Wires | – | 1 |
Code Explanation
Step 1: Include the Servo library
#include <Servo.h>The Servo library is needed to control the servo motor.
Step 2: Define the Servo object
Servo servoMain;This creates a Servo object called “servoMain” that will be used to control the servo motor.
Step 3: Define the trigger and echo pins for the ultrasonic sensor
int trigpin = 10;
int echopin = 11;
These variables define the trigger and echo pins for the ultrasonic sensor.
Step 4: Define variables for distance, duration, and cm
int distance;
float duration;
float cm;
These variables will be used to store the distance measurement from the ultrasonic sensor.
Step 5: Initialize the servo motor in the setup function
void setup()
{
   servoMain.attach(9); // servo on digital pin 9
   pinMode(trigpin, OUTPUT);
   pinMode(echopin, INPUT);
}
The servoMain.attach(9) line initializes the servo motor on digital pin 9. The pinMode(trigpin, OUTPUT) line sets the trigger pin as an output, and the pinMode(echopin, INPUT) line sets the echo pin as an input.
Step 6: Read the distance from the ultrasonic sensor in the loop function
void loop()
{
  digitalWrite(trigpin, LOW);
  delay(2);
  digitalWrite(trigpin, HIGH);
  delayMicroseconds(10);
  digitalWrite(trigpin, LOW);
  duration = pulseIn(echopin, HIGH);
  cm = (duration/58.82);
  distance = cm;
}
The ultrasonic sensor is triggered by setting the trigger pin to low for 2 microseconds, then high for 10 microseconds, and then low again. The pulseIn(echopin, HIGH) function measures the duration of the pulse from the echo pin when it goes high. The duration is then converted into distance in centimeters using the formula cm = (duration/58.82), which assumes a speed of sound of 343 meters per second.
Step 7: Control the servo motor based on the distance measurement
if(distance<60)
{
  servoMain.write(180);
  delay(3000);
}
else{
  servoMain.write(0);
  delay(50);
}
If the distance is less than 60 centimeters, the servo motor rotates to the 180-degree position for 3 seconds using servoMain.write(180) and then returns to the 90-degree position. If the distance is greater than or equal to 60 centimeters, the servo motor rotates to the 0-degree position for 50 milliseconds using servoMain.write(0) and then returns to the 90-degree position.
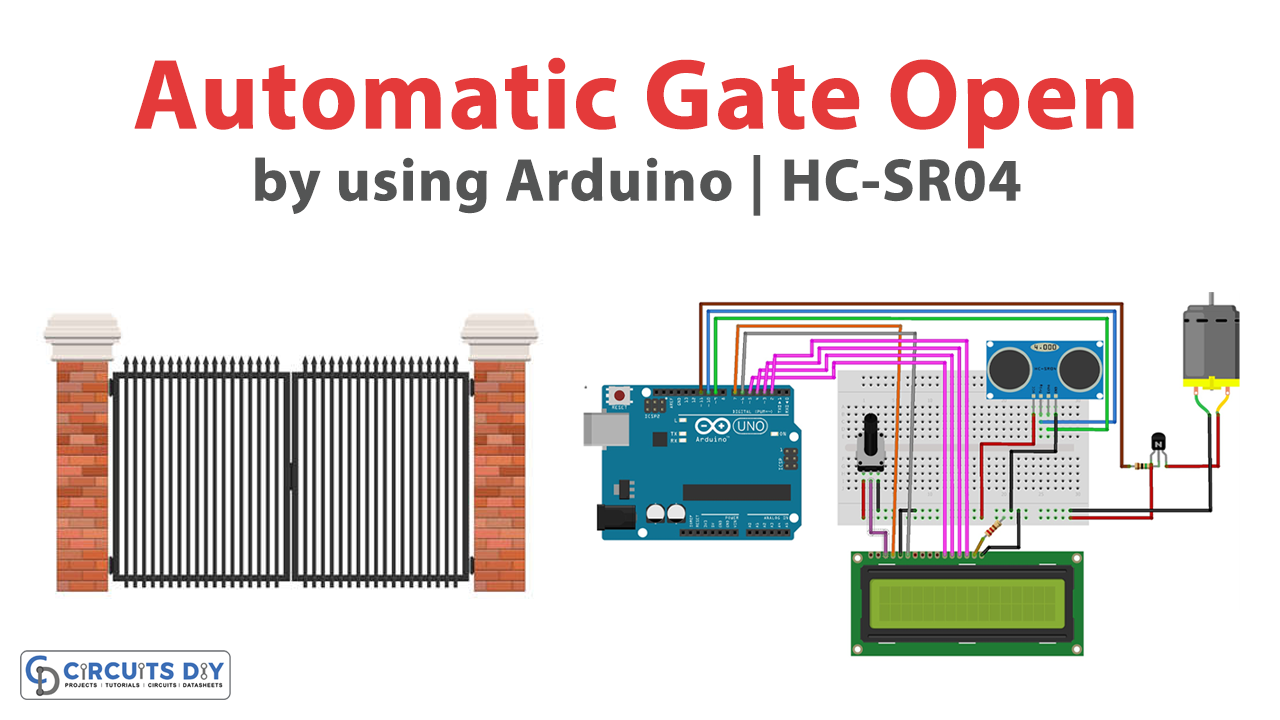
Schematic
Make connections according to the circuit diagram given below.

Installing Arduino IDE
First, you need to install Arduino IDE Software from its official website Arduino. Here is a simple step-by-step guide on “How to install Arduino IDE“.
Installing Libraries
Before you start uploading a code, download and unzip the following libraries at /Program Files(x86)/Arduino/Libraries (default), in order to use the sensor with the Arduino board. Here is a simple step-by-step guide on “How to Add Libraries in Arduino IDE“.
Code
Now copy the following code and upload it to Arduino IDE Software.
#include <Servo.h>
Servo servoMain; // Define our Servo
int trigpin = 10;
int echopin = 11;
int distance;
float duration;
float cm;

void setup()
{
   servoMain.attach(9); // servo on digital pin 10
    pinMode(trigpin, OUTPUT);
    pinMode(echopin, INPUT);
}

void loop()
{
  digitalWrite(trigpin, LOW);
  delay(2);
  digitalWrite(trigpin, HIGH);
  delayMicroseconds(10);
  digitalWrite(trigpin, LOW);
  duration = pulseIn(echopin, HIGH);
  cm = (duration/58.82);
  distance = cm;

  if(distance<60)
  {
    servoMain.write(180);  // Turn Servo back to center position (90 degrees)
   delay(3000);
  }
   else{
     servoMain.write(0);
     delay(50);
   }

}
Working Explanation
In the setup() function, the servo is initialized on digital pin 9 and the trigger and echo pins for the ultrasonic sensor are set as output and input respectively. In the loop() function, the ultrasonic sensor is triggered by setting the trigger pin to low for 2 microseconds, then high for 10 microseconds, and then low again. The duration of the pulse from the echo pin is then measured using the pulseIn() function and converted into distance in centimeters.
If the distance is less than 60 centimeters, the servo motor rotates to the 180-degree position for 3 seconds. Otherwise, the servo motor rotates to the 0-degree position for 50 milliseconds.
Applications
- Residential Security
- Industrial automation
- Parking lots
- Hospitals
- Public transportation