As water is a basic need for living things, conserving water as well as its proper maintenance is very important. Here we have used a rain sensor to detect the rain so that we can take some proper actions to conserve the water. Consequently, we can enhance the underground water levels through a recharge technique used underwater. This article will help you, with how to interface rain sensors with Arduino. It is a very simple project as reading the analog signal from a sensor with just one code like “analogRead“. But the applications of this project have the widest possibilities.
The rain sensors available in different size and categories depends on the sensing area and comparator module. So many online vendors are selling it at a reasonable cost. This kind of sensor works like a switch, it includes two parts like sensing pad and a sensor module. Whenever rain falls on the surface of a sensing pad (it uses FR-04 high-quality double-side materials for widest sensing) then the sensor module reads the data from the sensor pad to process and convert it into an analog or digital output. So the output generated by this sensor is analog (AO) and digital (DO). It uses an LM393 low-voltage comparator with an output driving ability of over 15mA. The operating voltage of this module varies between 3.3 volts to 5 Volts, the best approach is to give 5 V from Arduino power pins.
Hardware Required
| S.no | Component | Value | Qty |
|---|---|---|---|
| 1. | Rain Sensor Module | LM393 | 1 |
| 2. | Buzzer | – | 1 |
| 3. | Arduino Uno | – | 1 |
| 4. | Connecting Wires | – | – |
Circuit Diagram
Working Explanation
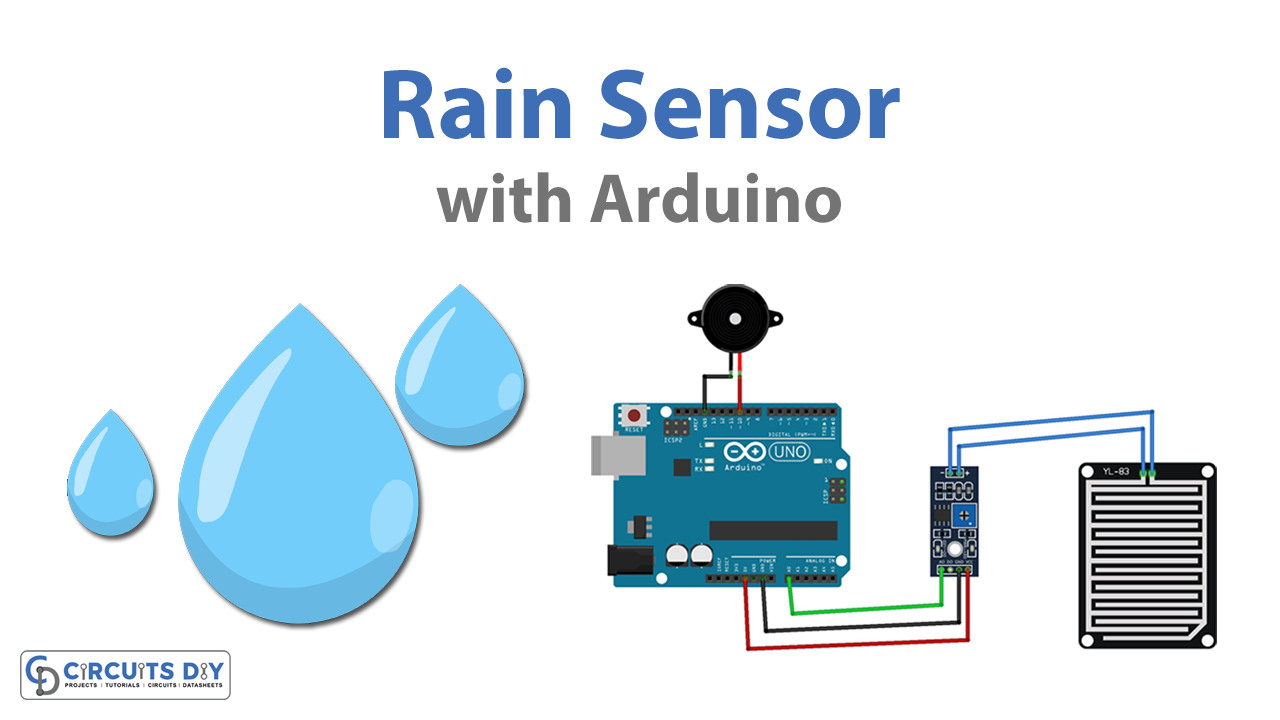
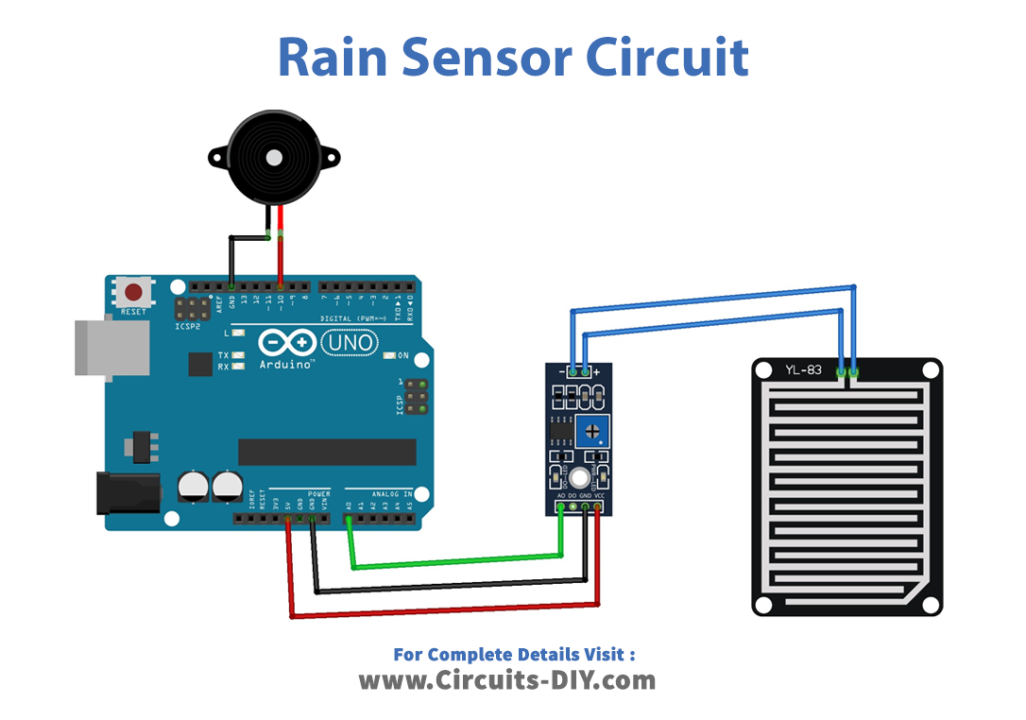
As shown in the hookup image, the rain sensor analog output terminal is connected to Arduino (A0) pin, and the output is taken from digital pin D10. The 5V and GND power sources are applied to the sensor module. The rain sensor module includes a sensing pad that includes two series of copper tracks coated with nickel. This pad includes two header pins which are connected internally to the copper tracks of the pad. The main function of these two header pins is for connecting the Sensing Pad with the rain sensor module with the help of two jumper wires. Here, the rain sensor module’s one pin provides a +5v power supply toward the one path of the sensing pad, whereas the other pin gets the return power from another path of the pad. Generally in dry situations, this pad gives huge resistance as well as less conductive. So, the voltage supply cannot be supplied from one path to another path. Here resistance mainly depends on the quantity of water on the sensing pad surface. Once water falls on the surface of the sensor pad, then its resistance will be reduced & conductivity will be enhanced. So, once the amount of water increases on the surface of the pad then it can supply huge power from one path to another.
Now when the rain falls the analog output varies from 5V to 0. If the sensor remains true then the output will be 5V, you can invert this output voltage range using a single transistor if you want. In this project, we used the serial monitor to just show the rain sensor reading you can introduce formulas or anything to make it more understandable.
Arduino Code for Rain Sensor
Here follow the instructions shown in the image, and connect the rain sensor and buzzer with Arduino. In this project, we took a buzzer device as an alarm output device. You can choose any output device depending on your need, for any inconvenience don’t forget to change the Arduino code as well.
/*Arduino Rain Sensor sketch*/

int rainsense= 0; // analog sensor input pin 0
int buzzerout= 10; // digital output pin 10 - buzzer output
int countval= 0; // counter value starting from 0 and goes up by 1 every second

void setup(){
   Serial.begin(9600);
   pinMode(buzzerout, OUTPUT);
   pinMode(rainsense, INPUT);
}
void loop(){
   int rainSenseReading = analogRead(rainsense);
   Serial.println(rainSenseReading); // serial monitoring message
   delay(250);// rain sensing value from 0 to 1023.
   // from heavy rain - no rain.
   if (countval >= 35){
      Serial.print("Heavy rain");
      digitalWrite(buzzerout, HIGH);  //raise an alert after x time
   }
   //raining for long duration rise buzzer sound
   // there is no rain then reset the counter value
   if (rainSenseReading <350){
      countval++; // increment count value
   }
   else if (rainSenseReading >350) { // if not raining
      digitalWrite(buzzerout, LOW); // turn off buzzer
      countval = 0; // reset count to 0
   }
   delay(1000);
}
Applications
These are essential components for the automatic systems used in the agriculture field because rainfall is detected throughout the months of irrigation.


