This practically consequential solar charger circuit utilizes to charge a pair of AA or AAA rechargeable battery cells from solar light. Moreover, the circuit utilizes to charge some other electronic devices as well to run perpetually. Appropriate charging is accomplished by placing the unit in the sun for a specified period of time. And this time duration varies by varying the battery type.
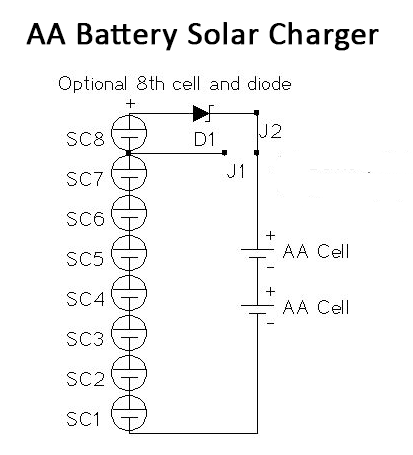
The solar charger circuit has 8 solar cells. All solar cells deliver around 0.5 volts in full daylight. These solar cells are associated with a battery.
Additionally, this solar voltage will drop to the battery voltage at around 2.4V, and the charging current starts flowing through the battery cells.
Since the solar cells are current-restricted devices. It is conceivable to utilize the circuit to charge a single AA or AAA battery cell. Furthermore, the number of solar cells can be increased or decreased as per the desired number of cells needed to charge.
Hardware Components
The following components are required to make AA Battery Solar Charger Circuit
| S.no | Components | Value | Qty |
|---|---|---|---|
| 1. | Solar Cells | – | 8 |
| 2. | Diode | 1N4002 | 1 |
| 3. | AA Battery Cells | – | 2 |
| 4. | Jumper wires | – | As per design |
AA Battery Solar Charger Circuit
Working Explanation
First of all, insert two rechargeable cells into the battery holders. Point the solar panels towards the direct sun, and let the batteries charge for a couple of hours. For fast charging, keep the solar panel focused on the sun throughout the charging cycle. However, Large battery cells will require more charging time than smaller ones. It is recommended to monitor the battery voltage during the first charge cycle to get a full charging time estimation.
It is highly emphasized, that do not let the batteries overheat. Therefore, if the charger is placed outside with the solar cells, excessive heat can destroy the cells. Thus, it is recommended to place the setup indoors. In addition, the power diode prevents the battery from discharging. And, the eighth solar cell helps to boost the voltage. This operation compensates for the voltage drop across the diode.
Moreover, connect jumper J2 and detach J1 across the 8th solar cell. And connect jumper J1 and take out SC8 and D1 for the 7th solar cell. Commonly, the jumpers are not a very crucial component in the circuit, they are just utilized in the schematic to show two different ways to assemble the circuit.In rainy and cloudy weather, connect one or two additional solar cells with the setup.
Applications and Uses
- The solar charger is used to charge solar batteries in daylight and powers the electric appliances at night.

