Introduction
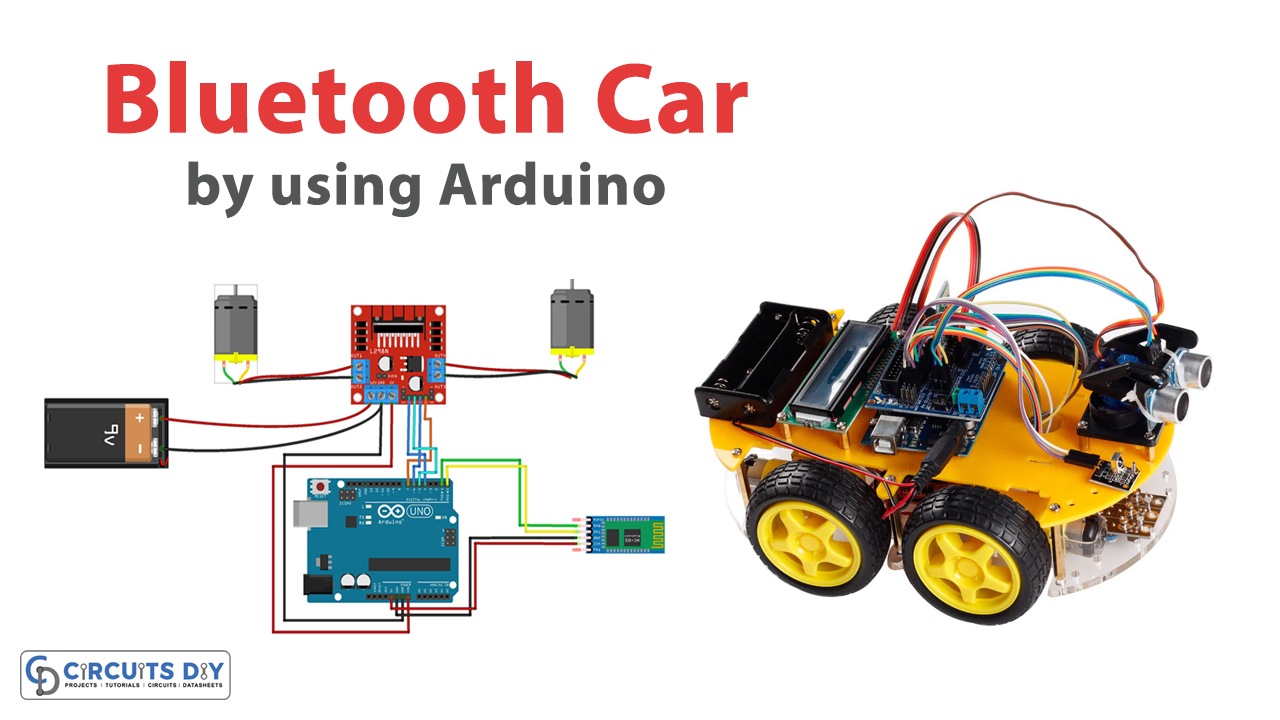
A Bluetooth-controlled car utilizing a Bluetooth module, an L298N motor driver, and an Arduino UNO is an innovative remote-controlled car that can be controlled using a smartphone or other Bluetooth-enabled device. The car can be operated remotely, making it an excellent choice for exploration, racing, or pure enjoyment.
The Arduino UNO, L298N motor driver, and Bluetooth module work in tandem to provide an adaptable and dependable platform for controlling the car’s movements, resulting in a smooth and responsive driving experience.
Hardware Components
You will require the following hardware for Arduino Bluetooth Car.
| S.no | Components | Value | Qty |
|---|---|---|---|
| 1 | Arduino UNO | – | 1 |
| 2 | Bluetooth Sensor | HC-05 | 1 |
| 3 | Motor Driver | LN298N | 1 |
| 4 | DC Motor | – | 2 |
| 5 | Battery | 9V | 1 |
| 6 | Breadboard | – | 1 |
| 7 | Jumper Wires | – | 1 |
Arduino Code
- Include the SoftwareSerial library, which allows you to create a serial communication interface on digital pins of the Arduino board.
#include <SoftwareSerial.h>
- Define the digital pins that are connected to the TX and RX pins of the Bluetooth module.
int bluetoothTx = 10;
int bluetoothRx = 11;
- Create a SoftwareSerial object to communicate with the Bluetooth module using the previously defined pins.
SoftwareSerial bluetooth(bluetoothTx, bluetoothRx);
- Define the input pins of the motor driver module.
int in1 = 4;
int in2 = 5;
int in3 = 6;
int in4 = 7;
- Define a variable
valto store the received command.
int val;
- Set up the Arduino board by setting the pin modes for the motor driver module inputs and starting serial communication with the Bluetooth module.
void setup()
{
  pinMode(in1, OUTPUT);
  pinMode(in2, OUTPUT);
  pinMode(in3, OUTPUT);
  pinMode(in4, OUTPUT);

  Serial.begin(9600);
  bluetooth.begin(9600);
}
- Continuously check for incoming Bluetooth commands using the
bluetooth.available()method. If a command is received, read it into thevalvariable.
void loop()
{
  // Check for Bluetooth commands
  while (bluetooth.available() > 0)
  {
    val = bluetooth.read();
  }

  // Motor control based on the received command
  if (val == 'F') {
    // Forward
    digitalWrite(in1, HIGH);
    digitalWrite(in2, LOW);
    digitalWrite(in3, HIGH);
    digitalWrite(in4, LOW);
  }
  else if (val == 'B') {
    // Backward
    digitalWrite(in1, LOW);
    digitalWrite(in2, HIGH);
    digitalWrite(in3, LOW);
    digitalWrite(in4, HIGH);
  }
  else if (val == 'L') {
    // Left
    digitalWrite(in1, LOW);
    digitalWrite(in2, LOW);
    digitalWrite(in3, HIGH);
    digitalWrite(in4, LOW);
  }
  else if (val == 'R') {
    // Right
    digitalWrite(in1, HIGH);
    digitalWrite(in2, LOW);
    digitalWrite(in3, LOW);
    digitalWrite(in4, LOW);
  }
  else if (val == 'S') {
    // Stop
    digitalWrite(in1, LOW);
    digitalWrite(in2, LOW);
    digitalWrite(in3, LOW);
    digitalWrite(in4, LOW);
  }
  else if (val == 'I') {
    // Forward Right
    digitalWrite(in1, HIGH);
    digitalWrite(in2, LOW);
    digitalWrite(in3, LOW);
    digitalWrite(in4, LOW);
  }
  else if (val == 'J') {
    // Backward Right
    digitalWrite(in1, LOW);
    digitalWrite(in2, LOW);
    digitalWrite(in3, LOW);
    digitalWrite(in4, HIGH);
  }
  else if (val == 'G') {
    // Forward Left
    digitalWrite(in1, LOW);
    digitalWrite(in2, LOW);
    digitalWrite(in3, HIGH);
    digitalWrite(in4, LOW);
  }
  else if (val == 'H') {
    // Backward Left
    digitalWrite(in1, LOW);
    digitalWrite(in2, HIGH);
    digitalWrite(in3, LOW);
    digitalWrite(in4, LOW);
  }
}
Schematic
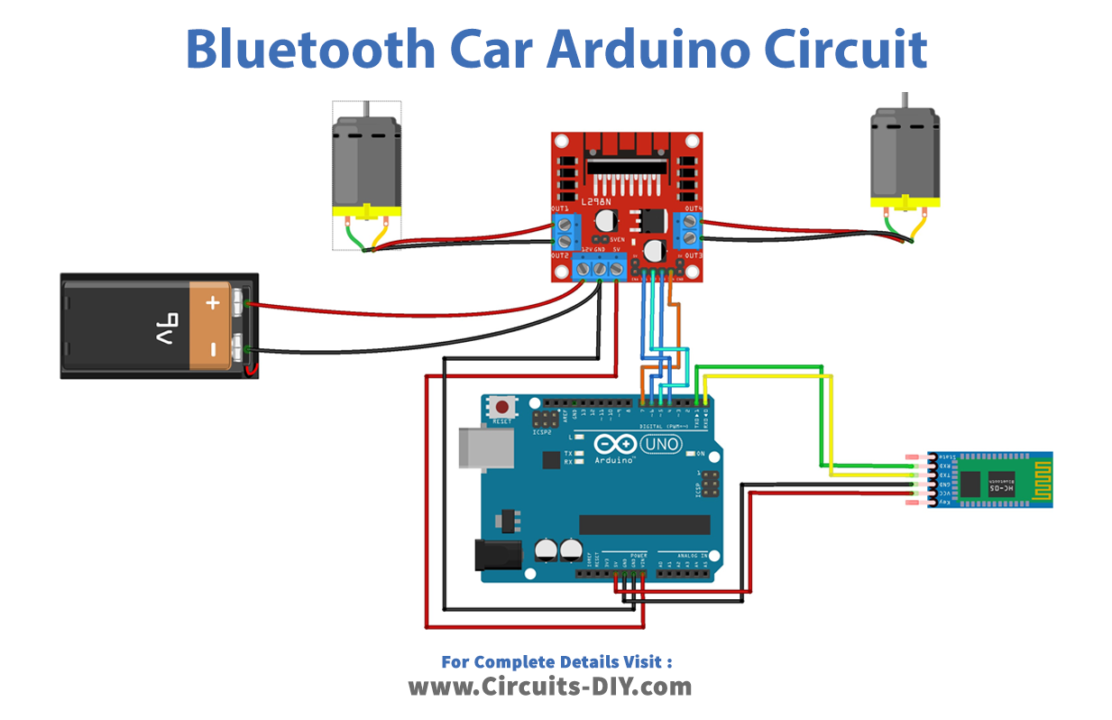
Make connections according to the circuit diagram given below.
Installing Arduino IDE
First, you need to install Arduino IDE Software from its official website Arduino. Here is a simple step-by-step guide on “How to install Arduino IDE“.
Installing Libraries
Before you start uploading a code, download and unzip the following libraries at /Progam Files(x86)/Arduino/Libraries (default), in order to use the sensor with the Arduino board. Here is a simple step-by-step guide on “How to Add Libraries in Arduino IDE“.
Code
Now copy the following code and upload it to Arduino IDE Software.
#include <SoftwareSerial.h>

// Define Bluetooth module pins
int bluetoothTx = 10;
int bluetoothRx = 11;

// Create a SoftwareSerial object to communicate with the Bluetooth module
SoftwareSerial bluetooth(bluetoothTx, bluetoothRx);

int in1 = 4;
int in2 = 5;
int in3 = 6;
int in4 = 7;
int val;

void setup()
{
  // Set up the Bluetooth module
  bluetooth.begin(9600);

  pinMode(in1, OUTPUT);
  pinMode(in2, OUTPUT);
  pinMode(in3, OUTPUT);
  pinMode(in4, OUTPUT);

  Serial.begin(9600);
}

void loop()
{
  // Check for Bluetooth commands
  while (bluetooth.available() > 0)
  {
    val = bluetooth.read();
  }

  // Control the car based on the received command
  if( val == 'F') //Forward
  {
    Serial.println("Forward");
    digitalWrite(in1, HIGH);
    digitalWrite(in2, LOW);
    digitalWrite(in3, HIGH);
    digitalWrite(in4, LOW);
  }
  else if(val == 'B') //Backward
  {
    Serial.println("Reverse");
    digitalWrite(in1, LOW);
    digitalWrite(in2, HIGH);
    digitalWrite(in3, LOW);
    digitalWrite(in4, HIGH);
  }
  else if(val == 'L') //Left
  {
    Serial.println("Turn Left");
    digitalWrite(in1, LOW);
    digitalWrite(in2, LOW);
    digitalWrite(in3, HIGH);
    digitalWrite(in4, LOW);
  }
  else if(val == 'R') //Right
  {
    Serial.println("Turn Right");
    digitalWrite(in1, HIGH);
    digitalWrite(in2, LOW);
    digitalWrite(in3, LOW);
    digitalWrite(in4, LOW);
  }
  else if(val == 'S') //Stop
  {
    Serial.println("Stop");
    digitalWrite(in1, LOW);
    digitalWrite(in2, LOW);
    digitalWrite(in3, LOW);
    digitalWrite(in4, LOW);
  }
  else if(val == 'I') //Forward Right
  {
    Serial.println("Forward Right");
    digitalWrite(in1, HIGH);
    digitalWrite(in2, LOW);
    digitalWrite(in3, LOW);
    digitalWrite(in4, LOW);
  }
  else if(val == 'J') //Backward Right
  {
    Serial.println("Backward Right");
    digitalWrite(in1, LOW);
    digitalWrite(in2, LOW);
    digitalWrite(in3, LOW);
    digitalWrite(in4, HIGH);
  }
  else if(val == 'G') //Forward Left
  {
    Serial.println("Forward Left");
    digitalWrite(in1, LOW);
    digitalWrite(in2, LOW);
    digitalWrite(in3, HIGH);
    digitalWrite(in4, LOW);
  }
  else if(val == 'H') //Backward Left
  {
    Serial.println("Backward Left");
    digitalWrite(in1, LOW);
    digitalWrite(in2, HIGH);
    digitalWrite(in3, LOW);
    digitalWrite(in4, LOW);
  }
}
Working Explanation
The code sets up the pins for the Bluetooth module and creates a SoftwareSerial object. It also sets up the pins for controlling the motors of the car. In the loop() function, the code checks for any Bluetooth commands available and stores them in the val variable. It then uses if-else statements to control the direction of the car based on the received command. The digitalWrite() function is used to set the pins for the motor in a particular direction.
For example, if the received command is ‘F’, the car moves forward by setting pin in1 and in3 to HIGH and pin in2 and in4 to LOW. Similarly, for other commands like ‘B’ (backward), ‘L’ (left), ‘R’ (right), ‘S’ (stop), ‘I’ (forward right), ‘J’ (backward right), ‘G’ (forward left), and ‘H’ (backward left), the code sets the pins accordingly to control the motor direction.
Applications
- Education
- Entertainment
- Research
- Home automation
- Surveillance
- Industrial automation
Conclusion.
We hope you have found this ABC Circuit very useful. If you feel any difficulty in making it feel free to ask anything in the comment section.

