Introduction
Power up your batteries like a pro with these Simple 12V Battery Charger Circuits with Auto Cut-off! Are you tired of dealing with dead car batteries or alarm system batteries? We bring you two easy-to-build circuits that will charge and protect your batteries from overcharging. These circuits are perfect for those who want a high-quality battery charger that is both efficient and automatic.
We are sure you’ll love these Simple 12V Battery Charger Circuits with Auto Cut-off! Say goodbye to dead batteries in your car or alarm system with these easy-to-build circuits that will charge your batteries safely and automatically. With these great circuits, you can charge your batteries and take your power supply to the next level.
Circuit 1: Simple 12V Battery Charger
Hardware Required
| S.no | Components | Value | Qty |
|---|---|---|---|
| 1 | IC | UA741 | 1 |
| 2 | Capacitor | 1000uF 25V | 1 |
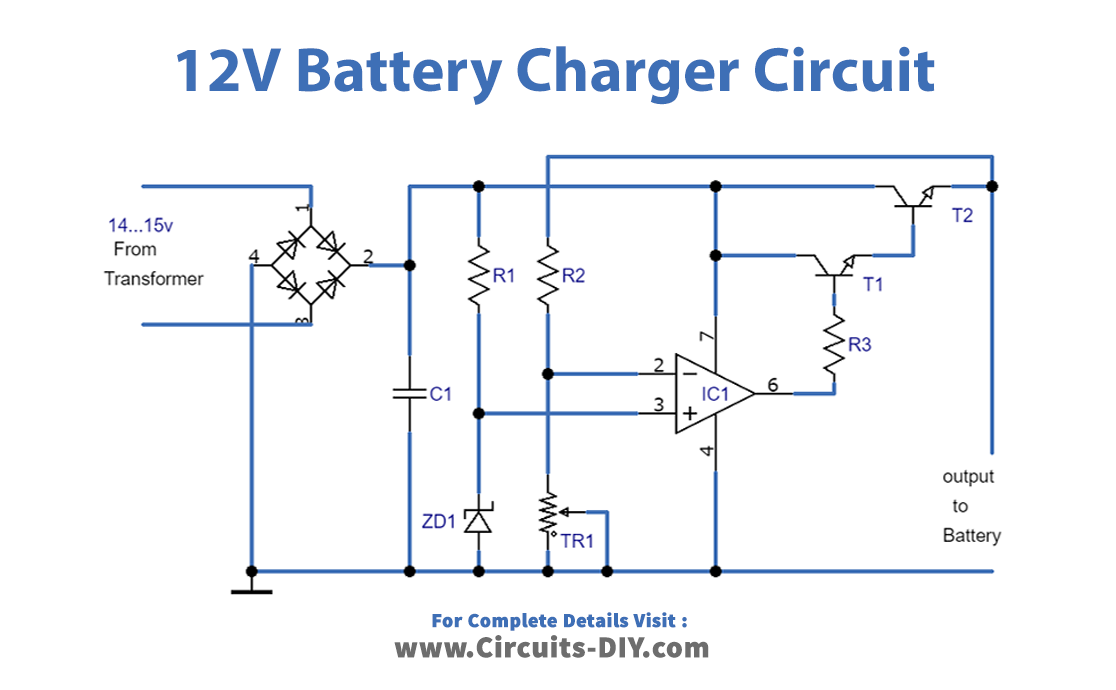
| 3 | Resistor | Rl-470 Ohms R2 = 10 K R3 = 270 Ohms | 1 1 1 |
| 4 | Zener Diode | 5.1 volts | 1 |
| 5 | V. Resistor | 10K | 1 |
| 6 | Transistor | T1 = 2N2218 T2 = 2N3055-BDW21C | 1 1 |
Circuit Diagram
Working Explanation
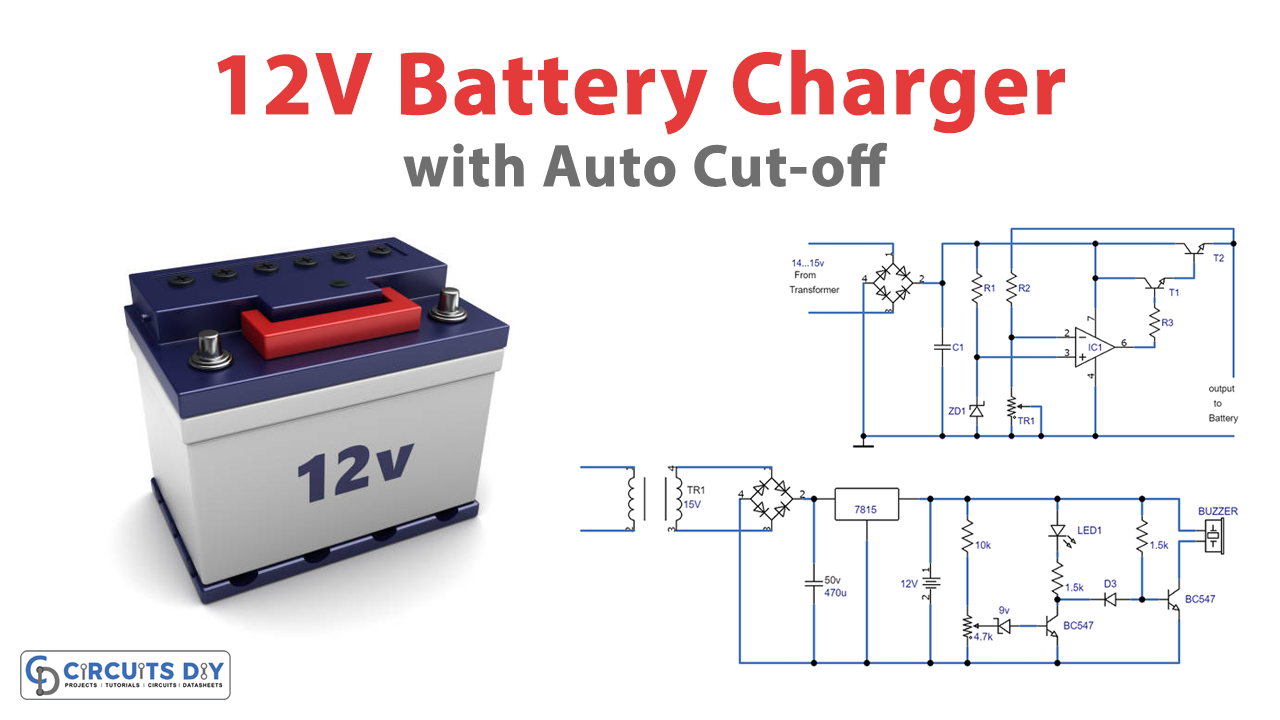
The first circuit is an automatic 12V battery charger with an auto cut-off feature that can recharge car and dry batteries used in alarm systems. The circuit is powered by a transformer with a secondary voltage of 14-15V and a current of 3A minimum. A trimmer is adjusted to achieve an output voltage of 14.4V without load. The maximum distributable current is 3A, so batteries with a capacity higher than 36Ah should not be charged.
Circuit 2: Simple 12V Battery Charger with Battery Indicator
Hardware Required
| S no | Components | Value | Qty |
|---|---|---|---|
| 1 | Voltage Regulator | LM7815 | 1 |
| 2 | Transistor | BC547P | 2 |
| 3 | Resistor | 10k, 1.5k, 100k | 1, 1, 1 |
| 4 | Diode Bridge | 1N4007 | 1 |
| 5 | Diode | 1n4148 | 1 |
| 6 | Zener Diode | 9V | 1 |
| 7 | Buzzer | – | 1 |
| 8 | V. Resistor | 4.7K | 1 |
| 9 | Capacitor | 470uF 50V | 1 |
| 10 | Transformer | 230V to 15V | 1 |
| 11 | LED | – | 1 |
| 12 | Battery | 12V | 1 |
Circuit Diagram

Working Explanation
The second circuit is a simple 12V battery charger with a battery indicator circuit. It is designed using a voltage regulator IC 7815 and two BC transistors 547 BJTs. The primary input voltage is stepped down by a transformer, rectified, and filtered before being regulated at 15V by the voltage regulator IC 7815. The battery starts charging as soon as the main power is available. The circuit has a twin indication system with a battery charging indicator and a low battery buzzer indicator. When the battery voltage falls below a certain value, the LED stops glowing, and the buzzer starts sounding to indicate that the battery is discharged and requires recharging.
Final Thoughts
In conclusion, these Simple 12V Battery Charger Circuits with Auto Cut-off are an excellent choice for anyone who needs a reliable and efficient battery charger. The circuits are easy to build and come with clear instructions and a parts list, so you can start building right away.
So, go ahead and try them out for yourself, and see how they can make your life easier and your projects more efficient!

