Introduction
Push buttons, also known as momentary switches, are widely used in various electronic projects to provide input to a microcontroller. In many cases, it is necessary to distinguish between a short press and a long press of a push button. For example, a short press may trigger one action, while a long press may trigger another.
In this tutorial, we will learn how to identify and distinguish between a short press and a long press of a pushbutton using an Arduino Uno. We will use the millis() function to track the amount of time the button is pressed, and compare it to a predefined threshold value.
Hardware Components
You will require the following hardware.
| S.no | Component | Value | Qty |
|---|---|---|---|
| 1. | Arduino UNO | – | 1 |
| 2. | USB Cable Type A to B | – | 1 |
| 3. | Button | – | 1 |
| 4. | Power Adapter for Arduino | 9V | 1 |
| 5. | Breadboard | – | 1 |
| 6. | Jumper Wires | – | 1 |
Button Long Short Press with Arduino
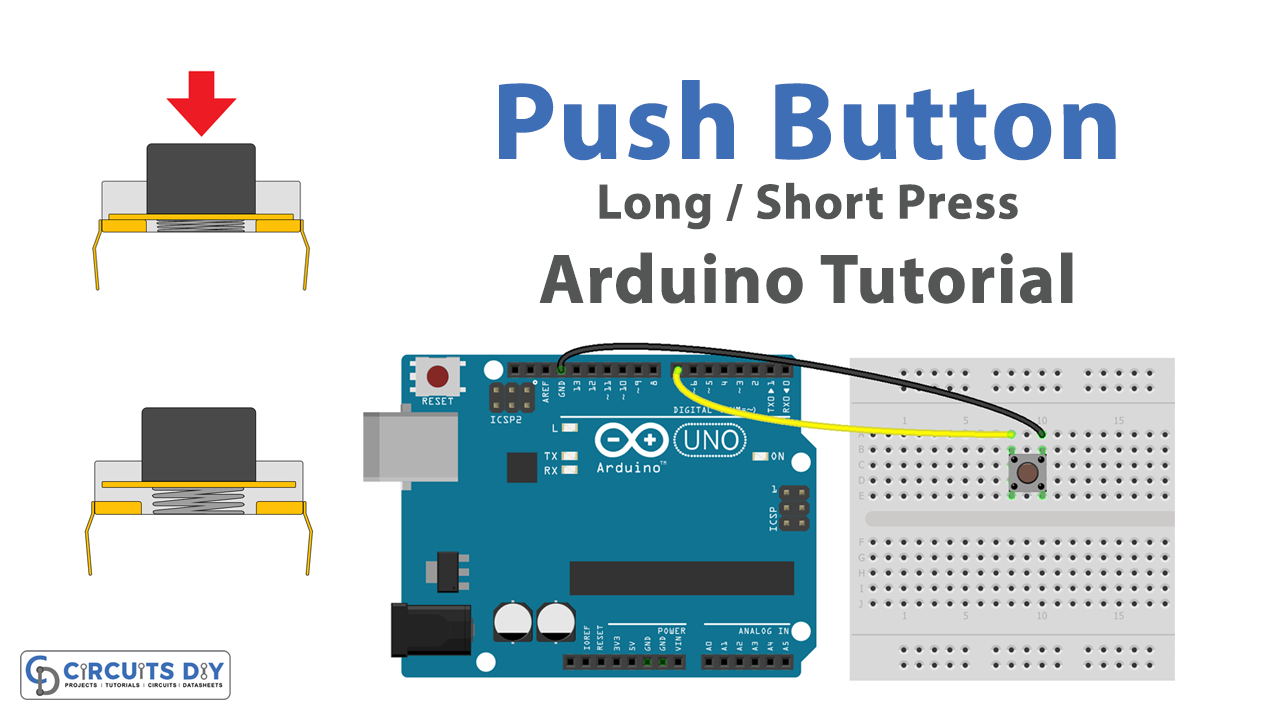
- Connect a pushbutton to digital pin 2 and GND on the Arduino board.
const int buttonPin = 2;
pinMode(buttonPin, INPUT);
In this step, we are connecting a pushbutton to digital pin 2 of the Arduino board. We also set the buttonPin as an INPUT pin using the pinMode() function.
- In the setup() function, initialize the digital pin as an input and start the serial communication:
void setup() {
  pinMode(buttonPin, INPUT);
  Serial.begin(9600);
}
In this step, we are initializing the buttonPin as an INPUT using the pinMode() function. We are also starting the serial communication using the Serial.begin() function with 9600 as the baud rate.
- In the loop() function, use the millis() function to keep track of the time when the button is pressed and released:
unsigned long buttonPressTime;
bool buttonState;

void loop() {
  buttonState = digitalRead(buttonPin);
  if (buttonState == LOW) {
    buttonPressTime = millis();
    while(digitalRead(buttonPin) == LOW);
    if (millis() - buttonPressTime > 1000) {
      Serial.println("Long press detected");
    } else {
      Serial.println("Short press detected");
    }
  }
}
In this step, we are using the millis() function to keep track of the time when the button is pressed and released. We are storing the current time in the buttonPressTime variable when the button is pressed. We are using the while loop to wait until the button is released. After the button is released, we are checking the difference between the current time and the button press time using the millis() function. If the difference is greater than 1000 milliseconds, we are printing “Long press detected” to the serial monitor using the Serial.println() function. Otherwise, we are printing “Short press detected” to the serial monitor.
4. Upload the code to the Arduino board
- Open the serial monitor to see the button press status.
Serial.begin(9600);Schematic
Make connections according to the circuit diagram given below.

Wiring / Connections
| Arduino | Button |
|---|---|
| D7 | One End |
| GND | GND |
Installing Arduino IDE
First, you need to install Arduino IDE Software from its official website Arduino. Here is a simple step-by-step guide on “How to install Arduino IDE“.
Code
Now copy the following code and upload it to Arduino IDE Software.
Arduino Code for detecting the short press
const int BUTTON_PIN = 7; // the number of the pushbutton pin
const int SHORT_PRESS_TIME = 500; // 500 milliseconds

// Variables will change:
int lastState = LOW;  // the previous state from the input pin
int currentState;     // the current reading from the input pin
unsigned long pressedTime  = 0;
unsigned long releasedTime = 0;


void setup() {
  Serial.begin(9600);
  pinMode(BUTTON_PIN, INPUT_PULLUP);
}

void loop() {
  // read the state of the switch/button:
  currentState = digitalRead(BUTTON_PIN);

  if(lastState == HIGH && currentState == LOW)        // button is pressed
    pressedTime = millis();
  else if(lastState == LOW && currentState == HIGH) { // button is released
    releasedTime = millis();

    long pressDuration = releasedTime - pressedTime;

    if( pressDuration < SHORT_PRESS_TIME )
      Serial.println("A short press is detected");
  }

  // save the the last state
  lastState = currentState;
}
Arduino Code for detecting long press when released
const int BUTTON_PIN = 7; // the number of the pushbutton pin
const int LONG_PRESS_TIME  = 1000; // 1000 milliseconds

// Variables will change:
int lastState = LOW;  // the previous state from the input pin
int currentState;     // the current reading from the input pin
unsigned long pressedTime  = 0;
unsigned long releasedTime = 0;


void setup() {
  Serial.begin(9600);
  pinMode(BUTTON_PIN, INPUT_PULLUP);
}

void loop() {
  // read the state of the switch/button:
  currentState = digitalRead(BUTTON_PIN);

  if(lastState == HIGH && currentState == LOW)        // button is pressed
    pressedTime = millis();
  else if(lastState == LOW && currentState == HIGH) { // button is released
    releasedTime = millis();

    long pressDuration = releasedTime - pressedTime;

    if( pressDuration > LONG_PRESS_TIME )
      Serial.println("A long press is detected");
  }

  // save the the last state
  lastState = currentState;
}
Arduino Code for detecting long press during pressing
const int BUTTON_PIN = 7; // the number of the pushbutton pin
const int LONG_PRESS_TIME  = 1000; // 1000 milliseconds

// Variables will change:
int lastState = LOW;  // the previous state from the input pin
int currentState;     // the current reading from the input pin
unsigned long pressedTime  = 0;
bool isPressing = false;
bool isLongDetected = false;

void setup() {
  Serial.begin(9600);
  pinMode(BUTTON_PIN, INPUT_PULLUP);
}

void loop() {
  // read the state of the switch/button:
  currentState = digitalRead(BUTTON_PIN);

  if(lastState == HIGH && currentState == LOW) {        // button is pressed
    pressedTime = millis();
    isPressing = true;
    isLongDetected = false;
  } else if(lastState == LOW && currentState == HIGH) { // button is released
    isPressing = false;
  }

  if(isPressing == true && isLongDetected == false) {
    long pressDuration = millis() - pressedTime;

    if( pressDuration > LONG_PRESS_TIME ) {
      Serial.println("A long press is detected");
      isLongDetected = true;
    }
  }

  // save the the last state
  lastState = currentState;
}
Working Explanation
In the setup() function, pin 2 is set as an input using the pinMode(buttonPin, INPUT) function. This means that pin 2 will be used to read the state of the button. Serial communication is also initialized using the Serial.begin(9600) function.
In the loop() function, the state of the button is checked using the digitalRead(buttonPin) function. If the button is pressed, the code checks whether this is the first time the button is pressed. If it is, it stores the time of the button press using the millis() function in the buttonPressStart variable and updates the buttonPressed variable to true. If the button is not pressed, it checks whether this is the first time the button is released. If it is, it calculates the time elapsed since the button press using the millis() function and the buttonPressStart variable. If the time elapsed is greater than the threshold, it prints “Long press detected” on the serial monitor, otherwise it prints “Short press detected” on the serial monitor.
Applications
- Brightness control
- Remote control
- Debugging
- Combination lock
- Gaming
- Alarm systems
- Robotics
- Access control
- Industrial automation
- Automotive
- Home automation
- Medical equipment
Conclusion.
We hope you have found this tutorial very useful. If you feel any difficulty in making it feel free to ask anything in the comment section.

