Introduction
Radar technology is a fascinating field that allows us to detect and track objects at a distance. One popular application of radar is in motion sensors, which can detect the presence of people or vehicles and trigger an action, such as turning on a light or activating an alarm. The HW-M10 Microwave Radar Motion Sensor Module is a compact and affordable device that can be easily interfaced with an Arduino microcontroller, making it an excellent choice for many projects.
This article will explore setting up and using the HW-M10 Microwave Radar Motion Sensor Module with an Arduino. We will cover the basic principles of radar technology, how to connect the module to the Arduino, and how to write a simple sketch to detect motion and trigger an action. Whether you are a beginner just getting started with Arduino or an experienced maker looking for a new project, this guide will provide you with all the information you need to get started. So, let’s dive in and start building!
What is Radar Motion Sensor?
Radar sensors are devices that take microwave echo signals and turn them into electrical signals. This wireless sensing technology can detect motion by determining the object’s motion. So, this category of motion detectors operates based on radar technology and makes use of microwave frequencies.

Hardware Components
You will require the following hardware for Interfacing HW-M10 Microwave Radar Motion Sensor Module with Arduino.
| S.no | Component | Value | Qty |
|---|---|---|---|
| 1. | Arduino UNO | – | 1 |
| 2. | Microwave Sensor Module | HW-M10 | 1 |
| 3. | Breadboard | – | 1 |
| 4. | Jumper Wires | – | 1 |
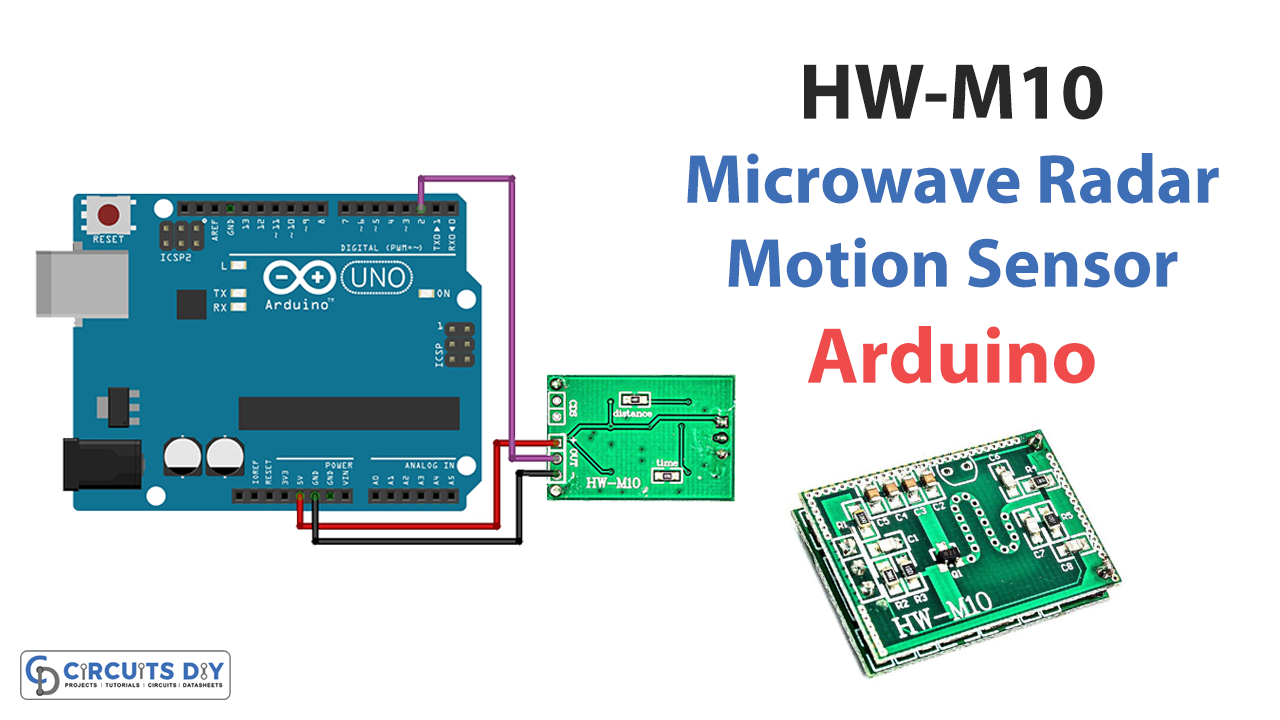
HW-M10 Microwave Radar Motion Sensor Arduino
Proceed as detailed below to connect the radar motion sensor to the Arduino.
Schematic
Make connections according to the circuit diagram given below.
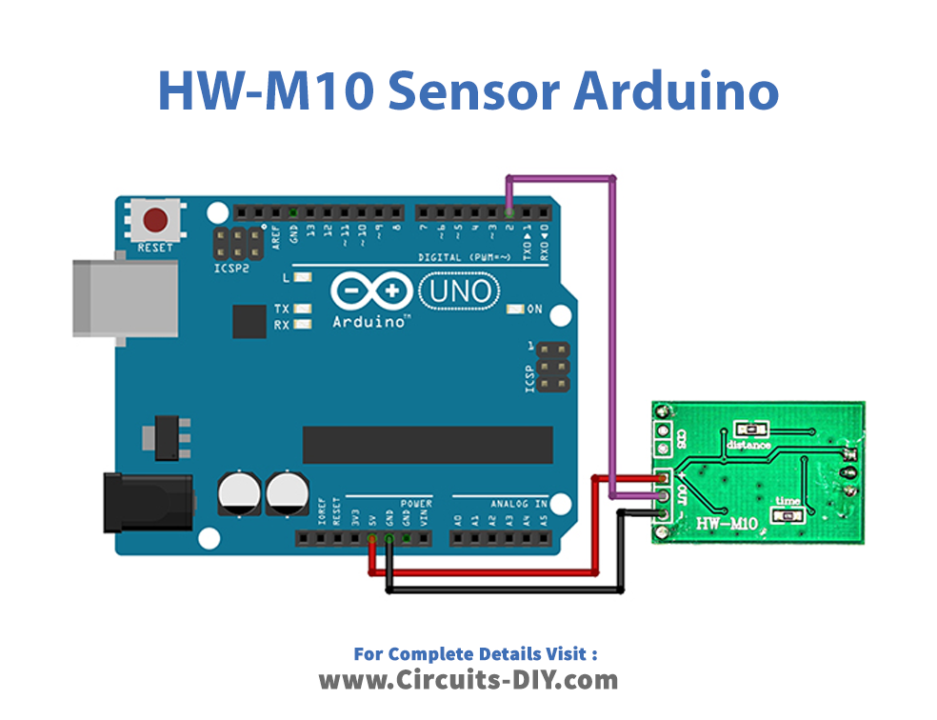
Wiring / Connections
| Arduino | Microwave Sensor |
|---|---|
| 5V | VCC |
| GND | GND |
| D2 | OUT |
Installing Arduino IDE
First, you need to install Arduino IDE Software from its official website Arduino. Here is a simple step-by-step guide on “How to install Arduino IDE“.
Code
Now copy the following code and upload it to Arduino IDE Software.
#define Motion_Detection_Sensor 2

void setup() {
  pinMode(Motion_Detection_Sensor,INPUT);
  Serial.begin(9600);
}

void loop() {
  Serial.print(digitalRead(Motion_Detection_Sensor));

  if(digitalRead(2) == HIGH) {
    Serial.println("\t Motion detected!");
  }
   else if(digitalRead(2) == LOW) {
    Serial.println("\t No Motion!");
  }

  delay(1000);
}
Let’s Test It
Once you have the HW-M10 Microwave Radar Motion Sensor Module connected to your Arduino and the code uploaded, it’s time to test it out and see if it’s working correctly.
First, open the Serial Monitor in the Arduino IDE. If the sensor detects any object, you should see the message change accordingly.
Working Explanation
The above code is designed to detect motion using the motion sensor and print the status of the motion on the serial monitor. It’s beginner-friendly and easy to understand.
- . It first defines a constant called “Motion_Detection_Sensor” and sets it equal to 2. This is the PIN on the Arduino that the sensor’s signal wire is connected to.
- The pinMode function is used in the void setup function to set the Motion_Detection_Sensor pin as an INPUT. This tells the Arduino that we want to read data from the sensor. The serial communication is also started with a baud rate of 9600.
- In the void loop function, the digitalRead function is used to read the state of the Motion_Detection_Sensor pin. If the digitalRead function returns HIGH, it means that motion has been detected, and the Serial.println function is used to print “Motion detected!” on the serial monitor. If the digitalRead function returns LOW, no motion is detected, and the Serial.println function prints “No Motion!” on the serial monitor.
- Finally, the delay function pauses the loop for 1000 milliseconds (1 second) before checking for motion again. This is to avoid overloading the sensor and to give you a chance to read the serial monitor.
Applications
- Motion detection
- Security alarms, etc
Conclusion.
We hope you have found this Interfacing HW-M10 Microwave Radar Motion Sensor Module with Arduino Circuit very useful. If you feel any difficulty in making it feel free to ask anything in the comment section.

