Introduction
To purchase the computer, you must have visited the computer stores. And, if you have gone there, you must have seen the TFT AMLCD monitor there. The thin-film transistor active matrix display, the high-quality flat screen monitor. The technology is often known as the active matrix. Moreover, it’s are of greater quality than the passive matrix. Because it uses exceptional image qualities like contrast and addressability. Hence, used in video games, etc. So, if you are looking to build some entering projects, this tutorial is for you. Because, In this tutorial, we are going to interface “1.8 TFT Color Display ST7735 with Arduino UNO”.
Specifications 1.8 TFT Display
- The input voltage range is from 3.3V to 5V
- The size of a display screen is about 1.8 inches.
- The display has an operating temperature range from -20 degrees to 70 degrees.
- The display has a pixel size of about 0.219×0.219cm.
- The brightness of a display screen is equal to 280sd/m2.
- The display uses the IIitek ILI91693C driver IC.
- It has a display resolution of 127(RGB) ×160.
- The display also contains the SD card socket.
Working Principle of TFT Display
A TFT display has a liquid crystal layer between the substrate and the pixel electrode. When the change of the voltage is applied to the liquid crystal, it changes the transmittance of panels. Thus, changes the quantity of light from the backlight. As a result, LCD generates full-color images.

Hardware Required
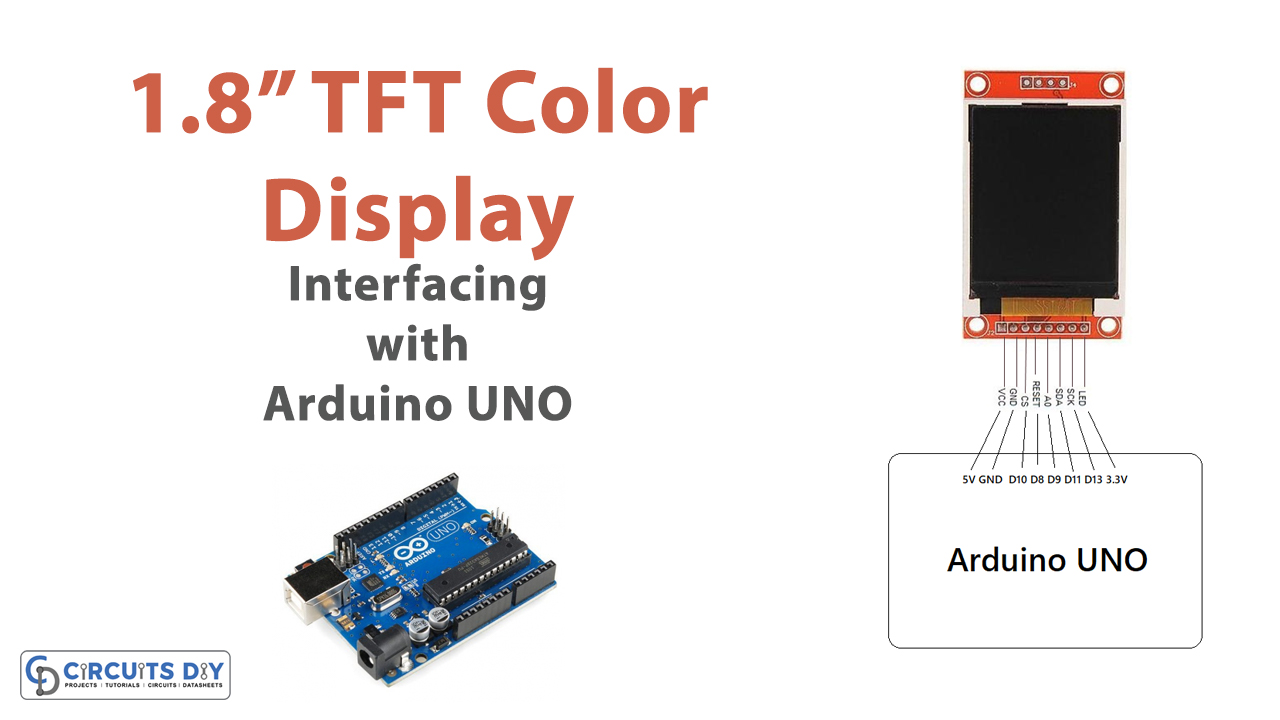
Circuit Diagram
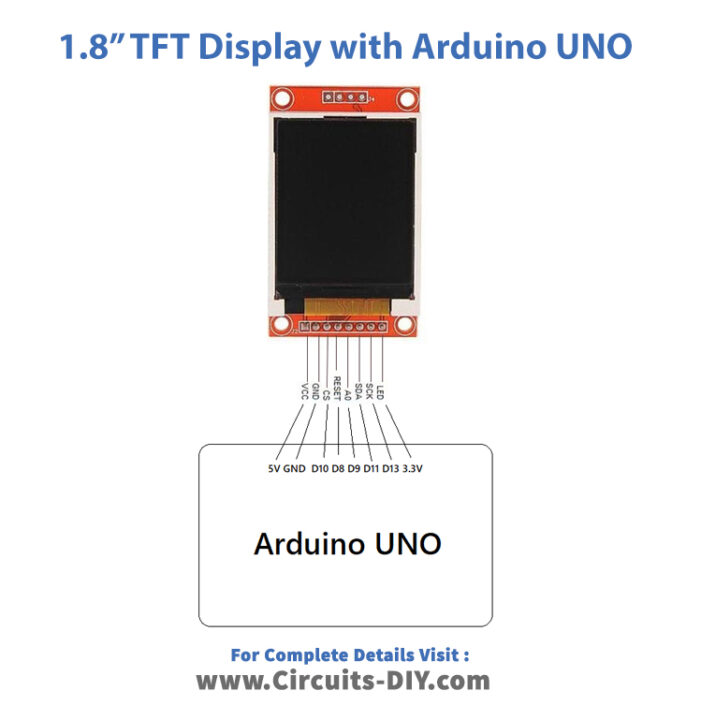
Connection Table
| Arduino | 1.8 TFT Display |
|---|---|
| 3.3V | LED |
| 13 | SCK |
| 11 | SDA |
| 9 | A0 |
| 8 | RESET |
| 10 | CS |
| GND | GND |
| 5V | VCC |
Arduino Code
// Circuits DIY
// For Complete Details Visit -> https://circuits-diy.com
// include TFT and SPI libraries
#include <TFT.h>
#include <SPI.h>

// pin definition for Arduino UNO
#define cs   10
#define dc   9
#define rst  8


// create an instance of the library
TFT TFTscreen = TFT(cs, dc, rst);

void setup() {

  //initialize the library
  TFTscreen.begin();

  // clear the screen with a black background
  TFTscreen.background(0, 0, 0);
}

void loop() {

  //generate a random color
  int redRandom = random(0, 255);
  int greenRandom = random (0, 255);
  int blueRandom = random (0, 255);

  // set the color for the figures
  TFTscreen.stroke(redRandom, greenRandom, blueRandom);

  // light up a single point
  TFTscreen.point(80,64);
  // wait 200 miliseconds until change to next figure
  delay(500);

  // draw a line
  TFTscreen.line(0,64,160,64);
  delay(500);

  //draw a square
  TFTscreen.rect(50,34,60,60);
  delay(500);

  //draw a circle
  TFTscreen.circle(80,64,30);
  delay(500);

  //erase all figures
  TFTscreen.background(0,0,0);
}
Working Explanation
Assemble the circuit according to the above schematic to Interface Display 1.8 TFT with Arduino UNO. Further, open your Arduino IDE and paste the above-mentioned code. After that, upload that code. Arduino will pass the commands to the display. Now, you will see that shapes would appear on the TFT screen.
Code Explanation
- Firstly you need to install the TFT library. You can download the library from:
https://github.com/arduino-libraries/TFT
- Now include the TFT library. Also, include the SPI library to communicate with the external display. After that, define the display pins that are connected with the pins of Arduino.
- In the void setup, initialize the TFT display by using the TFTscreen. begin ( ). Then, set the background colors of a display by using the TFTscreen.background( ).
- In the void loop, generate a random color by giving the random( ) command. Choose the random font color by giving the command TFT. stroke( ). Draw the line on a display by using TFTscreen. line( ). Use TFTscreen.rect( ) to draw a square. Use TFTscreen.circle( ) to draw a circle. At last, to clear the display set the background to 0 by using TFTscreen. background(0, 0, 0).
Application and Uses
- Smartphones.
- Video games.
- And, sometimes televisions.

