Introduction
In this tutorial, we will be discussing the steps for writing the code to control the maximum speed, acceleration, initial speed, position, and steps per revolution of a 5V 28BYJ-48 Microstepping Geared Stepper Motor with a ULN2003 Arduino Stepper Motor Driver Board. The code will be written using the Arduino IDE, and it will utilize the Stepper library to control the stepper motor. The code will also display the status of the stepper motor on the serial monitor, allowing you to monitor the current position and speed of the stepper motor.
A stepper motor is a type of electric motor that can rotate in precise steps, making it ideal for applications that require precise control over position and speed. The 5V 28BYJ-48 Microstepping Geared Stepper Motor is a compact and powerful stepper motor that is widely used in a variety of projects. The ULN2003 Arduino Stepper Motor Driver Board is a driver board that allows you to control the speed, direction, and steps of the stepper motor using an Arduino UNO microcontroller.
Hardware Components
You will require the following hardware for Control 28BYJ-48 Stepper Motor with Arduino.
| S.no | Component | Value | Qty |
|---|---|---|---|
| 1. | Arduino UNO | – | 1 |
| 2. | USB Cable Type A to B | – | 1 |
| 3. | 28BYJ-48 stepper motor + ULN2003 Driver Module | – | 1 |
| 4. | 5V Power Adapter | – | 1 |
| 5. | DC Power Jack | – | 1 |
| 6. | 9V Power Adapter for Arduino | – | 1 |
| 7. | Jumper Wires | – | 1 |
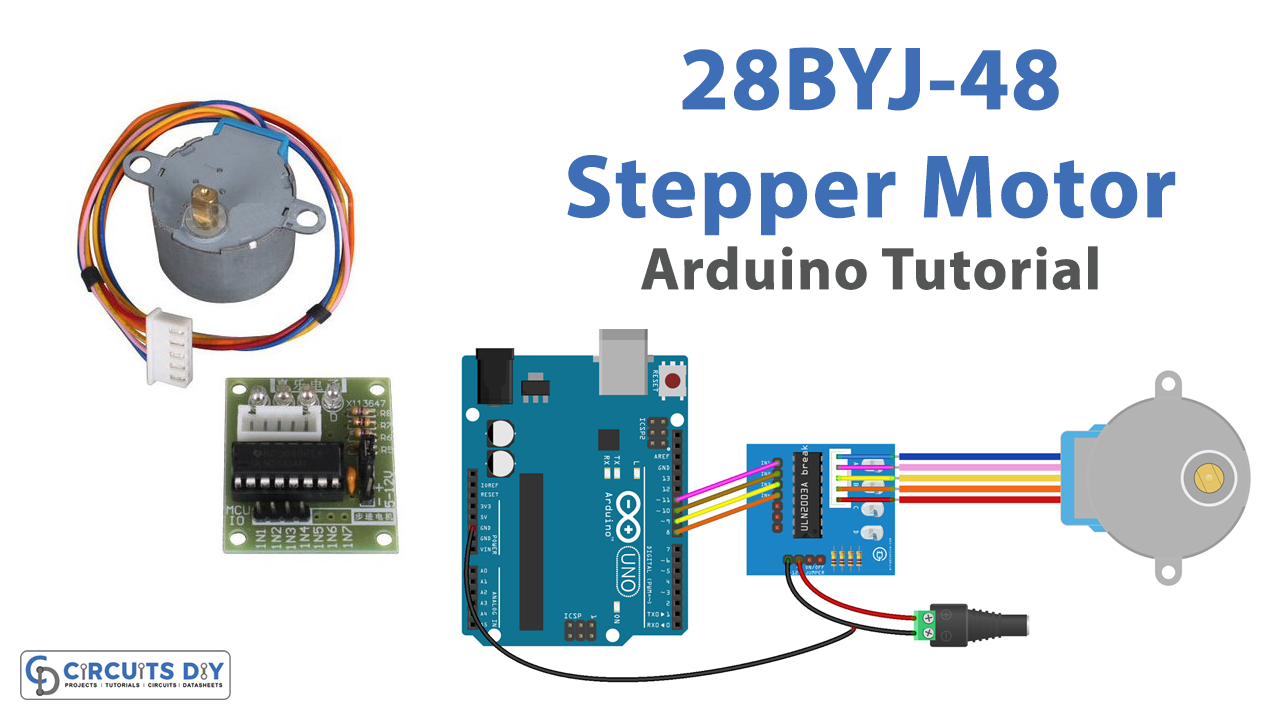
28BYJ-48 Stepper Motor with Arduino
- Connect the 5V 28BYJ-48 Microstepping Geared Stepper Motor to the ULN2003 Stepper Motor Driver Board. Connect the 4 wires of the stepper motor to the IN1, IN2, IN3, and IN4 pins of the driver board.
- Connect the ULN2003 Stepper Motor Driver Board to your Arduino UNO. Connect the GND pin to GND, the VCC pin to 5V, and the IN1, IN2, IN3, and IN4 pins to digital pins 8, 9, 10, and 11 on the Arduino, respectively.
- In the Arduino IDE, import the necessary libraries by adding these lines at the top of your sketch:
#include <AccelStepper.h>
- In the setup() function, create a new Stepper object and set the number of steps per revolution of the stepper motor:
Stepper myStepper(4096, 8, 9, 10, 11);
- In the loop() function, set the maximum speed, acceleration, initial speed and position of the stepper motor using the setMaxSpeed() , setAcceleration() , setSpeed() and move() functions respectively:
myStepper.setMaxSpeed(60);
myStepper.setAcceleration(100);
myStepper.setSpeed(30);
myStepper.move(200);
- Use the Serial.println() function to display the status of the stepper motor on the serial monitor
Serial.println("Stepper motor running at maximum speed: 60 steps per second");
Serial.println("Stepper motor acceleration: 100 steps per second squared");
Serial.println("Stepper motor initial speed: 30 steps per second");
Serial.println("Stepper motor position: 200 steps");
- Use the step() function to rotate the stepper motor by a certain number of steps:
myStepper.step(200); // rotate the motor by 200 steps
- Use the run() function to rotate the stepper motor by a certain number of steps at a certain speed:
myStepper.run(FORWARD, 30, 200); // rotate the motor forward at 30 steps per second for 200 steps
- Use the release() function to release the stepper motor and allow it to rotate freely:
myStepper.release();
- Upload the code to your Arduino UNO and open the serial monitor to see the status of the stepper motor.
Schematic
Make connections according to the circuit diagram given below.
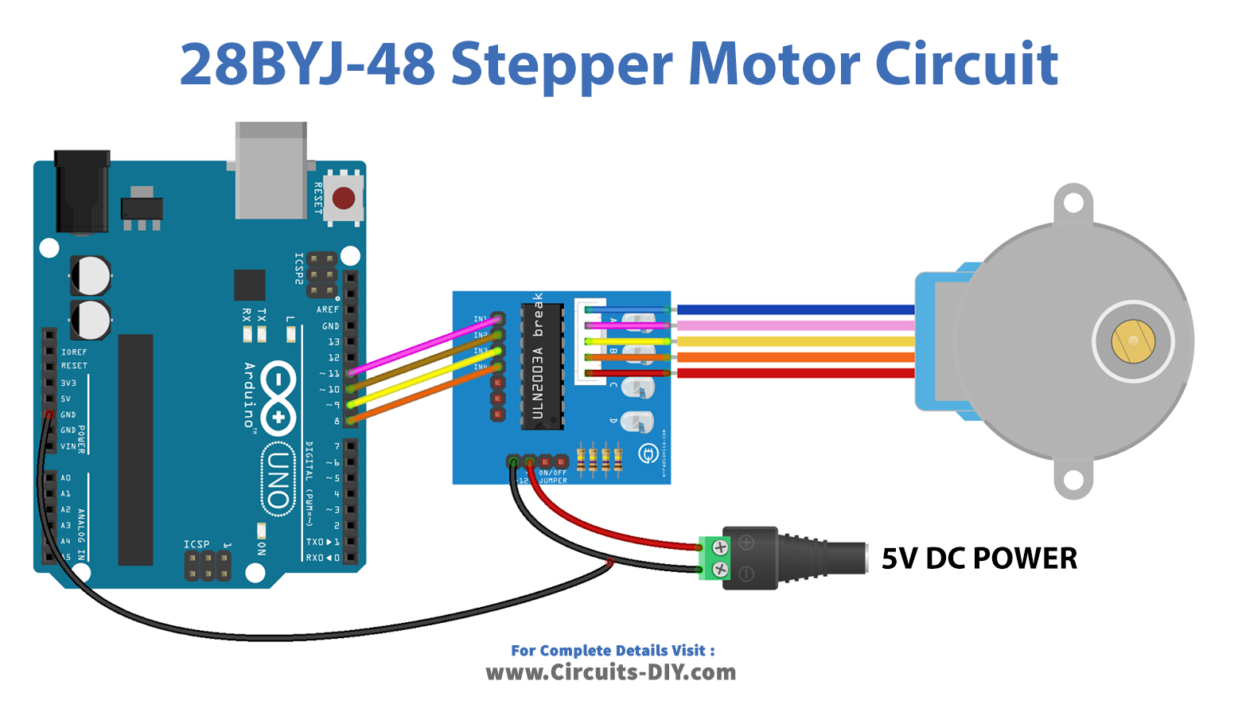
Wiring / Connections
| Arduino | 28BYJ-48 Motor Driver |
|---|---|
| D11 | IN1 |
| D10 | IN2 |
| D9 | IN3 |
| D8 | IN4 |
Installing Arduino IDE
First, you need to install Arduino IDE Software from its official website Arduino. Here is a simple step-by-step guide on “How to install Arduino IDE“.
Installing Libraries
Before you start uploading a code, download and unzip the following libraries at /Progam Files(x86)/Arduino/Libraries (default), in order to use the sensor with the Arduino board. Here is a simple step-by-step guide on “How to Add Libraries in Arduino IDE“.
Code
Now copy the following code and upload it to Arduino IDE Software.
// Include the AccelStepper Library
#include <AccelStepper.h>

// define step constant
#define FULLSTEP 4
#define STEP_PER_REVOLUTION 2048 // this value is from datasheet

// Pins entered in sequence IN1-IN3-IN2-IN4 for proper step sequence
AccelStepper stepper(FULLSTEP, 11, 9, 10, 8);

void setup() {
  Serial.begin(9600);
  stepper.setMaxSpeed(1000.0);   // set the maximum speed
  stepper.setAcceleration(50.0); // set acceleration
  stepper.setSpeed(200);         // set initial speed
  stepper.setCurrentPosition(0); // set position
  stepper.moveTo(STEP_PER_REVOLUTION); // set target position: 64 steps <=> one revolution
}

void loop() {
  // change direction once the motor reaches target position
  if (stepper.distanceToGo() == 0)
    stepper.moveTo(-stepper.currentPosition());

  stepper.run(); // MUST be called in loop() function

  Serial.print(F("Current Position: "));
  Serial.println(stepper.currentPosition());
}
Arduino Code for two 28BYJ-48 stepper motors
// Include the AccelStepper Library
#include <AccelStepper.h>

// define step constant
#define FULLSTEP 4
#define STEP_PER_REVOLUTION 2048 // this value is from datasheet

// Pins entered in sequence IN1-IN3-IN2-IN4 for proper step sequence
AccelStepper stepper_1(FULLSTEP, 11, 9, 10, 8);
AccelStepper stepper_2(FULLSTEP,  7, 5,  6, 4);

void setup() {
  Serial.begin(9600);

  stepper_1.setMaxSpeed(1000.0);   // set the maximum speed
  stepper_1.setAcceleration(50.0); // set acceleration
  stepper_1.setSpeed(200);         // set initial speed
  stepper_1.setCurrentPosition(0); // set position
  stepper_1.moveTo(STEP_PER_REVOLUTION); // set target position: 64 steps <=> one revolution

  stepper_2.setMaxSpeed(1000.0);   // set the maximum speed
  stepper_2.setAcceleration(50.0); // set acceleration
  stepper_2.setSpeed(200);         // set initial speed
  stepper_2.setCurrentPosition(0); // set position
  stepper_2.moveTo(STEP_PER_REVOLUTION); // set target position: 64 steps <=> one revolution
}

void loop() {
  // change direction once the motor reaches target position
  if (stepper_1.distanceToGo() == 0)
    stepper_1.moveTo(-stepper_1.currentPosition());

  if (stepper_2.distanceToGo() == 0)
    stepper_2.moveTo(-stepper_2.currentPosition());

  stepper_1.run(); // MUST be called in loop() function
  stepper_2.run(); // MUST be called in loop() function

  Serial.print(F("stepper_1# current position: "));
  Serial.println(stepper_1.currentPosition());

  Serial.print(F("stepper_2# current position: "));
  Serial.println(stepper_2.currentPosition());
}
Working Explanation
In the setup() function, a new Stepper object is created and the number of steps per revolution of the stepper motor is set. The Stepper object is created by passing the number of steps per revolution, and the pin numbers of the digital pins to which the ULN2003 Stepper Motor Driver Board is connected. In the loop() function, the setMaxSpeed() function sets the maximum speed, setAcceleration() function sets the acceleration, setSpeed() function sets the initial speed and the move() function sets the position of the stepper motor.
The step() function is used to rotate the stepper motor by a certain number of steps, and the run() function is used to rotate the stepper motor by a certain number of steps at a certain speed. The release() function is used to release the stepper motor and allow it to rotate freely. Finally, the Serial.println() function is used to send the status of the stepper motor to the serial monitor, which allows the user to monitor the current position and speed of the stepper motor and troubleshoot any issues that may arise.
Applications
- Robotics
- CNC machines
- 3D printing
- Camera Sliders
- Automated stage props
Conclusion.
We hope you have found this 28BYJ-48 Stepper Motor Circuit very useful. If you feel any difficulty in making it feel free to ask anything in the comment section.